
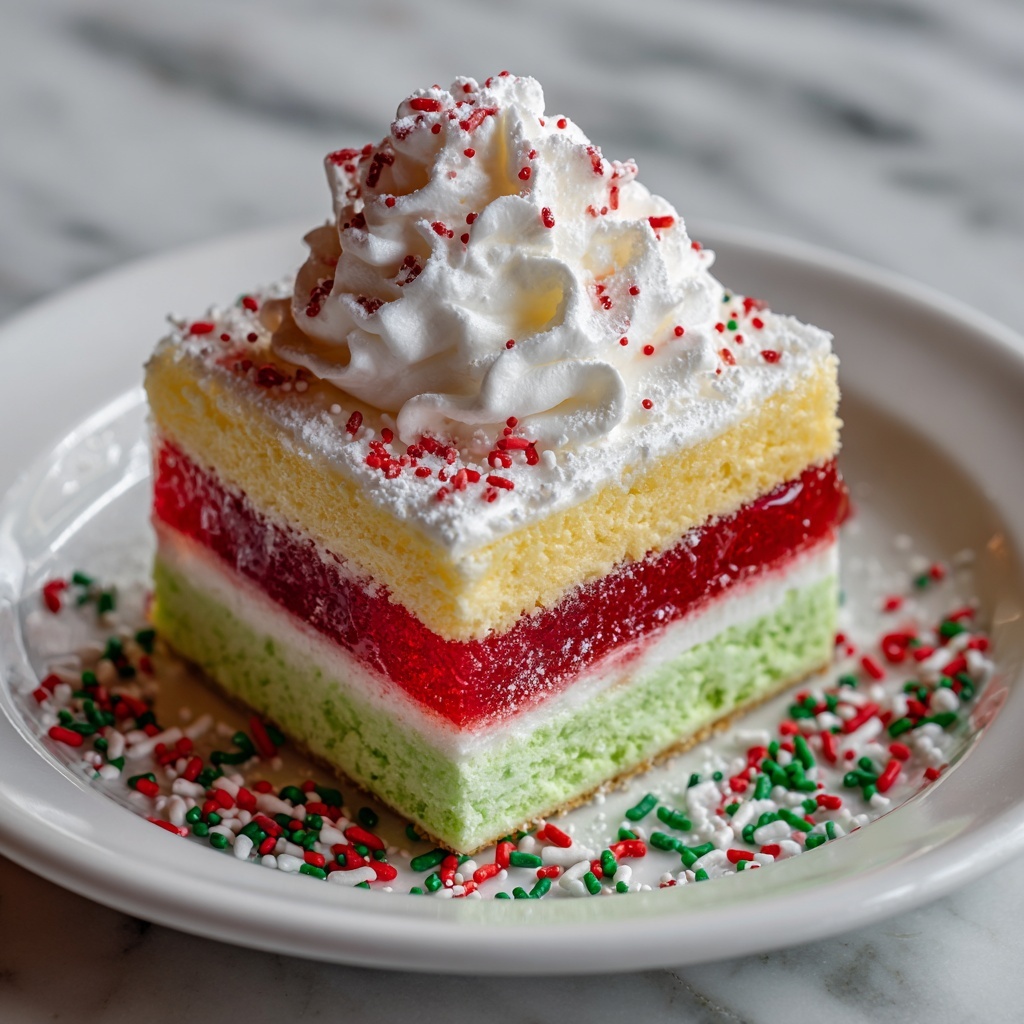
If you’re looking for a festive dessert that’s colorful, fun, and full of sweet surprises, this Holiday-Inspired Poke Cake Recipe is an absolute winner. Imagine a tender white cake studded with vibrant red and green gelatin that bursts with flavor, all topped with fluffy whipped cream and festive sprinkles. It’s the perfect centerpiece for your holiday gatherings, blending classic comfort with a playful twist.
Ingredients You’ll Need
Gathering the right ingredients is key to making this Holiday-Inspired Poke Cake Recipe truly shine. Each component plays an essential role—from the light, fluffy texture of the white cake to the bright, jiggly pockets of gelatin and the creamy whipped topping that ties it all together.
- White cake mix: The base of the cake, providing a soft, moist crumb that soaks up all the delicious gelatin flavors.
- Vanilla extract (optional): Adds a warm, comforting depth to the cake batter.
- Red gelatin (cherry or strawberry): Offers a pop of festive color and fruity sweetness.
- Green gelatin (lime): Brings a contrasting tartness and vibrant hue that screams holiday cheer.
- Boiling water: Essential for dissolving the gelatin crystals fully and ensuring they set properly in the cake.
- Whipped topping (e.g., Cool Whip): Adds a light, airy finish that keeps the cake moist and luscious.
- Holiday sprinkles or crushed candy canes: Fun, festive decorations that add texture and visual appeal on top.
How to Make Holiday-Inspired Poke Cake Recipe
Step 1: Bake the Cake
Start by preheating your oven to 350°F (175°C) and greasing a 9×13-inch baking dish. Follow the instructions on your white cake mix box to prepare the batter, and if you love that subtle depth, mix in a teaspoon of vanilla extract. Pour the batter evenly into your pan and bake for 25-30 minutes. You’ll know it’s done when a toothpick inserted in the center comes out clean. Allow it to cool completely before moving on—cool cake is key to perfect gelatin setting.
Step 2: Poke the Cake
Using the handle of a wooden spoon or a sturdy skewer, poke holes about 1 inch apart all over the cake’s surface. Don’t be shy with this step because these holes are what give the cake its magic by holding the colorful gelatin later.
Step 3: Prepare the Gelatin Filling
In two separate bowls, dissolve the red and green gelatin powders in 1 cup of boiling water each. Stir well until fully dissolved—getting the gelatin right makes all the difference in taste and texture.
Step 4: Fill the Holes with Gelatin
Carefully pour the red gelatin into half of the holes on the cake and the green gelatin into the other half. Take your time with this to avoid mixing the colors too much. This step is what makes the cake beautifully festive and irresistibly fun to eat.
Step 5: Chill the Cake
Cover the cake loosely with plastic wrap and refrigerate it for at least 2 hours. This waiting period is crucial because it allows the gelatin to firm up inside the cake, creating that signature poke cake texture and look.
Step 6: Add the Whipped Topping and Garnish
Once the gelatin has set, spread the whipped topping evenly across the entire cake surface. Then go ahead and sprinkle your favorite holiday-themed decorations like holiday sprinkles or crushed candy canes on top to add festive flair and a little crunch.
Step 7: Serve and Enjoy
Slice the cake into generous squares and serve chilled for the best taste and texture. Every bite delivers a cool gelatin surprise that’s as delicious as it is delightful to look at.
How to Serve Holiday-Inspired Poke Cake Recipe

Garnishes
Adding garnishes is where you can truly personalize your Holiday-Inspired Poke Cake Recipe. Crushed candy canes add a peppermint punch and crunch, while colorful holiday sprinkles bring sweetness and whimsy. Fresh mint leaves or edible glitter can also elevate the festive vibe if you’re feeling fancy.
Side Dishes
This cake pairs beautifully with simple sides like a scoop of vanilla ice cream or a dollop of fresh whipped cream. Bright fruit salads or warm mulled cider also complement the flavors and make your holiday dessert spread extra special without overpowering the main attraction.
Creative Ways to Present
Want to impress your guests? Serve the poke cake on a beautiful holiday-themed platter or in individual clear cups to showcase those stunning gelatin colors. You could also cut the cake into small bites for a fun party platter or layer it in a trifle dish with extra whipped topping for a show-stopping presentation.
Make Ahead and Storage
Storing Leftovers
The Holiday-Inspired Poke Cake Recipe is best enjoyed within 2-3 days of making it. Store any leftovers tightly covered in the refrigerator to keep the whipped topping fresh and the gelatin moist. Proper storage ensures you enjoy the same vibrant flavors and textures later.
Freezing
While this poke cake is delicious fresh, freezing is not recommended because the gelatin’s texture can become grainy and the whipped topping may weep when thawed. For best results, enjoy this dessert within a few days instead of freezing.
Reheating
This cake is designed to be served cold and is not suited for reheating. The cool gelatin and whipped topping are what make the Holiday-Inspired Poke Cake Recipe so refreshing and festive, so keep it chilled to enjoy every bite as intended.
FAQs
Can I use homemade cake instead of box mix?
Absolutely! If you prefer baking your cake from scratch, use your favorite white cake recipe. Just make sure the cake is sturdy enough to hold the gelatin, and that it’s completely cooled before poking and filling.
What other gelatin flavors can I use?
Feel free to get creative with gelatin flavors. Cranberry, raspberry, or even orange could be festive alternatives. Just pick colors that complement the holiday theme to keep that beautiful visual effect.
Can I prepare this cake a day in advance?
Yes, this is a great make-ahead dessert. Prepare the cake and gelatin the day before, then add the whipped topping and garnishes just before serving to keep everything fresh and looking fabulous.
Is there a dairy-free alternative for the whipped topping?
Yes, you can substitute with dairy-free whipped toppings available at most grocery stores or make your own coconut whipped cream. This makes the cake suitable for those with dietary restrictions without sacrificing taste.
How do I prevent gelatin from mixing colors?
Pour the gelatin gently and allow a few minutes’ wait before pouring the second color. Using a spoon or a small measuring cup to fill the holes carefully helps keep the red and green colors nicely separated.
Final Thoughts
This Holiday-Inspired Poke Cake Recipe is truly a joy to make and eat, bringing festive color and delicious flavor to any celebration. It’s cozy enough for family gatherings yet playful enough to be a standout dessert at holiday parties. Trust me, once you try it, it’ll become a seasonal favorite you’ll reach for year after year. So grab your ingredients and get ready to wow everyone with this irresistible holiday treat!
Print
Holiday-Inspired Poke Cake Recipe
- Prep Time: 20 minutes
- Cook Time: 30 minutes
- Total Time: 2 hours 50 minutes
- Yield: 12 servings
- Category: Dessert
- Method: Baking
- Cuisine: American
- Diet: Vegetarian
Description
Celebrate the holidays with this colorful and festive Holiday-Inspired Poke Cake. This delightful dessert starts with a classic white cake baked to perfection, then transformed by vibrant red and green gelatin poured into poke holes to create bursts of flavor and color. Topped with whipped topping and decorated with holiday sprinkles or crushed candy canes, this cake is sure to impress your guests and become a seasonal favorite.
Ingredients
For the Cake
- 1 box white cake mix (plus ingredients listed on the box)
- 1 teaspoon vanilla extract (optional)
For the Gelatin Filling
- 1 (3 oz) box red gelatin (e.g., cherry or strawberry)
- 1 (3 oz) box green gelatin (e.g., lime)
- 2 cups boiling water (1 cup per gelatin flavor)
For the Topping and Decoration
- 1 (8 oz) container whipped topping (e.g., Cool Whip), thawed
- Holiday sprinkles, crushed candy canes, or other festive decorations
Instructions
- Bake the Cake: Preheat your oven to 350°F (175°C) and grease a 9×13-inch baking dish. Prepare the white cake mix according to the package instructions, and add vanilla extract if you wish for extra flavor. Pour the batter into the prepared dish and bake for 25-30 minutes or until a toothpick inserted into the center comes out clean. Allow the cake to cool completely before proceeding.
- Poke the Cake: Using the handle of a wooden spoon or a skewer, gently poke holes about 1 inch apart all over the surface of the cooled cake. This allows the gelatin to seep into the cake and add delightful pockets of flavor and moisture.
- Prepare Gelatin Filling: In two separate bowls, dissolve each box of gelatin (red and green) in 1 cup boiling water. Stir each until fully dissolved to create vibrant colored gelatin mixtures.
- Pour Gelatin into Cake Holes: Carefully spoon or pour the red gelatin mixture into half of the holes on the cake, and the green gelatin into the remaining holes. Take your time to avoid spilling and ensure the gelatin settles into the holes.
- Chill the Cake: Cover the cake with plastic wrap or foil and refrigerate for at least 2 hours. This chilling time allows the gelatin to set firmly within the cake.
- Add Topping: Once the gelatin is set, spread the thawed whipped topping evenly over the entire surface of the cake, creating a creamy layer that complements the vibrant gelatin.
- Garnish: Decorate the whipped topping with holiday sprinkles, crushed candy canes, or any festive decorations you prefer to add a seasonal touch.
- Serve: Slice the cake into servings and enjoy chilled for the best flavor and moist texture.
Notes
- Ensure the cake is completely cooled before poking holes to prevent it from crumbling.
- You can substitute the gelatin flavors with other colors to fit different occasions.
- For a more intense flavor, use fresh fruit juice in place of water to dissolve the gelatin if desired.
- Store leftovers covered in the refrigerator; best consumed within 3 days.
- The whipped topping can be replaced with homemade whipped cream if preferred.

