
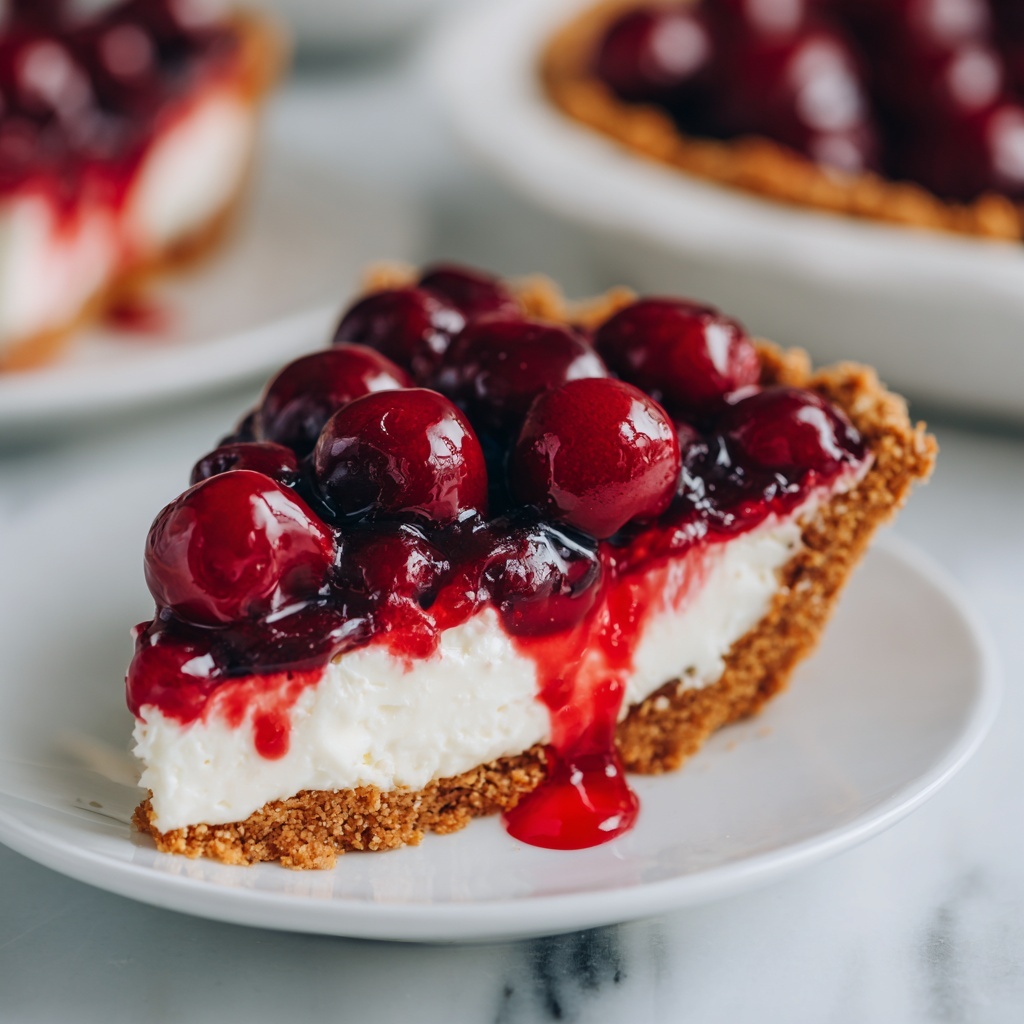
If you are in the mood for a dessert that feels like a hug on a plate, you absolutely need to try this No-Bake Cherry Cheesecake Bars Recipe. These bars combine the irresistible creaminess of cheesecake with the bright, tangy sweetness of cherries, all resting on a crunchy graham cracker crust. The best part? No oven required, making it perfect for hot days, last-minute dessert plans, or anyone craving a luscious treat with minimal fuss. Whether you’re serving them at a family gathering or sneaking a bite after dinner, these cherry cheesecake bars will quickly become a beloved favorite.
Ingredients You’ll Need
This recipe is beautifully simple, using a handful of essential ingredients that each bring something special to the table. From the buttery crust to the fluffy cheesecake layer and the vibrant cherry topping, every element plays a key role in creating the perfect balance of flavor and texture.
- Unsalted butter (7 tablespoons, melted): The secret to a rich, sturdy crust that holds everything together.
- Graham cracker crumbs (1 ½ cups): Adding that classic, slightly sweet crunch essential for the crust base.
- Granulated sugar (3 tablespoons): Just enough sweetness to complement the crust’s texture.
- Cream cheese (8 ounces, softened): The star of the cheesecake layer, lending that smooth, creamy body.
- Powdered sugar (1 cup): Ensures your cream cheese filling is perfectly sweet without any graininess.
- Pure vanilla extract (1 teaspoon): Brings warmth and depth to the cheesecake flavor.
- Cool Whip (1 container, 8 ounces): Lightens the cheesecake filling, creating an airy, luscious texture.
- Cherry pie filling (1 can, 21 ounces): The crowning glory—juicy cherries in a glossy sauce that add a pop of color and a burst of fruity sweetness.
How to Make No-Bake Cherry Cheesecake Bars Recipe
Step 1: Prepare the Crust
Begin by melting the butter in the microwave for about 30 seconds until fully liquid. In a medium bowl, stir together the melted butter, graham cracker crumbs, and granulated sugar until the mixture has the texture of wet sand. This mixture forms your crisp, buttery crust that will hold the cheesecake and cherry layers beautifully. Press it firmly and evenly into the bottom of a greased 8×8-inch baking dish—this is what gives the bars their deliciously crunchy foundation.
Step 2: Make the Cheesecake Filling
Next, in a large bowl, beat the softened cream cheese until it’s wonderfully smooth and creamy. Slowly incorporate the powdered sugar and vanilla extract, mixing well until your filling is velvety with a perfect hint of sweetness. The magic happens when you gently fold in the Cool Whip—this lightens the mixture, making it fluffy and easy to spread over your crust.
Step 3: Assemble the Bars
Spread the creamy cheesecake filling evenly over the pressed graham cracker crust, smoothing the top with a spatula for a pristine layer. Then, spoon the cherry pie filling evenly over the cheesecake layer, making sure those glossy cherries are distributed across the surface like little bursts of joy.
Step 4: Chill and Serve
Cover your masterpiece with plastic wrap or aluminum foil and refrigerate for a minimum of 2 hours, though overnight is even better for the flavors to mingle and set firmly. When it’s time to serve, slice into neat squares and enjoy the perfect bite of cool, creamy, and fruity bliss.
How to Serve No-Bake Cherry Cheesecake Bars Recipe

Garnishes
For an extra touch of indulgence, fresh whipped cream is always a winner. You can sprinkle a few toasted almond slices on top for some crunch or add a few fresh cherries if you have them. A light dusting of powdered sugar also makes these bars look like a picture-perfect dessert ready for company.
Side Dishes
Pairing these No-Bake Cherry Cheesecake Bars with a cup of hot coffee or a refreshing glass of iced tea makes the experience all the more delightful. They’re also excellent alongside fresh fruit salad or a scoop of vanilla ice cream for a truly decadent treat.
Creative Ways to Present
Want to impress your friends? Present these bars on a pretty tiered dessert stand or individually plate them with a drizzle of dark chocolate or a sprig of mint. For parties, consider serving mini squares in pretty paper liners as bite-sized delights that are easy to grab and enjoy.
Make Ahead and Storage
Storing Leftovers
Leftover cherry cheesecake bars are best stored in an airtight container in the refrigerator. They’ll stay fresh and delicious for up to 5 days, making them perfect for preparing ahead or enjoying over several days.
Freezing
If you want to keep these bars longer, freezing is a great option. Wrap individual slices tightly in plastic wrap and place them in a freezer-safe container. Frozen, they maintain their quality for up to 2 months. Thaw them overnight in the refrigerator before serving to preserve their creamy texture.
Reheating
This dessert is best enjoyed chilled, so reheating is not recommended. Simply let any frozen bars thaw completely in the fridge for the smoothest texture and most refreshing flavor.
FAQs
Can I use fresh cherries instead of cherry pie filling?
Absolutely! Fresh cherries can add a wonderfully natural flavor and texture. You might want to lightly sweeten and cook them down to create a syrupy consistency that mimics the pie filling for the best results.
Is there a way to make this recipe dairy-free?
Yes, you can swap out the cream cheese and Cool Whip for plant-based alternatives like dairy-free cream cheese and coconut whipped topping. Just keep in mind the texture might vary slightly, but the bars will still be delicious.
Can these bars be made in different sizes?
Definitely! You can double the recipe for a larger 9×13-inch pan or halve it for a smaller batch. Just adjust your chilling and slicing times accordingly so the bars set properly.
How long should I chill the bars before serving?
A minimum of 2 hours is needed to let the cheesecake firm up and the flavors meld beautifully. However, refrigerating overnight results in an even creamier texture and more developed taste.
Can I use a different crust instead of graham cracker crumbs?
Sure! Crushed digestive biscuits, vanilla wafers, or even an Oreo crust can be delightful alternatives, adding their unique twists to this classic recipe.
Final Thoughts
This No-Bake Cherry Cheesecake Bars Recipe is an absolute gem that brings joy to any occasion without the stress of complicated baking. The creamy filling, buttery crust, and vibrant cherry topping come together in a heavenly harmony that’s as easy to make as it is to love. So go ahead, give it a try and treat yourself and your loved ones to this delightful dessert that’s guaranteed to impress and satisfy every time.
Print
No-Bake Cherry Cheesecake Bars Recipe
- Prep Time: 15 minutes
- Cook Time: 0 minutes
- Total Time: 2 hours 15 minutes
- Yield: 9 servings
- Category: Dessert
- Method: No-Cook
- Cuisine: American
Description
These No-Bake Cherry Cheesecake Bars are a deliciously creamy and easy-to-make dessert featuring a buttery graham cracker crust, a smooth cream cheese filling folded with cool whip, and topped with a sweet cherry pie filling. Perfect for a quick treat that requires no oven, these bars chill in the fridge and serve up a perfect balance of creamy, fruity, and crunchy textures.
Ingredients
For the Crust
- 7 tablespoons unsalted butter, melted
- 1 ½ cups graham cracker crumbs (about 9 whole crackers)
- 3 tablespoons granulated sugar
For the Filling
- 8 ounces cream cheese, softened
- 1 cup powdered sugar
- 1 teaspoon pure vanilla extract
- 1 container (8 ounces) Cool Whip
Topping
- 1 can (21 ounces) cherry pie filling
Instructions
- Melt Butter: Microwave the butter for about 30 seconds or until completely melted to prepare it for mixing with the crust ingredients.
- Make the Crust Mixture: In a medium bowl, combine the melted butter, graham cracker crumbs, and granulated sugar. Mix thoroughly until the texture resembles wet sand, indicating it’s ready to press into the pan.
- Form the Crust: Grease an 8×8-inch baking dish with butter or cooking spray. Press the crumb mixture firmly and evenly into the bottom of the dish to create a solid crust layer.
- Beat Cream Cheese: In a large bowl, beat the softened cream cheese until smooth and creamy to remove any lumps and ensure a silky filling.
- Add Sugar and Vanilla: Gradually add the powdered sugar and vanilla extract to the cream cheese, mixing until fully combined and smooth for a sweet and fragrant filling base.
- Fold in Cool Whip: Gently fold in the Cool Whip, taking care to keep the mixture light and fluffy, which creates a creamy texture for the cheesecake layer.
- Spread Filling: Evenly spread the cream cheese filling over the prepared graham cracker crust, smoothing the surface with a spatula for uniformity.
- Add Cherry Topping: Spoon the cherry pie filling evenly over the cream cheese layer, spreading gently to cover the entire surface.
- Chill Bars: Cover the dish with plastic wrap or aluminum foil and refrigerate for at least 2 hours or overnight to allow the cheesecake bars to set firmly.
- Serve: After chilling, slice the dessert into squares and serve cold for a refreshing and indulgent treat.
Notes
- For best results, ensure the cream cheese is fully softened to avoid lumps.
- Press the crust firmly to prevent it from crumbling when cutting the bars.
- You can substitute cherry pie filling with other fruit pie fillings for variety.
- These bars should be kept refrigerated and are best enjoyed within 3 days.
- Use full-fat cream cheese and Cool Whip for the creamiest texture.

