
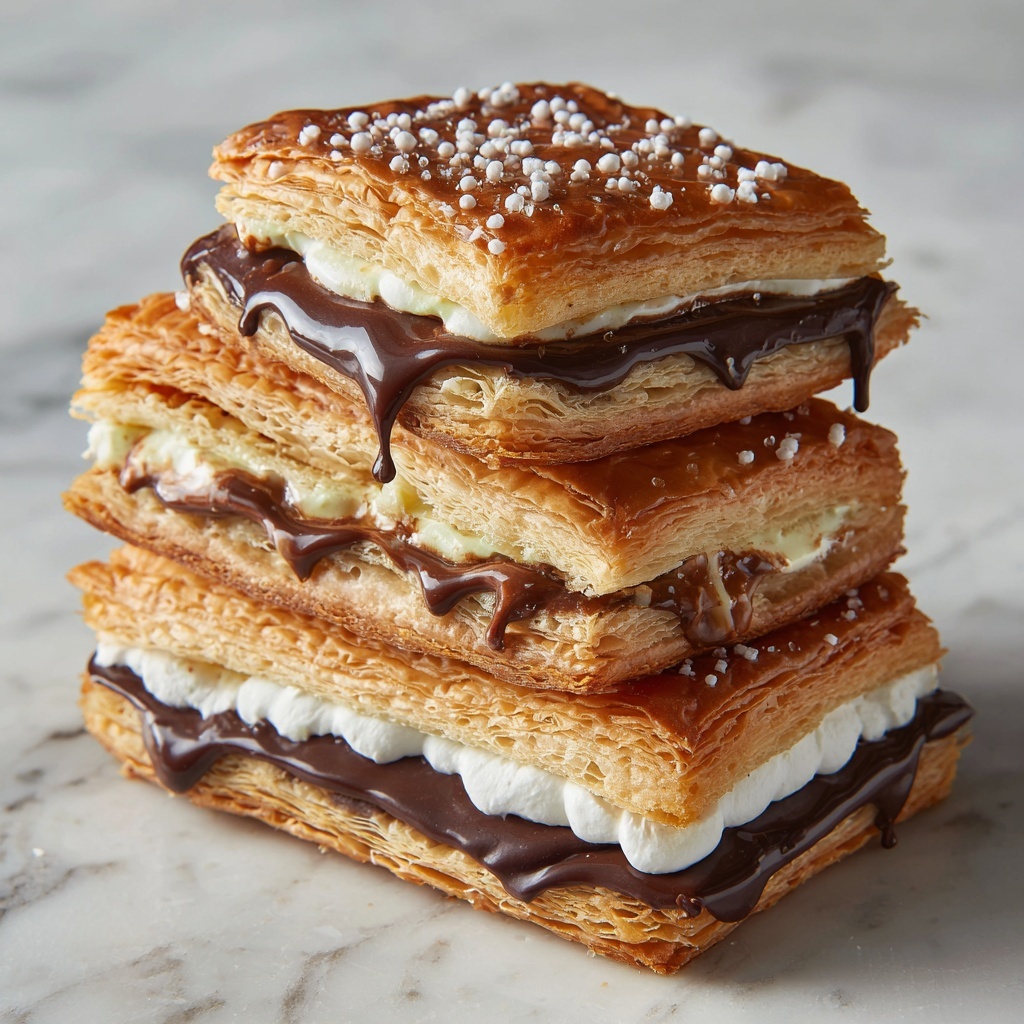
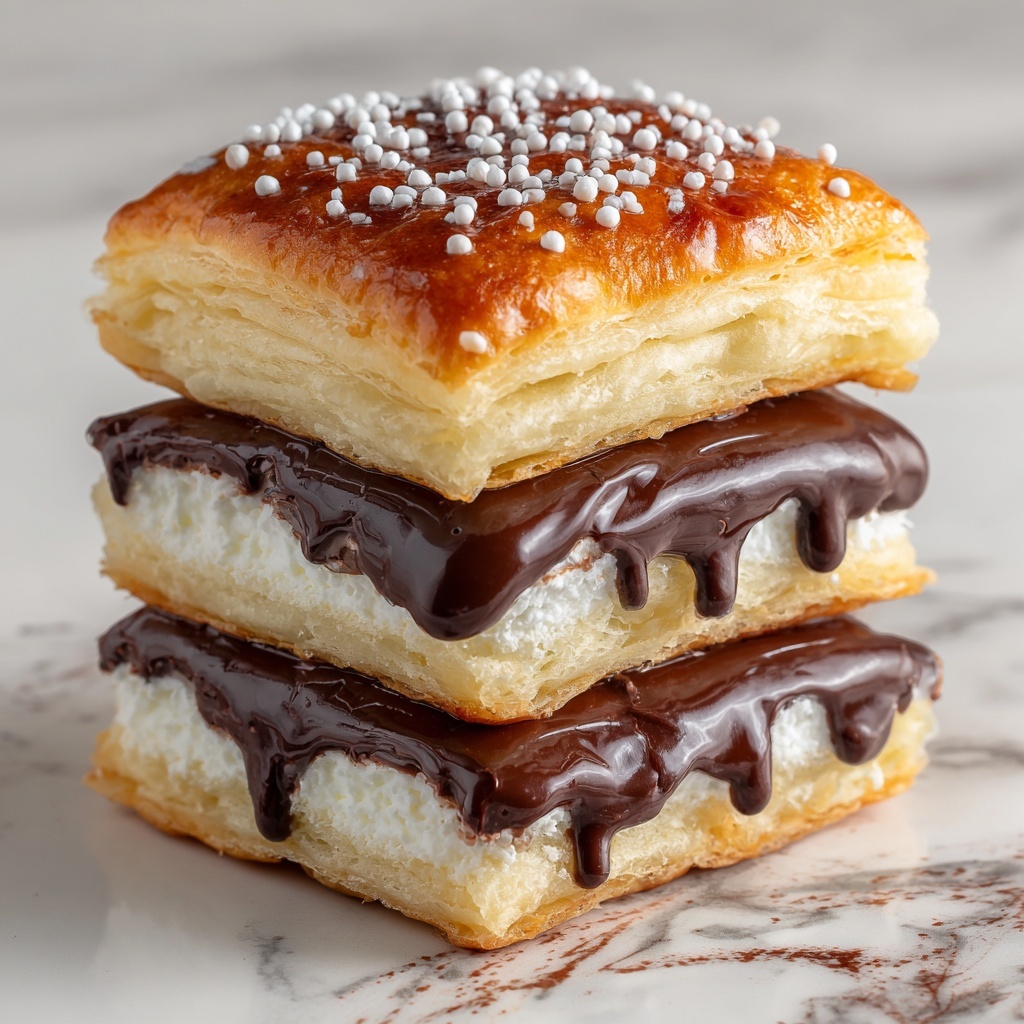
If you have a sweet tooth and love bakery-style treats, you are going to adore the Frosted Chocolate Fudge Pop Tarts That Wow Every Bite Recipe. This recipe blends the rich, deep flavors of cacao and bittersweet chocolate with a tender, almond-tapioca crust, all finished with a luscious chocolate frosting that simply melts in your mouth. It’s a homemade pop tart experience that feels both indulgent and lovingly crafted, making it perfect for breakfast, snack time, or dessert. Trust me, these pop tarts really do wow every bite with that perfect balance of fudgy filling and crisp, flaky pastry.
Ingredients You’ll Need
Getting these pop tarts just right means using simple, wholesome ingredients that work together to create a stunning combination of flavor, texture, and indulgence. Each one plays a crucial role in delivering that dreamy chocolate goodness and perfectly tender crust.
- Blanched almond flour: Provides a nutty, tender base that keeps the crust light yet sturdy.
- Tapioca flour: Adds chew and elasticity, helping the dough hold together beautifully.
- Raw cacao powder: Supplies that deep chocolate flavor without any bitterness.
- Fine sea salt: Balances sweetness and intensifies the chocolate notes.
- Coconut sugar: A natural sweetener that gives a subtle caramel undertone.
- Grass-fed butter (cold): Creates a flaky, rich crust and a buttery chocolate filling.
- Large eggs: Bind the dough components and add structure.
- Full fat coconut milk: Contributes to a silky chocolate filling that won’t be too heavy.
- Bittersweet chocolate (chopped): The heart of the filling for intense fudgy decadence.
- Pure vanilla extract: Enhances all the chocolate flavors with a warm aroma.
- Organic powdered sugar: For a silky smooth frosting that perfectly tops the pop tarts.
- Dairy-free milk: Adds just the right consistency to the frosting with extra creaminess.
- Melted chocolate: Swirled into the frosting for that irresistible glossy finish.
How to Make Frosted Chocolate Fudge Pop Tarts That Wow Every Bite Recipe
Step 1: Prepare the Dough
The journey begins by combining almost all your dry and wet ingredients (except the eggs) in a food processor. Pulsing creates thick crumbs – this crumbly mixture is exactly what you want before adding eggs to bring everything together into a soft, manageable dough. This step ensures you get the perfect balance between flaky and tender in the crust.
Step 2: Chill the Dough
Once your dough is formed, splitting it into two discs and chilling them makes a huge difference. Chilling firms up the butter and helps deepen the flavor, while making the dough easier to roll out without sticking. You can chill for 1 hour or up to two days — the longer, the richer the taste!
Step 3: Make the Chocolate Filling
While the dough chills, melt half the bittersweet chopped chocolate with coconut milk over medium-low heat, stirring until glossy and smooth. Then, add the rest of the chocolate and butter, stirring them in with vanilla and a pinch of salt. Refrigerate this decadent filling for 20 minutes so it firms enough to hold on but will still be creamy inside your pop tarts.
Step 4: Preheat and Roll Out Dough
Set your oven to 350°F. Lightly dust your work surface with tapioca flour and roll one disc of dough out to a 9 x 12 inch rectangle, about 1/8 to 1/4 inch thick. Then carefully cut it into nine smaller rectangles, roughly 3 by 4 inches each. These will become your pop tart bases.
Step 5: Freeze Dough Rectangles
Pop the cut dough rectangles onto a lined baking sheet, keeping space between them, and freeze for a few minutes. This step helps them keep their shape and prevents spreading during baking. While one batch chills in the freezer, roll out and cut the second dough disc.
Step 6: Fill and Seal Your Pop Tarts
Working quickly, spoon about 1 1/2 tablespoons of the chilled chocolate filling onto the center of half the rectangles, leaving a small border around the edges. Top with the remaining rectangles and press the edges firmly together, using a fork to crimp and seal. This little edge-crimping trick locks in the filling so it won’t leak during baking.
Step 7: Bake and Cool
Arrange the filled pop tarts on a baking sheet and bake for 20 minutes until the crust turns beautifully golden. Let them cool first for 10 minutes on the sheet, then transfer to a wire rack to cool completely. Cooling is key to prevent the filling from oozing and prepares them perfectly for the frosting.
Step 8: Make and Apply the Frosting
In a bowl, whisk powdered sugar, cacao powder, and dairy-free milk until smooth, then fold in the melted chocolate for a glossy, rich frosting. Generously spoon or spread this over the top of your cooled pop tarts. Let them set at room temperature for about 20 minutes to achieve the perfect texture that’s both decadent and inviting.
How to Serve Frosted Chocolate Fudge Pop Tarts That Wow Every Bite Recipe
Garnishes
To elevate your Frosted Chocolate Fudge Pop Tarts That Wow Every Bite Recipe even more, try sprinkling a bit of flaky sea salt or a light dusting of cacao nibs on top of the frosting. This adds texture contrast and a touch of sophistication to every indulgent bite.
Side Dishes
Serve these pop tarts alongside a chilled glass of almond milk or a frothy cappuccino. A fresh fruit salad with berries or a dollop of coconut whipped cream can also beautifully balance the rich chocolate intensity and add a fresh, vibrant note to your treat time.
Creative Ways to Present
Invite friends for brunch and present these pop tarts on a wooden platter with small ramekins of nut butters, berry jams, or even warm caramel for dipping. You can cut them into mini squares for a bite-sized dessert board or stack them with parchment paper for an eye-catching gift box.
Make Ahead and Storage
Storing Leftovers
Once frosted, store any leftover pop tarts in an airtight container at room temperature for up to two days. After that, refrigeration is best to keep the filling and crust fresh, just bring them back to room temperature before enjoying.
Freezing
These pop tarts freeze wonderfully. Wrap each one individually in plastic wrap and place them in a freezer bag. They will keep for up to a month. When you’re ready for a treat, just thaw at room temperature or warm gently in a toaster oven.
Reheating
To recapture that fresh-baked vibe, warm frozen or refrigerated pop tarts at 300°F for about 5-7 minutes, or until warmed through. Avoid microwave reheating to keep the crust crisp and the filling luscious.
FAQs
Can I use gluten-free flours other than almond and tapioca?
Almond and tapioca flours provide the best texture and flavor balance for the dough. Using other gluten-free flours may alter the dough’s texture or taste. If you want to experiment, consider keeping the tapioca for elasticity and swapping just a portion of the almond flour.
Is this recipe dairy-free?
It can be made dairy-free by using dairy-free butter and plant-based milk for the frosting. The recipe as given suggests grass-fed butter, but swapping in coconut or vegan butter works just fine without sacrificing flavor.
How long does it take to chill the dough?
A minimum of one hour is recommended, but chilling the dough up to two days will actually improve the flavor and make it easier to work with. Just be sure to keep it wrapped tightly in the fridge.
Can I make the chocolate filling ahead of time?
Absolutely! Prepare and chill the chocolate filling up to two days in advance. Just stir it well before using, and ensure it is firm but spreadable when filling the pop tarts.
What is the best way to seal the pop tarts?
Using a fork to press and crimp the edges firmly seals the dough layers and prevents the filling from leaking out during baking. Make sure to leave a small border around the filling to make sealing easier.
Final Thoughts
Making Frosted Chocolate Fudge Pop Tarts That Wow Every Bite Recipe is such a joyful kitchen adventure—each step leads you closer to sharing a homemade delight that tastes far beyond ordinary. Whether you’re treating yourself or impressing friends and family, these pop tarts deliver on flavor, texture, and pure chocolatey happiness. Give this recipe a try, and you might just find yourself baking these chocolate gems again and again!
Print
Frosted Chocolate Fudge Pop Tarts That Wow Every Bite Recipe
- Prep Time: 30 minutes
- Cook Time: 20 minutes
- Total Time: 2 hours 5 minutes
- Yield: 9 pop tarts
- Category: Dessert
- Method: Baking
- Cuisine: American
- Diet: Gluten Free
Description
Indulge in these delectable Frosted Chocolate Fudge Pop Tarts, featuring a rich almond and tapioca flour crust filled with luscious bittersweet chocolate fudge and topped with a smooth chocolate frosting. Perfectly baked to golden perfection, these pop tarts offer a delightful balance of fudgy sweetness and a tender, flaky pastry that’s guaranteed to wow with every bite.
Ingredients
For the Dough
- 2 cups blanched almond flour
- 1 cup tapioca flour, plus extra for rolling
- 1/2 cup raw cacao powder
- 1/2 teaspoon fine sea salt
- 1/3 cup coconut sugar
- 1/2 cup grass-fed butter, cold
- 2 large eggs
For the Filling
- 1 cup full fat coconut milk
- 6 ounces bittersweet chocolate, chopped (divided)
- 2 tablespoons grass-fed butter
- 1 teaspoon pure vanilla extract
- 1/4 teaspoon fine sea salt
For the Chocolate Frosting
- 1 cup organic powdered sugar
- 2 tablespoons raw cacao powder
- 3 tablespoons dairy-free milk (or milk of your choice)
- 1/4 cup melted chocolate
Instructions
- Preparation: Gather all ingredients and kitchen tools such as a food processor, saucepan, rolling surface, baking sheets, and utensils for sealing edges.
- Prepare the Dough: In a food processor, pulse together all dough ingredients except the eggs until thick crumbs form. Add eggs and blend until the mixture forms a cohesive dough.
- Chill the Dough: Divide the dough into two equal discs, wrap each in plastic wrap, and chill in the refrigerator for at least 1 hour or up to 2 days to develop full flavor.
- Make the Chocolate Filling: In a small saucepan over medium-low heat, combine coconut milk and half of the chopped bittersweet chocolate, stirring constantly until melted and smooth. Remove from heat, add remaining chocolate and butter, stir until combined, then mix in vanilla extract and salt. Refrigerate the filling for 20 minutes to thicken.
- Preheat the Oven: Set your oven to 350°F (175°C) to prepare for baking the pop tarts.
- Roll Out the Dough: On a surface generously floured with tapioca flour, roll one chilled dough disc into a 9 x 12-inch rectangle about 1/8 to 1/4 inch thick. Cut the dough into 9 equal rectangles approximately 3 x 4 inches each.
- Freeze the Rectangles: Place the dough rectangles on a lined baking sheet 1 to 2 inches apart and freeze while rolling out the second disc.
- Fill the Pop Tarts: Remove the rectangles from the freezer. Place about 1 1/2 tablespoons of the chilled chocolate filling on the center of half of the rectangles, leaving a 1/2 inch border around edges. Top each with a second rectangle and seal edges firmly using a fork to prevent leakage during baking.
- Bake and Cool: Bake the assembled pop tarts in the preheated oven for 20 minutes until edges are set and slightly firm. Let them cool on the baking sheet for 10 minutes before transferring to wire racks to cool completely.
- Make the Chocolate Frosting: In a medium bowl, whisk together powdered sugar, raw cacao powder, vanilla extract, and dairy-free milk until smooth. Fold in melted chocolate until fully incorporated and glossy.
- Frost the Cooled Pop Tarts: Generously spread or spoon the chocolate frosting over the tops of the cooled pop tarts. Allow the frosting to set at room temperature for about 20 minutes before serving.
Notes
- Use cold butter for the dough to achieve a flaky texture.
- Chilling the dough discs helps in easy rolling and better texture of the crust.
- Freezing the dough rectangles before filling prevents the dough from becoming too soft and hard to handle.
- Seal edges carefully to avoid filling leakage during baking.
- The frosting can be customized with your preferred milk for a dairy-free or traditional option.
- Pop tarts are best enjoyed within 2 days or can be refrigerated for up to 4 days.
- For extra flair, sprinkle a pinch of sea salt on top of the frosting for a salted chocolate twist.


