
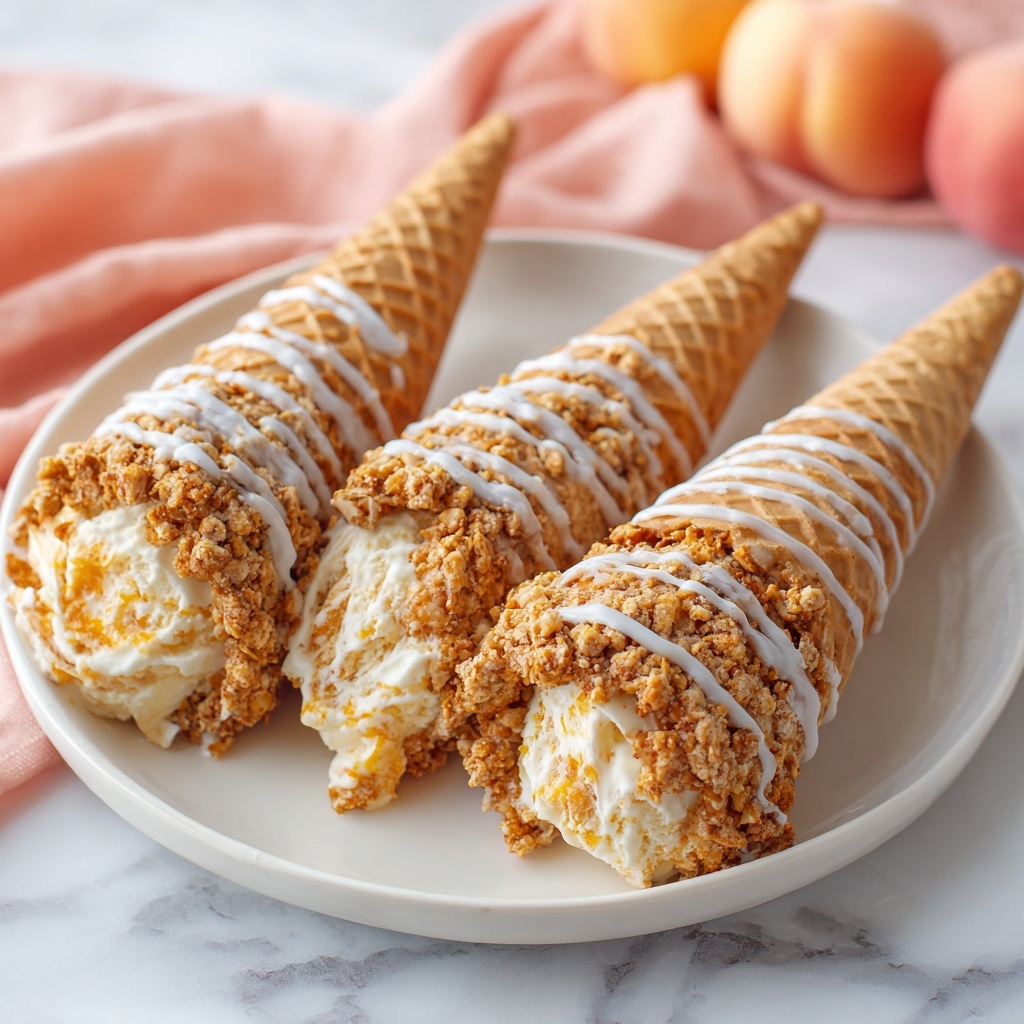
If you’ve been hunting for a show-stopping dessert that marries the comforting warmth of peach cobbler with the creamy decadence of cheesecake, let me introduce you to the magic of the Peach Cobbler Cheesecake Cones Recipe. This delightful treat takes juicy, cinnamon-spiced peaches baked to golden perfection and combines them with a luscious, whipped cheesecake filling, all nestled inside crisp waffle cones dipped in rich chocolate. The textures and flavors play off one another with such harmony that each bite feels like a summer celebration in your mouth. It’s perfect for sharing, impressing guests, or simply indulging in a personal sweet escape on a sunny afternoon.
Ingredients You’ll Need
Gathering the right ingredients is where the fun begins. Each one is simple yet essential, contributing a unique texture or flavor to make this Peach Cobbler Cheesecake Cones Recipe truly sing. From creamy cream cheese to buttery cake mix and sweet, juicy peaches, every item plays a starring role.
- Cream Cheese (16 oz, softened): The creamy base for the cheesecake layer, providing richness and smoothness.
- Heavy Whipping Cream (1 cup, cold): Whipped for lightness, it turns the cheesecake filling into a fluffy delight.
- Confectioner’s Sugar (1 cup): Adds just the right amount of sweetness to balance the tangy cream cheese.
- Vanilla Extract (1 tsp, preferably pure): Elevates the flavor profile with a warm, aromatic note.
- Lemon Juice (½ tsp, fresh preferred): Brightens up the cheesecake filling with a subtle pop of freshness.
- Sliced Peaches (48 oz, with juice): The star fruit, juicy and tender, bringing that classic cobbler flavor.
- Cake Mix (1 box, yellow or white): Creates a golden, buttery topping with a perfect crumb texture.
- Butter (1 cup, salted): Drizzled over the cake mix, it bakes into a rich, crispy crust.
- Cinnamon (1½ tsp): Infuses warm spice into the cobbler for that cozy mood.
- Waffle Cones (12): Crisp holders for all that delicious filling, coated in chocolate for extra indulgence.
- Cream Filled Cookies (16 oz, crushed): Provide a crunchy, sweet garnish that contrasts delightfully with the soft filling.
- Whipped Cream (3 tbsp): Adds a final light touch, perfect for topping or extra creaminess.
- Melted Chocolate: Used for dipping cones and drizzling to add an irresistible chocolaty finish.
How to Make Peach Cobbler Cheesecake Cones Recipe
Step 1: Prepare Your Oven and Chocolate Dip
Start by preheating your oven to a steady 350°F. Meanwhile, melt the chocolate in short bursts in the microwave, stirring between intervals until smooth and shiny. This is your ticket to that gorgeous chocolate coating for your waffle cones, which you’ll dip the top halves of and set aside to harden, adding a perfect, crisp shell to each cone.
Step 2: Crush Cookies and Prep the Baking Dish
Crush the cream-filled cookies finely—these will give the cones a delightful crunch later on. Then, spray a 9×13 inch baking dish with non-stick cooking spray to make clean-up a breeze. Pour in the sliced peaches with their juice, which will be your fruity, juicy base.
Step 3: Assemble and Bake the Cobbler
Sprinkle the dry cake mix evenly over the peaches and cinnamon. Drizzle the melted butter on top, allowing it to soak into the mix and create that golden, crisp crust typical of a beloved peach cobbler. Pop the dish into the oven for 45 to 55 minutes until it’s bubbly and beautifully browned on top.
Step 4: Whip and Prepare the Cheesecake Filling
While the cobbler is baking, whip the cold heavy cream until stiff peaks form—this will give your cheesecake filling a light texture. In a separate bowl, beat the softened cream cheese with confectioner’s sugar, vanilla extract, and fresh lemon juice until silky smooth. Gently fold in the whipped cream for a luscious, airy cheesecake layer ready to complement the warm peaches.
Step 5: Assemble the Cones
Once the cobbler has cooled slightly, start layering inside your chocolate-dipped waffle cones. Begin with a spoonful of cheesecake filling, then add some warm peach cobbler mixture, and continue layering until the cone is full. Finish by sprinkling crushed cookie crumbs and drizzling with melted chocolate for that extra wow factor.
How to Serve Peach Cobbler Cheesecake Cones Recipe

Garnishes
Enhancing these cones isn’t difficult, and the garnishes take them to a whole new level. Use extra cookie crumbs for crunch and a sprinkle on top of whipped cream for a dreamy finish. Don’t forget a generous swirl of melted chocolate over the cones to give them a slick, glossy appeal and a delicious bite with every lick.
Side Dishes
This dessert stands beautifully on its own, but if you want a side, a scoop of vanilla or cinnamon ice cream pairs extravagantly well with the peach cobbler flavor. Alternatively, a light fruit salad featuring berries or melons can balance the richness while keeping the summer vibe fresh and bright.
Creative Ways to Present
Presentation is half the fun! Serve the cones upright in a decorative cone holder or place them in a rustic wooden box lined with parchment paper for a picnic-style treat. For gatherings, you could even arrange them on a platter interspersed with fresh mint leaves and peach slices, turning your dessert table into an eye-catching display.
Make Ahead and Storage
Storing Leftovers
If you find yourself with extras, store the cheesecake filling and peach cobbler separately in airtight containers in the refrigerator. Keep the waffle cones at room temperature in an airtight container to maintain crispness, and assemble just before serving to prevent sogginess.
Freezing
The peach cobbler component freezes beautifully. Pop it in a freezer-safe container before baking or after cooling, and freeze for up to 3 months. The cheesecake filling does not freeze as well due to its texture, so it’s best to prepare that fresh when ready to serve.
Reheating
Reheat the cobbler gently in the oven at 300°F until warmed through—this preserves the texture better than the microwave. Avoid reheating the cheesecake filling; serve it chilled for perfect consistency. Then assemble the cones just before serving for the best experience.
FAQs
Can I use fresh peaches instead of canned peaches?
Absolutely! Fresh peaches work wonderfully, especially in season. Just peel and slice them, then toss with a little sugar and lemon juice before baking to bring out their natural sweetness and maintain the juicy texture.
Do I have to use a boxed cake mix?
While a boxed cake mix makes this recipe quick and foolproof, you can opt for a homemade cake topping if you prefer. Just make sure it’s a buttery, crumbly topping that will bake to a nice golden crust similar to the mix’s texture.
Can I make these cones vegan or dairy-free?
Replacing the cream cheese and heavy cream with vegan alternatives is possible, though the texture and taste will change slightly. There are great vegan cream cheese and whipping cream options available that whip nicely and can help keep the dessert deliciously creamy.
How far in advance can I make this dessert for a party?
You can bake the peach cobbler up to two days ahead and refrigerate it. Prepare the cheesecake filling the morning of your event for optimum freshness. Assemble the cones shortly before serving to keep the waffle cones crisp and the filling perfect.
What’s the best way to crush the cookies?
For the best texture, place the cream-filled cookies in a sealed plastic bag and gently crush them using a rolling pin or the bottom of a heavy pan until you have fine crumbs. This method avoids making the crumbs too powdery or uneven.
Final Thoughts
I can’t recommend the Peach Cobbler Cheesecake Cones Recipe enough to anyone who loves desserts with layers of flavor and texture. It’s a playful spin on classic Southern comfort food that’s elegant yet approachable, making it perfect for any summer gathering or an indulgent treat. Give it a try—you might just find your new favorite way to enjoy peach cobbler!
Print
Peach Cobbler Cheesecake Cones Recipe
- Prep Time: 15 minutes
- Cook Time: 50 minutes
- Total Time: 1 hour 5 minutes
- Yield: 12 servings
- Category: Dessert
- Method: Baking
- Cuisine: American
Description
Enjoy a delightful summer treat with these Peach Cobbler Cheesecake Cones. Juicy baked peaches mixed with cake mix and cinnamon create a bubbly, golden cobbler base, layered inside crisp waffle cones along with a luscious, creamy cheesecake filling. Topped with melted chocolate and cookie crumbs, these cones combine the best of cobbler and cheesecake in a portable and crave-worthy dessert.
Ingredients
Cheesecake Filling
- 16 oz Cream Cheese, softened
- 1 cup Heavy Whipping Cream, cold
- 1 cup Confectioner’s Sugar
- 1 tsp Vanilla Extract, preferably pure
- ½ tsp Lemon Juice, fresh preferred
Peach Cobbler
- 48 oz Sliced Peaches with juice
- 1 box Cake Mix (yellow or white)
- 1 cup Butter, salted
- 1½ tsp Cinnamon
For Assembly and Garnish
- 12 Waffle Cones
- 16 oz Cream Filled Cookies, crushed
- Melted Chocolate
- 3 tbsp Whipped Cream
- Cookie Crumbs
Instructions
- Preparation: Preheat your oven to 350°F (175°C). Prepare a 9×13 inch baking dish by spraying it with non-stick cooking spray.
- Melt Chocolate: Melt the chocolate in the microwave until smooth, about 30 seconds to 1 minute. Dip the top halves of the waffle cones into the melted chocolate to coat, then set them aside to harden.
- Crush Cookies: Crush the cream-filled cookies into fine crumbs using a food processor or by placing them in a sealed bag and rolling with a rolling pin.
- Assemble Peach Cobbler: Pour the sliced peaches along with their juice into the prepared baking dish. Sprinkle the dry cake mix evenly over the peaches. Drizzle the melted butter over the top, and sprinkle with cinnamon.
- Bake Cobbler: Place the dish in the preheated oven and bake for 45 to 55 minutes, until the mixture is bubbly and the top is golden brown.
- Whip Cream: While the cobbler is baking, whip the cold heavy cream until stiff peaks form.
- Prepare Cheesecake Filling: In a mixing bowl, combine the softened cream cheese, confectioner’s sugar, vanilla extract, and lemon juice. Beat until smooth and creamy. Gently fold in the whipped cream to create a light cheesecake filling.
- Assemble Cones: Once the peach cobbler has cooled slightly, fill each prepared waffle cone by layering cheesecake filling and the baked peach cobbler mixture. Alternate layers to create a balanced filling.
- Garnish and Serve: Drizzle additional melted chocolate over the filled cones and sprinkle with crushed cookie crumbs. Add a dollop of whipped cream on top if desired. Serve immediately for best texture and flavor.
Notes
- For a deeper cinnamon flavor, sprinkle cinnamon directly into the cake mix before baking.
- Use fresh peaches when in season as a substitute for canned sliced peaches for an even fresher taste.
- If the melted chocolate hardens too quickly while dipping cones, gently reheat in the microwave in short bursts.
- These cones are best enjoyed the same day to prevent the waffle cones from becoming soggy.
- To make this dessert gluten free, use gluten free cake mix and gluten free cookies.
