
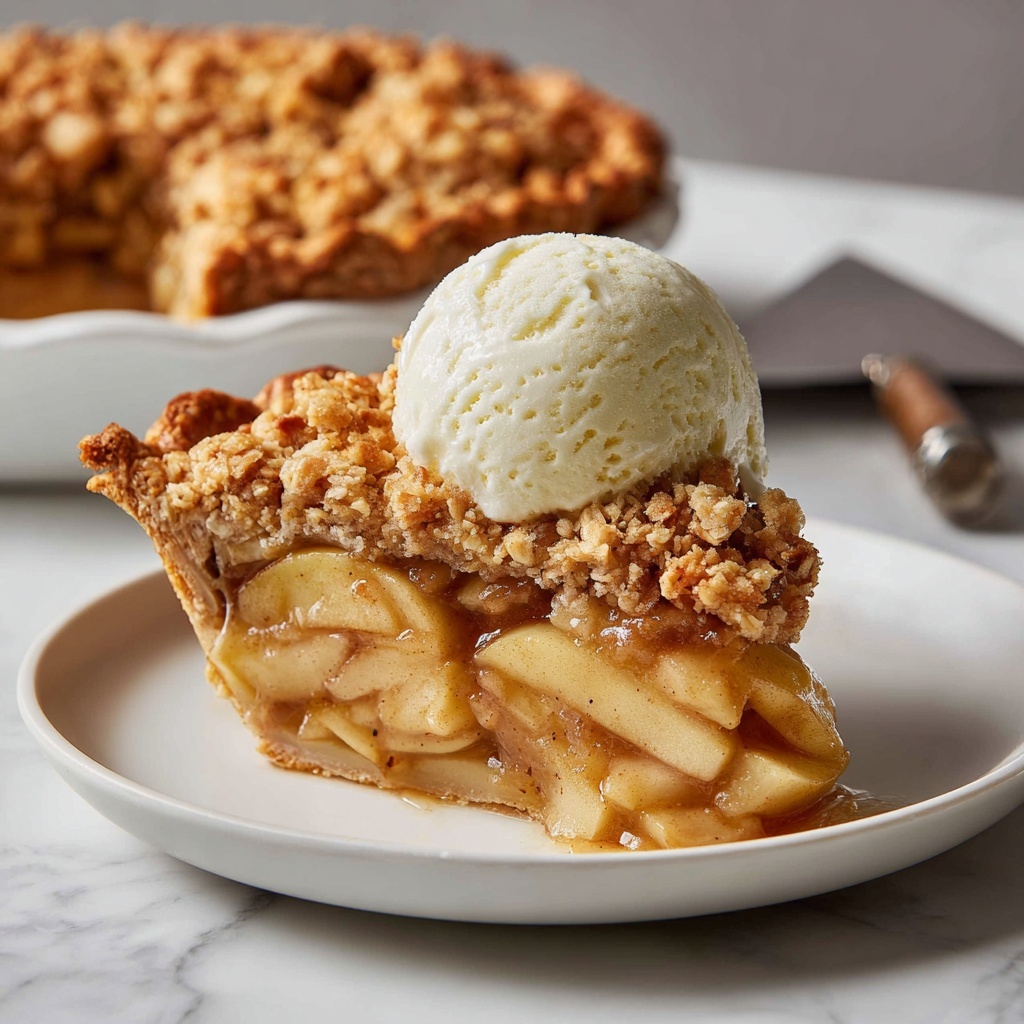
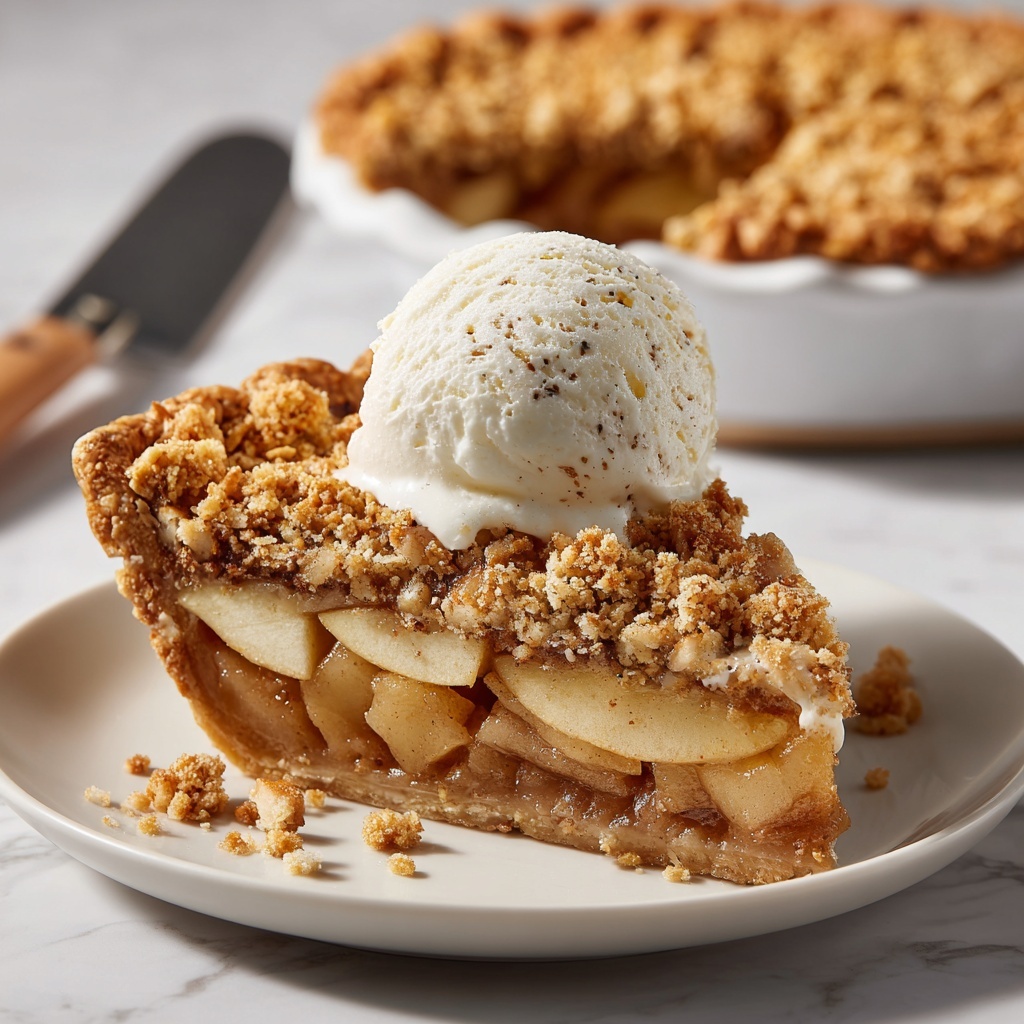
This Vegan Apple Pie Recipe is a true celebration of comforting flavors and plant-based goodness all wrapped up in a flaky, golden crust. Imagine tender, spiced apple slices bursting with cinnamon, nutmeg, and a hint of fresh vanilla, encased in a perfectly baked vegan pastry that’s buttery yet cruelty-free. Whether you’re a seasoned vegan or simply looking to explore a deliciously wholesome dessert, this recipe promises to become a steadfast favorite in your baking repertoire. It’s not just delicious; it’s a piece of cozy tradition reimagined with kindness and care.
Ingredients You’ll Need
Simple, thoughtfully chosen ingredients are the secret to this Vegan Apple Pie Recipe’s magic. Each component plays a vital role—from the crisp apples that provide natural sweetness to the spices that infuse warmth and aroma, plus the vegan butter and non-dairy milk that help create that irresistible flaky crust and golden finish.
- Vegan pie crust: Prepared at least an hour ahead for optimal texture and ease of handling.
- Apples (1.8 kg): Approximately 8-9 large apples, peeled and sliced into ½ cm slices to ensure the perfect tender bite without turning mushy.
- Granulated sugar (200 g): Mixed with vanilla and spices to create a fragrant, deliciously balanced sweetness coating the apples.
- Vanilla pod: Adds a lush, natural vanilla flavor by rubbing the seeds into the sugar.
- Lemon zest (1 tablespoon): Brings a fresh, lively brightness that cuts through the sweetness.
- Ground cinnamon (1 tablespoon): The quintessential spice for apple pie, warming and comforting.
- Ground ginger (¼ teaspoon): Adds a subtle spicy kick for depth.
- Ground nutmeg (¼ teaspoon): Rounds out the spice profile with a hint of earthiness.
- Apple cider vinegar (2 tablespoons): Enhances the apples’ natural tartness and balances the flavors beautifully.
- Cornstarch (4 tablespoons): Acts as a thickening agent, ensuring a luscious, jammy filling.
- Vegan butter (30 g): Incorporated into the apple sauce to add richness and a silky finish.
- Non-dairy milk (2 tablespoons): Combined with maple syrup to brush the top crust, creating that irresistible golden sheen.
- Maple syrup (1 tablespoon): Offers natural sweetness and helps the crust caramelize.
- Demerara sugar (1 tablespoon): Sprinkled on top for a delightful crunchy texture and added sweetness.
How to Make Vegan Apple Pie Recipe
Step 1: Prepare the Crust
Start by preparing your vegan pie crust up to step 6, then chill it in the fridge for at least one hour. This chilling time is crucial for achieving that tender, flaky texture we all love — it relaxes the dough and makes it easier to roll out later.
Step 2: Slice the Apples
While the crust chills, wash, peel, and core the apples. Slice each one into ½ cm thick pieces. Keeping the slices moderately thick prevents the filling from becoming mushy during baking and ensures every bite has a perfect balance of tender texture and slight bite.
Step 3: Flavor the Sugar Mix
Add granulated sugar to a large mixing bowl along with the vanilla pod sliced lengthways and the fresh lemon zest. Rub the vanilla seeds and zest into the sugar with your fingertips to release their aromatic oils. Remove the pod afterward. Stir in the cinnamon, ground ginger, and nutmeg to create that warm, inviting spice blend that defines this Vegan Apple Pie Recipe.
Step 4: Coat the Apples
To your bowl of spiced sugar, add the sliced apples, apple cider vinegar, and 1 tablespoon (10 g) of cornstarch. Toss everything together using your hands, making sure every slice is beautifully coated with the flavorful mix, promising a filling that’s evenly sweet, spiced, and nicely thickened.
Step 5: Macerate the Apples
Cover the bowl with cling film or a plate and let the apples sit for an hour. This step allows the fruit to release some juices, soaking up the seasonings for a deeply flavorful filling. After macerating, drain the apple slices from the juices using a colander or sieve, saving the juices for the next step.
Step 6: Cook the Apple Sauce
Pour the reserved apple juices into a saucepan and whisk in the remaining 3 tablespoons (30 g) of cornstarch until fully combined. Gently bring the mixture to a simmer over medium heat while whisking continuously. After about 3 minutes, the sauce should thicken beautifully. Remove it from the heat and whisk in the vegan butter to give it a lovely smooth richness.
Step 7: Coat Apples in Sauce and Cool
Pour this luscious sauce over your drained apple slices, stirring gently with a spatula or spoon until each slice is coated in the velvety mixture. Allow it to cool to room temperature for about 10 minutes, giving the filling the perfect consistency before filling your pie shell.
Step 8: Prepare Oven and Baking Sheet
Place a large baking tray or sheet inside the oven and preheat to 200°C fan-forced (392°F) or 210°C conventional (410°F). Preheating the baking sheet ensures a hot surface when your pie goes in, helping the bottom crust to bake crisp and golden.
Step 9: Roll Out and Fit Bottom Crust
Take your chilled dough discs out of the fridge and let them rest at room temperature for 5 minutes to soften slightly. On a lightly floured surface, roll out one disc until it’s larger than your 9-inch pie tin. Carefully transfer it using your rolling pin into the pie tin, gently pressing it into the base and sides without stretching the dough.
Step 10: Trim and Crimp Edges
Trim the excess pastry with scissors so it hangs just slightly over the rim. For a charming look and to seal the crust, pinch the edges with your fingers or crimp using a fork. Then, pierce several holes in the base with a fork to prevent bubbling during baking.
Step 11: Roll and Prepare Top Crust
Roll out the second dough disc similarly and decide whether you want a whole top crust or a beautiful lattice design by slicing it into thin strips. Either way, this will create the gorgeous golden crown for your pie.
Step 12: Fill the Pie
Layer the apple slices evenly inside the pie shell, stacking them neatly. Pour any leftover juices atop the filling for extra moisture and flavor.
Step 13: Add Top Crust and Seal
Place your prepared top crust over the filling, trimming any excess dough hanging over the edges. Crimp the edges together with a fork to seal the pie tightly. If you opted for a whole crust, cut a few small slits in it with a sharp knife to allow steam to escape during baking.
Step 14: Brush with Vegan “Egg Wash”
Mix the non-dairy milk with maple syrup to create a shiny glaze. Brush this lightly over the top crust and sprinkle the surface evenly with demerara sugar for that irresistible sparkle and crunch once baked.
Step 15: Bake Your Pie
Place the pie carefully on the preheated tray in the oven. Bake for 20 minutes at 200°C fan (392°F) or 210°C conventional (410°F), then reduce the temperature to 160°C fan (320°F) or 175°C conventional (350°F) and continue baking for another 40-50 minutes. Look for a golden-brown crust and slightly firm apples when pierced with a fork. If the apples need more time, bake an extra 5-10 minutes.
How to Serve Vegan Apple Pie Recipe
Garnishes
A simple dusting of powdered sugar or a scoop of vegan vanilla ice cream elevates this pie wonderfully. For an extra touch of indulgence, drizzle some warmed maple syrup or a dollop of coconut whipped cream on top—it’s pure bliss.
Side Dishes
This pie pairs beautifully with a hot cup of spiced tea or a creamy plant-based latte. For a more substantial dessert experience, serve it alongside homemade vegan caramel sauce or a handful of toasted nuts to add texture contrasts.
Creative Ways to Present
Try cutting your pie into elegant lattice-topped slices for a rustic, charming look perfect for guests. Alternatively, serve smaller individual pies or tartlets using the same filling and crust for a playful, personalized touch that’s perfect for parties or afternoon tea.
Make Ahead and Storage
Storing Leftovers
Once cooled completely, store your Vegan Apple Pie in an airtight container or cover it tightly with plastic wrap. It will keep nicely in the fridge for up to 4 days, maintaining its freshness and flavor. The flavors actually deepen overnight, making it taste even better the next day!
Freezing
You can freeze the pie after baking and cooling. Wrap it well in plastic wrap and foil to protect it from freezer burn. Frozen pie will keep for up to 2 months. When ready to enjoy, thaw overnight in the refrigerator before reheating for the best results.
Reheating
To reheat, preheat your oven to 175°C (350°F) and warm the pie for about 15-20 minutes. This ensures the crust crisps back up beautifully and the filling heats evenly, preserving that freshly baked quality we all crave.
FAQs
Can I use any type of apples for this Vegan Apple Pie Recipe?
Yes! However, a mix of sweet and tart apples like Granny Smith combined with Fuji or Braeburn works best to create a balanced flavor and texture that holds up during baking.
Is it necessary to macerate the apples for an hour?
Macerating helps the apples absorb the spices and sugar, releasing juices that become your filling’s sauce. While you can skip it in a pinch, letting them sit for an hour truly boosts flavor and texture.
Can I make this pie gluten-free?
Absolutely. Substitute the vegan pie crust with a gluten-free version made from almond flour or a gluten-free flour blend. Keep an eye on baking times, as they may vary slightly.
What can I use instead of vegan butter?
You can swap vegan butter for refined coconut oil or plant-based margarine with a neutral flavor. These will still provide the necessary fat content for a flaky crust and rich filling.
How do I prevent the bottom crust from getting soggy?
Preheating the baking tray helps crisp the bottom. Also, piercing the crust before baking and rolling the dough evenly thin without tears prevents sogginess. Letting the pie cool completely before slicing also helps the filling set properly.
Final Thoughts
This Vegan Apple Pie Recipe is more than just a dessert; it’s a warm hug shared with loved ones, a deliciously kind twist on a timeless classic. With every slice, you’ll taste the love and care poured into every step. I promise, once you make this recipe, it will quickly become a cherished staple in your kitchen. So go on, bake it, share it, and enjoy every comforting bite!
Print
Vegan Apple Pie Recipe
- Prep Time: 40 minutes
- Cook Time: 1 hour 10 minutes
- Total Time: 2 hours 30 minutes
- Yield: 12 servings
- Category: Dessert
- Method: Baking
- Cuisine: American
- Diet: Vegan
Description
This vegan apple pie recipe features a flaky, buttery pie crust and a spiced apple filling infused with vanilla, cinnamon, ginger, and nutmeg. Apples are macerated to draw out their juices, which are then cooked into a thickened sauce and combined back with the apple slices for a luscious texture. Baked to golden perfection with a maple syrup and non-dairy milk glaze on top, this comforting dessert is perfect for sharing and suitable for vegan diets.
Ingredients
Pie Crust
- 1 batch vegan pie crust (prepared at least 1 hour ahead)
Filling
- 1.8 kg apples (around 8–9 large apples)
- 200 g granulated sugar
- 1 vanilla pod
- 1 tablespoon lemon zest (freshly zested)
- 1 tablespoon ground cinnamon
- ¼ teaspoon ground ginger
- ¼ teaspoon ground nutmeg
- 2 tablespoons apple cider vinegar
- 4 tablespoons cornstarch (divided: 1 tablespoon + 3 tablespoons)
- 30 g vegan butter
Topping
- 2 tablespoons non-dairy milk
- 1 tablespoon maple syrup (or agave syrup)
- 1 tablespoon demerara sugar
Instructions
- Prepare the crust: Prepare the vegan pie crust up to step 6 of the crust recipe and chill it for at least one hour while you prepare the filling.
- Prepare the apples: Wash, peel, and remove cores from the apples. Slice them into approximately ½ cm thick slices, avoiding cutting too thin to prevent mushiness during cooking.
- Flavor the sugar mixture: In a large mixing bowl, combine the granulated sugar with the split vanilla pod and lemon zest. Rub the vanilla and zest into the sugar thoroughly to extract the bean seeds, then remove the pod. Stir in cinnamon, ground ginger, and nutmeg.
- Coat the apples: Add the sliced apples to the sugar mixture along with apple cider vinegar and 1 tablespoon (10g) of cornstarch. Toss with hands until the slices are evenly coated.
- Macerate the apples: Cover the bowl with plastic wrap or a plate and let the apples macerate for one hour, allowing the sugar and spices to soak into the fruit. After maceration, strain the apples through a colander to separate the slices from the released juice.
- Cook the apple sauce: Place the collected juice in a saucepan. Whisk in the remaining 3 tablespoons (30g) of cornstarch until smooth. Heat gently and bring to a simmer while whisking continuously until the sauce thickens, about 3 minutes. Remove from heat and whisk in the vegan butter until melted and incorporated.
- Coat the apples in sauce: Pour the thickened sauce over the sliced apples and stir gently using a spatula or large spoon until evenly coated. Allow the mixture to cool to room temperature for 10 minutes.
- Preheat the oven: Place a large baking tray into the oven and preheat to fan-forced 200°C (392°F) or conventional 210°C (410°F).
- Roll out the bottom pastry: Remove dough discs from the fridge and let sit at room temperature for 5 minutes. On a lightly floured surface, roll out one disc wider than your 9-inch pie tin. Use your rolling pin to carefully transfer the pastry into the deep pie tin.
- Form the bottom crust: Gently press the dough into the base and sides of the tin. Trim excess pastry around edges with scissors. Crimp or pinch the edges with fingers or a fork, and pierce holes in the base with a fork to prevent bubbling.
- Prepare top crust: Roll out the second disc of dough and choose either to cover the pie fully or cut into strips for a lattice design.
- Fill the pie: Layer the apple slices evenly into the pie dish, stacking moderately. Pour any remaining juices on top of the apples.
- Assemble the top: Add the top pastry piece(s), trim excess pastry, and crimp edges to seal. If using a whole top crust, cut slits to allow steam to escape.
- Apply egg wash: Combine non-dairy milk and maple syrup, and lightly brush over the surface of the pie. Sprinkle demerara sugar evenly on top.
- Bake the pie: Place the pie on the preheated tray and bake at fan-forced 200°C (392°F) or conventional 210°C (410°F) for 20 minutes. Then reduce the temperature to fan-forced 160°C (320°F) or conventional 175°C (350°F) and bake for an additional 40-50 minutes until the crust is golden brown and the filling is slightly firm to the fork.
- Cool and store: Let the pie cool completely at room temperature. For clean slicing, chill for a few hours before serving. Store covered in the fridge for up to 4 days. The pie can also be served warm if preferred.
Notes
- Use firm apples suitable for baking, such as Granny Smith or Braeburn, to ensure the filling holds shape.
- Do not slice apples too thinly to avoid mushy texture after baking.
- Vanilla pod should be split and seeds scraped into sugar for maximum flavor; remove pod before adding apples.
- The maceration step helps extract juices and intensify flavor in the filling.
- Vent holes in top crust or lattice design prevent the pie from becoming soggy.
- If using a whole top crust, slits are essential for steam release to avoid cracking.
- Letting the pie chill after baking results in cleaner slices.
- Non-dairy milk and maple syrup glaze enhances browning and adds subtle sweetness.
- Store leftovers refrigerated and consume within 4 days for freshness.

