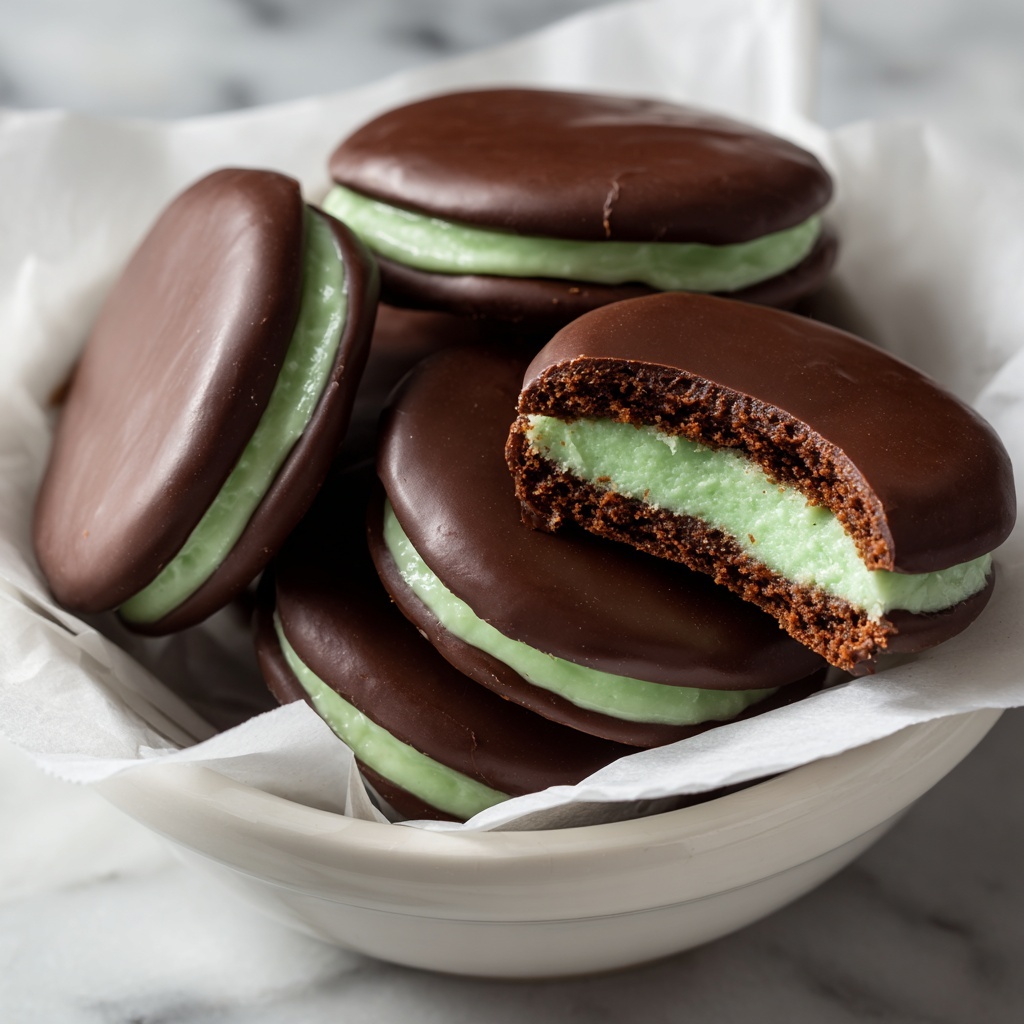
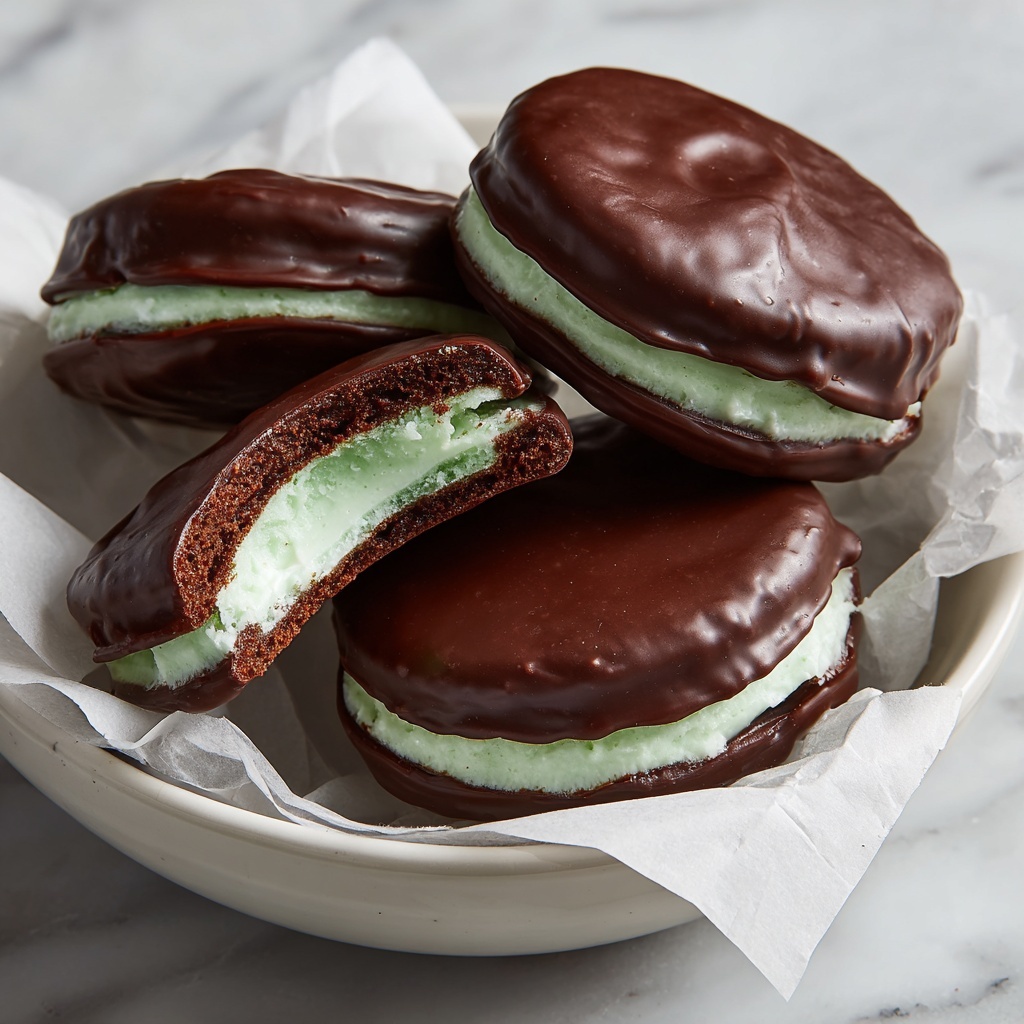
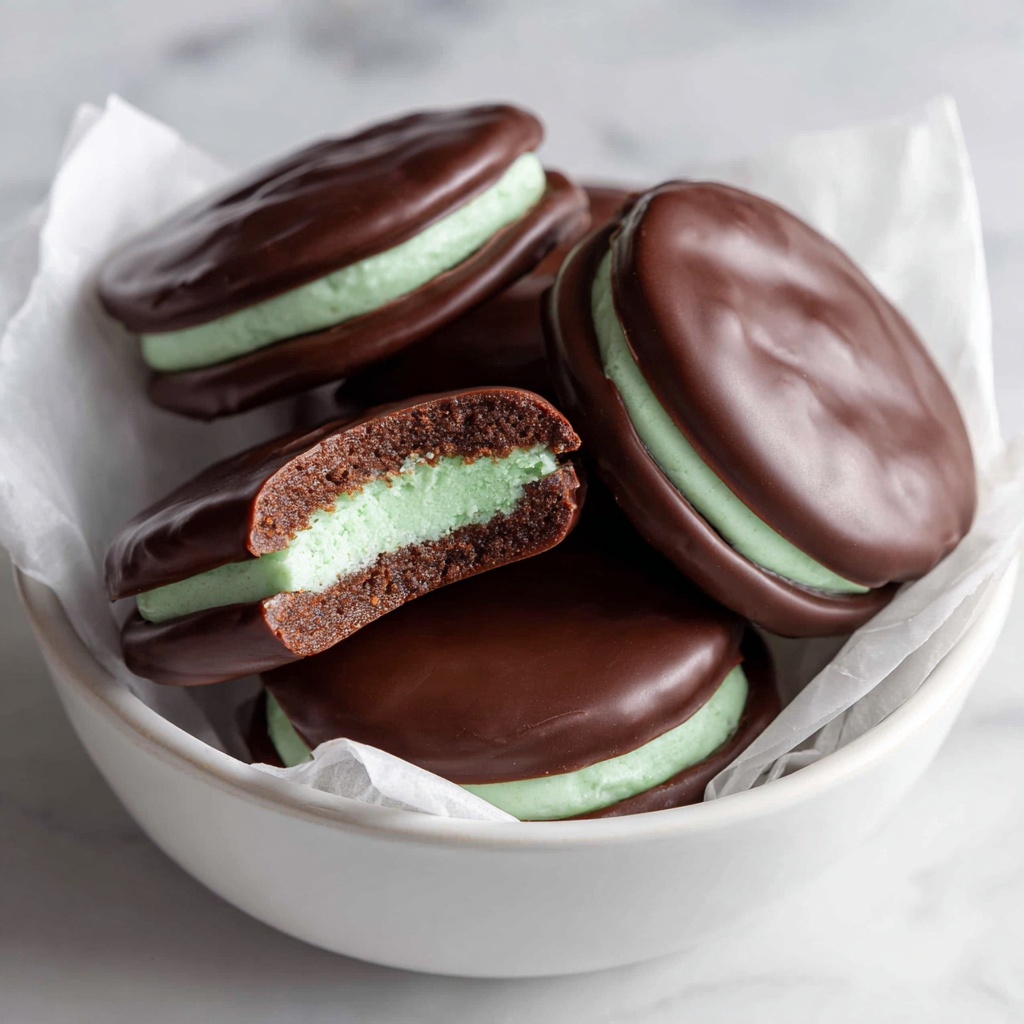
If you adore the refreshing zing of mint paired with smooth chocolate, you are in for a treat with this Mint Sandwich Cookies with Chocolate Coating Recipe. These little gems are buttery, creamy, and unbelievably satisfying, with a crisp crunch from the crackers and a luscious minty frosting center, all wrapped up in a shiny dark chocolate shell. They are perfect for parties, cozy nights in, or whenever you want a sweet bite that’s both classic and a little whimsical. Trust me, once you make these, they’ll become a favorite go-to cookie to impress friends and family alike.
Ingredients You’ll Need
Gathering the ingredients for this Mint Sandwich Cookies with Chocolate Coating Recipe is straightforward, and each component works harmoniously to build a cookie that’s bursting with flavor and texture. From the buttery crackers to the rich chocolate coating, every element plays a crucial role.
- Butter-Flavored Crackers (72 pieces): These provide a crisp, slightly salty base that balances the sweetness perfectly. Use gluten-free crackers if needed.
- Dark Chocolate Candy Coating (1 pound): The star coating that melts smoothly and hardens with a glossy finish; semi-sweet or milk chocolate can be used for a milder flavor.
- Vanilla Frosting (1 container): The creamy filling base that’s easy to work with – store-bought frosting saves time without sacrificing taste.
- Peppermint Extract (1 teaspoon): Adds that unmistakable minty freshness; adjust to your liking or swap with mint extract for a stronger kick.
- Green Food Coloring (1 drop, optional): Just a hint for the minty look, but feel free to skip for a clean, classic biscuit appearance.
How to Make Mint Sandwich Cookies with Chocolate Coating Recipe
Step 1: Prepare the Mint Filling
Start by mixing the vanilla frosting with the peppermint extract and green food coloring in a large bowl. This creamy mint filling is the heart of your cookies, so stir gently to blend the flavors without losing that fluffy texture that spreads easily onto your crackers.
Step 2: Assemble the Sandwiches
Using a butter knife or small spatula, evenly spread the minty frosting onto half of your butter-flavored crackers. Then, carefully top each frosted cracker with another plain cracker to create a perfect little sandwich. The evenness here matters because it ensures every bite has just the right amount of filling.
Step 3: Melt the Chocolate
Chop the dark chocolate candy coating into smaller pieces and place them in a microwave-safe bowl. Heat in short bursts of 20 to 30 seconds, stirring between sessions until the chocolate is fully melted and silky smooth. This step is key to achieving that shiny, flawless chocolate exterior.
Step 4: Dip the Sandwich Cookies
One by one, carefully dip each sandwich cookie into the melted chocolate, making sure to cover it completely. Let the excess chocolate drip off before placing the cookie on a sheet lined with waxed paper. This smooth chocolate shell seals in all that creamy mint goodness.
Step 5: Let the Chocolate Set
Allow the chocolate-coated cookies to rest at room temperature for about 30 to 60 minutes. Patience here rewards you with a beautifully hardened shell that cracks delightfully with each bite. Avoid refrigerating as it can cause the chocolate to lose its glossy finish.
Step 6: Store Your Cookies
Once set, transfer your mint sandwich cookies to an airtight container. Keeping them at room temperature ensures they maintain their crispness and freshness for up to a week, perfect for nibbling throughout your week or sharing with friends.
How to Serve Mint Sandwich Cookies with Chocolate Coating Recipe
Garnishes
Sprinkle some crushed peppermint candies or finely chopped fresh mint leaves on the chocolate before it sets for an extra pop of texture and color. If you want to go all out, a light dusting of edible shimmer powder adds a festive sparkle that makes these cookies look as good as they taste.
Side Dishes
These cookies pair wonderfully with a warm cup of coffee or a cold glass of milk for dipping. For an adult twist, serve them alongside a minty cocktail or a rich hot chocolate topped with whipped cream.
Creative Ways to Present
Arrange your layered mint sandwich cookies on a decorative plate or tiered stand to showcase their glossy chocolate coatings. Wrapping each cookie in a small piece of parchment or placing them in mini paper cups makes them perfect for gifting or party favors.
Make Ahead and Storage
Storing Leftovers
Keep your cookies fresh by storing them in an airtight container at room temperature. Avoid humid areas as moisture can soften the chocolate coating and affect the crispness of the crackers. When properly stored, they last deliciously for up to a week.
Freezing
You can freeze the fully assembled and coated cookies by placing them in a single layer on a tray to freeze solid before transferring to a zip-top freezer bag or airtight container. This prevents sticking and keeps their texture intact. Thaw at room temperature before serving.
Reheating
Since these cookies are best enjoyed chilled or at room temperature, reheating is not recommended as it can melt the chocolate coating and change the texture of the filling. If needed, simply let frozen cookies thaw naturally and enjoy their original charm.
FAQs
Can I use milk chocolate instead of dark chocolate?
Absolutely! Milk chocolate provides a sweeter, creamier coating compared to dark chocolate, which is a bit more robust and slightly bitter. Either option works well, so choose according to your taste preference.
Is it possible to make these cookies gluten-free?
Yes, just substitute the butter-flavored crackers with a gluten-free variety. Make sure the frosting and chocolate candy coating you use are also gluten-free certified to keep the entire recipe safe for gluten-sensitive friends.
How strong should the peppermint extract flavor be?
Start with 1 teaspoon as recommended, but feel free to adjust to your liking. Mint extracts vary in strength, so adding a little at a time during mixing helps you avoid overpowering the filling.
Can I make the frosting from scratch instead of store-bought?
Definitely! A simple buttercream frosting flavored with vanilla extract works great and lets you control ingredients. Just whip butter, powdered sugar, a dash of vanilla, and a splash of milk until creamy, then add your peppermint extract and food coloring.
How should I serve these at a party?
Serve them on a decorative tray with small tongs for guests to easily pick up. These cookies also look fantastic in clear jars or gift boxes if you want to give them away as favors or enjoy them later.
Final Thoughts
You really can’t go wrong with this Mint Sandwich Cookies with Chocolate Coating Recipe. It’s simple, fun to make, and yields show-stopping treats that bring the perfect balance of mint, chocolate, and buttery crunch to your palate. Whether for holidays, special occasions, or an everyday indulgence, these cookies invite smiles and happy taste buds. Go ahead, dive in and make your kitchen smell like a minty chocolate heaven today!
Print
Mint Sandwich Cookies with Chocolate Coating Recipe
- Prep Time: 15 minutes
- Cook Time: 15 minutes
- Total Time: 45 minutes
- Yield: 12 servings (72 cookies)
- Category: Dessert, Snack
- Method: No-Cook
- Cuisine: American
- Diet: Gluten Free
Description
These Mint Sandwich Cookies combine buttery crackers with a creamy mint-flavored frosting, all enveloped in a rich dark chocolate coating. Perfect for mint lovers looking for an easy-to-make, deliciously refreshing treat that offers a balance of minty freshness and chocolate decadence.
Ingredients
Cookies and Filling
- 72 pieces Butter-Flavored Crackers (can substitute with gluten-free crackers for a gluten-free version)
- 1 container Vanilla Frosting (store-bought or homemade)
- 1 teaspoon Peppermint Extract (adjust quantity to taste; mint extract can be used for a stronger flavor)
- 1 drop Green Food Coloring (optional)
Chocolate Coating
- 1 pound Dark Chocolate Candy Coating (semi-sweet or milk chocolate can be used as alternatives)
Instructions
- Prepare Mint Filling: In a large mixing bowl, gently stir together the vanilla frosting, peppermint extract, and a few drops of green food coloring to create a creamy, minty filling with a light green hue if desired.
- Assemble Sandwiches: Using a knife or spatula, evenly spread the mint frosting mixture over half of the butter-flavored crackers. Then, top each with another cracker to form sandwich cookies.
- Melt Chocolate: Chop the dark chocolate candy coating into small pieces, place in a microwave-safe bowl, and microwave in 20-30 second intervals, stirring frequently until the chocolate is smooth and fully melted.
- Dip Sandwiches: Carefully dip each cookie sandwich into the melted chocolate to fully coat it. Allow excess chocolate to drip back into the bowl.
- Set Cookies: Place the chocolate-coated cookies on a sheet of waxed paper and let them stand at room temperature for 30-60 minutes until the chocolate hardens and sets completely.
- Store: Once the chocolate is set, store the mint sandwich cookies in an airtight container at room temperature for up to one week to maintain freshness.
Notes
- You can substitute gluten-free crackers to make this recipe gluten-free.
- For a stronger mint flavor, use mint extract instead of peppermint extract.
- If you prefer a classic look, omit the green food coloring.
- Store cookies in an airtight container to keep them fresh for up to one week.
- Chocolate can be melted using a double boiler if a microwave is not available.


