
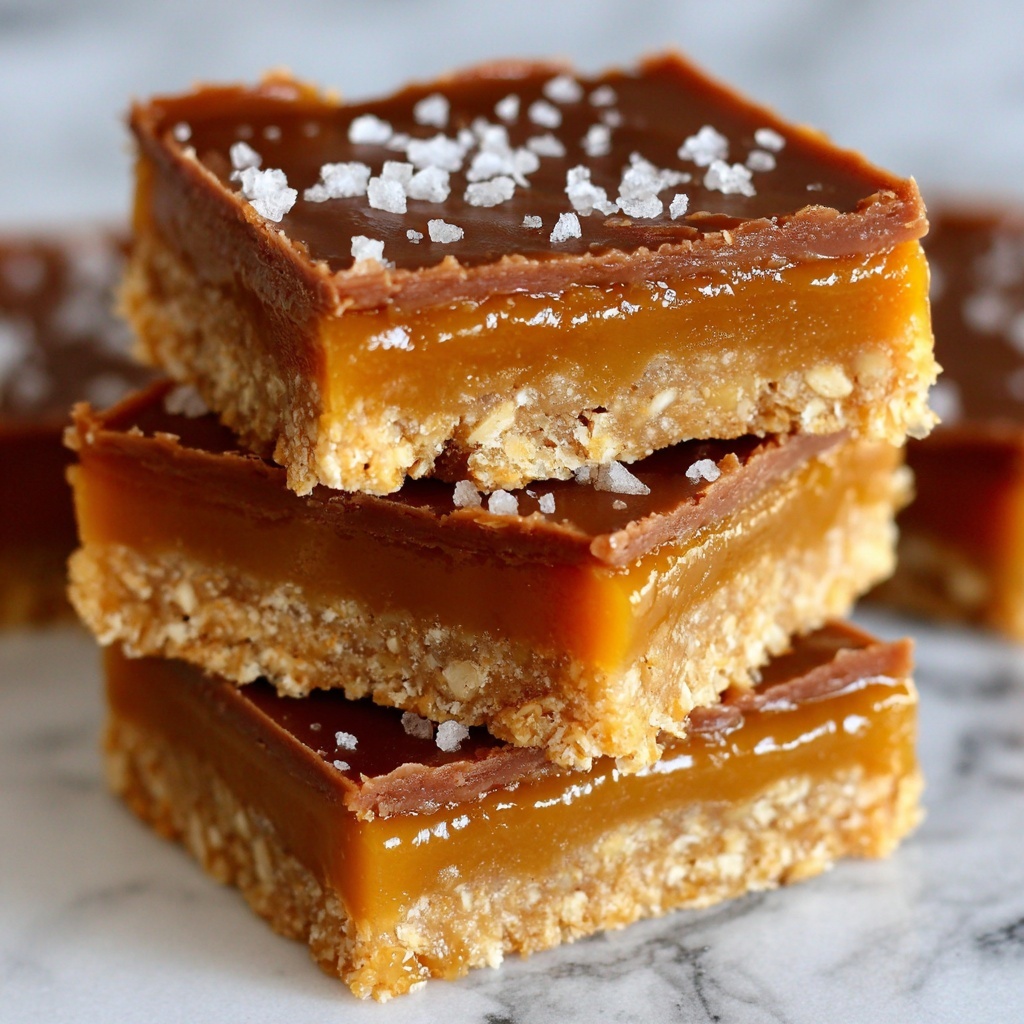
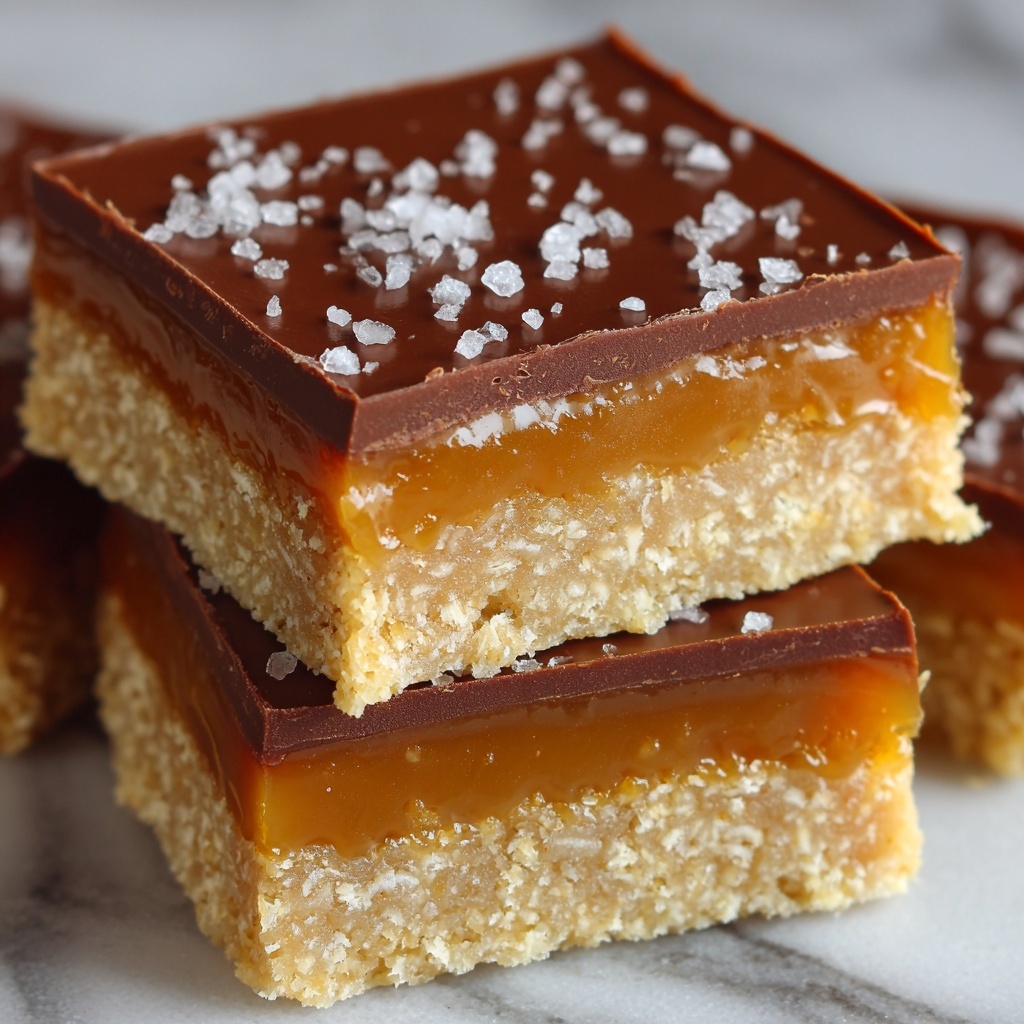
If you are on the hunt for a treat that perfectly balances rich chocolate, creamy peanut butter, and wholesome oats, this Chocolate Peanut Butter Oatmeal Bars Recipe is going to become your new obsession. Each bite showcases the nutty aroma of smooth peanut butter intertwined with the deep indulgence of vegan chocolate, all layered atop a satisfying oat crust that adds just the right chew and heartiness. These bars are not only decadent but also unbelievably simple to make, promising a no-fuss way to satisfy your sweet cravings while feeling a little bit good about it too!
Ingredients You’ll Need
This Chocolate Peanut Butter Oatmeal Bars Recipe is surprisingly easy to whip up with just a handful of kitchen staples. Each ingredient is thoughtfully chosen to bring the perfect harmony of taste, texture, and that luscious melt-in-your-mouth feel.
- Rolled oats: Acts as the hearty, fiber-rich base providing a chewy texture and wholesome flavor.
- Smooth peanut butter: Brings creamy richness and a classic nutty taste that pairs beautifully with chocolate.
- Pure maple syrup: Gives natural sweetness and a subtle depth that enhances the overall flavor.
- Sea salt: Just a pinch to balance sweetness and elevate all the flavors, plus extra for garnish.
- Coconut oil: Adds smoothness and helps bind the filling while keeping it vegan-friendly.
- Vegan chocolate: The star ingredient that tops off the bars with luscious, meltaway chocolate goodness.
How to Make Chocolate Peanut Butter Oatmeal Bars Recipe
Step 1: Prepare the Crust
Start by lining an 8-inch square pan with parchment paper for easy removal. Blitz the rolled oats and sea salt in a food processor until finely ground, then add the peanut butter and maple syrup. Blend this until the mixture sticks together to form a dough—don’t worry if it seems crumbly at first; a touch more maple syrup can help unify it. Press this oat mixture firmly into the base of your pan, smoothing the surface with a spatula or the bottom of a glass. Pop it in the fridge while you prepare the filling so it firms up nicely.
Step 2: Make the Caramel Filling
In a heatproof bowl set over simmering water (a double boiler), combine the bulk of the peanut butter, maple syrup, and solid coconut oil. Stir gently until these ingredients melt and blend into a smooth, glossy caramel layer. Pour this deliciously sticky filling evenly over the chilled crust, then refrigerate for at least 1 to 2 hours or, better yet, overnight to let it set perfectly firm.
Step 3: Add the Chocolate Topping
For the grand finale, melt vegan chocolate together with a smaller portion of peanut butter over your double boiler until silky smooth. Pour this luscious chocolate glaze on top of the set caramel and sprinkle with a little flaky sea salt for that added sparkle of flavor contrast. Chill again in the fridge for about 15 to 20 minutes, just until the chocolate firms up into a glossy crown.
Step 4: Slice and Serve
When it’s finally time to enjoy, heat a sharp knife in hot water and wipe it dry before slicing. This trick ensures clean cuts without crumbly edges because the warm blade gently melts through the layers. Cut into squares or whatever shape feels fun, and get ready for compliments pouring in!
How to Serve Chocolate Peanut Butter Oatmeal Bars Recipe
Garnishes
These bars are stunning on their own, but you can jazz them up with a sprinkle of toasted chopped peanuts, a drizzle of melted peanut butter, or even a light dusting of cocoa powder for a beautiful finishing touch. The flaky sea salt on top really brings out the complex flavors and adds a lovely crunch.
Side Dishes
Pair these bars with a cup of strong coffee or a chilled glass of almond milk for a perfect snack moment. They also complement fresh fruit like sliced bananas or berries, which add a fresh burst that contrasts nicely with the rich, dense bars.
Creative Ways to Present
For a party, wrap individual bars in parchment paper tied with twine for a rustic, homemade gift vibe. Or layer them in a clear jar with whipped coconut cream and fresh raspberries for an elegant dessert in a glass that’s sure to impress without requiring extra baking.
Make Ahead and Storage
Storing Leftovers
Store your Chocolate Peanut Butter Oatmeal Bars in an airtight container in the refrigerator to keep them fresh and firm for up to one week. This makes them an excellent make-ahead treat for busy days when you need a quick energy boost or a guilt-free indulgence.
Freezing
If you want to keep them longer, these bars freeze beautifully. Wrap them tightly in parchment or plastic wrap, then place them in a freezer-safe container. They’ll hold up well for up to three months, so you can enjoy a homemade snack anytime.
Reheating
To enjoy thawed bars at their best, let them warm up at room temperature for 10-15 minutes before eating, or microwave briefly in short bursts if you prefer a softer, gooey texture. The chocolate layer will soften perfectly without melting into a mess.
FAQs
Can I use crunchy peanut butter in this recipe?
Absolutely! Using crunchy peanut butter will add some delightful texture to the bars, giving you extra peanutty crunch in every bite. Just keep in mind it might slightly alter the smoothness of the filling.
Is this recipe gluten-free?
Yes, as long as you use certified gluten-free rolled oats, this recipe is naturally gluten-free. The oats provide a hearty and wholesome base without any wheat or gluten-containing ingredients.
Can I substitute the maple syrup with another sweetener?
You can swap maple syrup for honey or agave syrup if you prefer, but maple syrup gives a unique depth and subtle caramel notes that perfectly complement the peanut butter and chocolate. Adjust amounts depending on sweetness levels.
What kind of chocolate works best?
Vegan dark chocolate is ideal here since it melts well and balances the sweetness with a rich cocoa flavor. You can experiment with milk or semi-sweet chocolates if vegan is not a concern, but make sure the chocolate you choose has good quality for the best taste.
Can I make these bars nut-free?
It’s a bit tricky because peanut butter is key to this recipe’s flavor and texture. However, you could try sunflower seed butter or soy nut butter as alternatives for a nut-free version, though the taste and consistency will differ.
Final Thoughts
This Chocolate Peanut Butter Oatmeal Bars Recipe is truly a gem for any sweet tooth craving a deliciously wholesome treat. The layers of creamy peanut butter, rich chocolate, and hearty oats come together to create a perfect harmony that’s both comforting and indulgent. Don’t hesitate to give these bars a try and share them with your loved ones—you might just see them disappear faster than you expect!
Print
Chocolate Peanut Butter Oatmeal Bars Recipe
- Prep Time: 20 minutes
- Cook Time: 15 minutes (melting over double boiler)
- Total Time: 1 hour 55 minutes (including chilling time)
- Yield: 16 bars
- Category: Dessert
- Method: No-Cook
- Cuisine: American
- Diet: Vegan
Description
These Chocolate Peanut Butter Oatmeal Bars are a delicious, vegan-friendly treat combining a crunchy oat crust with a rich peanut butter caramel filling and a smooth chocolate topping. Naturally sweetened with maple syrup and made without baking, they offer the perfect balance of indulgence and wholesome ingredients for snack time or dessert.
Ingredients
Crust
- 200 g rolled oats (certified gluten-free if needed)
- ½ teaspoon sea salt (plus extra for garnish)
- 200 g smooth peanut butter
- 100 ml pure maple syrup
Filling
- 280 g smooth peanut butter
- 150 ml pure maple syrup
- 55 g coconut oil (solid)
Topping
- 200 g vegan chocolate
- 50 g smooth peanut butter
Instructions
- Prepare the crust: Line an 8-inch square pan with parchment paper, covering the base and sides. Add oats and sea salt to a food processor and blitz until finely ground. Add 200 g peanut butter and 100 ml maple syrup and blend until the mixture forms a sticky dough. If necessary, add a little more maple syrup to bring it together.
- Press the crust: Evenly spread the dough into the pan’s base, smoothing with a spatula or flat-bottomed glass. Place the pan in the fridge to chill while preparing the filling.
- Make the filling: In a heat-resistant bowl, combine 280 g peanut butter, 150 ml maple syrup, and 55 g solid coconut oil. Heat this mixture over a double boiler (bain-marie), stirring continuously until fully melted and smooth, forming a caramel-like consistency.
- Assemble the filling layer: Pour the warm peanut butter caramel evenly over the chilled crust. Return the pan to the fridge and allow it to set for 1–2 hours or until firm. For best results, chilling overnight works well.
- Prepare the topping: Melt 200 g vegan chocolate together with 50 g peanut butter over a double boiler, stirring until smooth and combined.
- Apply the topping: Pour the melted chocolate and peanut butter mixture over the set caramel layer. Sprinkle flaky sea salt on top for added flavor. Place the pan back in the fridge and chill for 15–20 minutes until the chocolate topping is firm.
- Slice the bars: To cut, dip a sharp knife into boiling water to heat it, wipe dry, and gently slice through the bars. The heat helps create clean cuts through the firm layers.
- Storage: Store the bars in an airtight container in the refrigerator for up to one week. They can also be frozen and thawed as needed for longer storage.
Notes
- Use certified gluten-free oats if gluten sensitivity is a concern.
- Double boiler setup: place a heat-resistant bowl over simmering water without letting the bowl touch the water.
- Adjust maple syrup quantity slightly if dough is not sticky enough.
- Flaky sea salt on top enhances the sweet and salty contrast.
- Warm the knife before slicing to avoid cracking and get neat edges.
- Freezing the bars extends shelf life; thaw in the fridge before serving.


