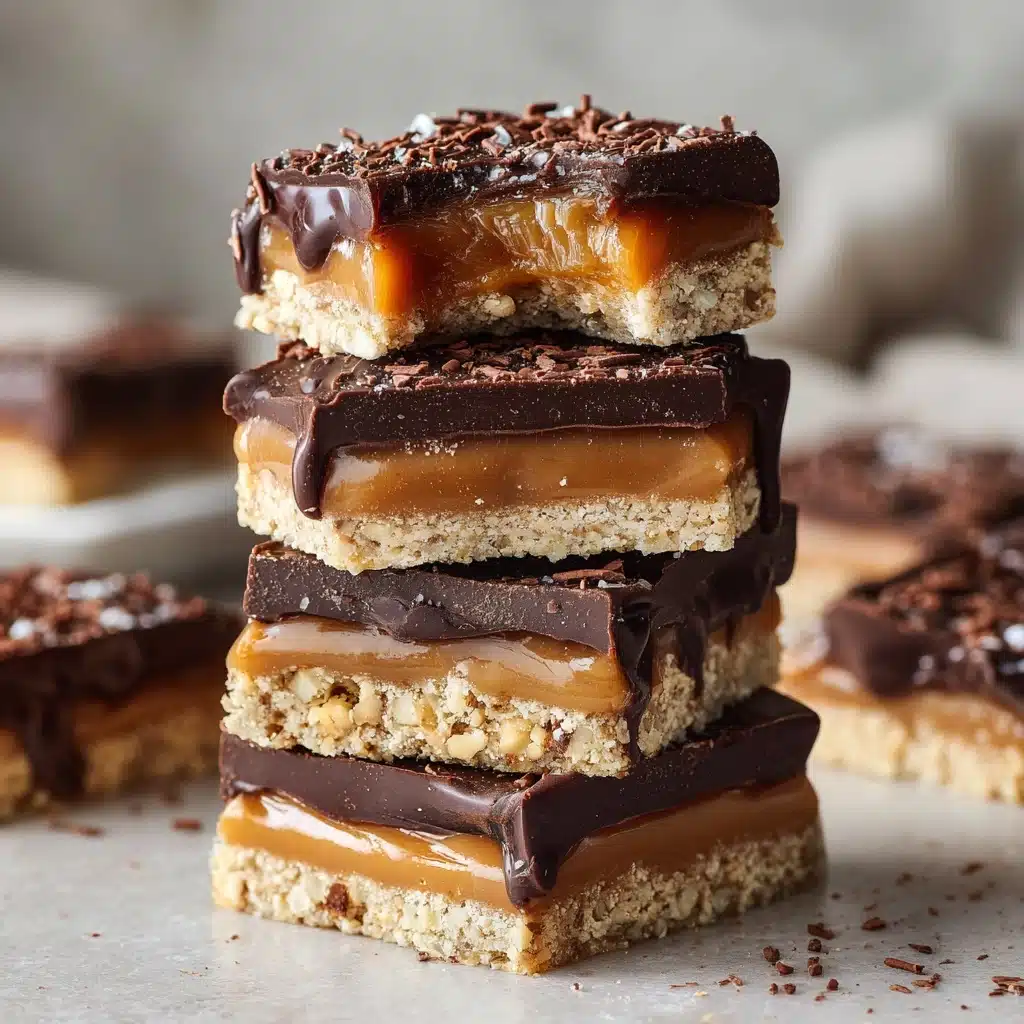
If you’ve ever waited all year for Girl Scout cookie season just to get your hands on those irresistible caramel-coconut-chocolate rings, you’re in for a treat. This recipe for Homemade Samoas (Girl Scout Cookies) lets you recreate the magic in your own kitchen—no uniform required! Imagine buttery shortbread, gooey caramel, toasty coconut, and a luscious chocolate coating, all coming together in the most nostalgic and completely addictive bite. You’ll never have to ration your stash again!

Ingredients You’ll Need
The ingredient list for these Homemade Samoas (Girl Scout Cookies) is refreshingly simple, yet each component plays a key role in nailing that classic flavor and texture. Here’s what you’ll need and why each is essential:
- Unsalted butter (1 cup): The backbone of the shortbread, giving it a rich, melt-in-your-mouth texture.
- Granulated sugar (½ cup): Adds just the right sweetness and helps the cookies bake up beautifully golden.
- All-purpose flour (2 cups): Provides structure and the signature crispness.
- Baking powder (¼ teaspoon): A touch of lift for a tender crumb—don’t skip it.
- Salt (¼ teaspoon in dough, ¼ teaspoon in topping): Balances the sweetness and intensifies all the flavors.
- Milk (2 tablespoons) or heavy cream: Binds the dough together and makes it easy to roll out.
- Vanilla extract (½ teaspoon): Adds warmth and depth you’ll notice in every bite.
- Sweetened shredded coconut (3 cups): Toasted for that nutty, golden flavor that’s key to classic Samoas.
- Soft caramels (12 oz, about 40 pieces): The shortcut to a silky, chewy caramel topping (no candy thermometer needed!).
- Semisweet or dark chocolate (10 oz): The deep, chocolatey finish that makes these cookies so satisfying.
How to Make Homemade Samoas (Girl Scout Cookies)
Step 1: Make the Shortbread Dough
Start by preheating your oven to 350°F (175°C) and lining two baking sheets with parchment paper. In a large mixing bowl, cream together the softened butter and sugar until the mixture is light and fluffy—this gives your cookies that signature tender bite. Next, mix in the flour, baking powder, and salt just until combined. Add the milk and vanilla, then stir until the dough comes together. Don’t overwork it; you want the cookies to stay delicate and crisp.
Step 2: Shape and Bake the Cookies
On a well-floured surface, roll out your dough to about ¼-inch thickness. Using a 2-inch round cutter, cut out as many circles as you can. For that classic Samoas look, use a small bottle cap (or the end of a piping tip) to cut out the centers and make rings. Arrange them on the prepared baking sheets and bake for 10–12 minutes, until the edges just turn golden. Let them cool completely before the fun toppings begin!
Step 3: Toast the Coconut
Spread the shredded coconut evenly on a baking sheet and pop it in the oven for 5–7 minutes, stirring it every couple of minutes. You’re looking for a deep golden color and a toasty aroma—this step is what gives Homemade Samoas (Girl Scout Cookies) that unmistakable crunch and flavor.
Step 4: Prepare the Caramel-Coconut Topping
In a saucepan over low heat (or a microwave-safe bowl), combine the soft caramels, milk (or cream), and salt. Stir gently until the caramel is fully melted and smooth. Immediately fold in the toasted coconut, mixing well so every strand gets coated in that luscious caramel. Work quickly—the mixture will thicken as it cools!
Step 5: Assemble the Cookies
Using a small spoon or offset spatula, spread a generous layer of the coconut-caramel mixture onto each cooled cookie ring. Don’t worry if it gets a little messy; that homemade look is half the charm. Press the topping gently so it adheres well.
Step 6: Add the Chocolate Finish
Melt the chocolate (either in the microwave in bursts or over a double boiler). Dip the bottom of each cookie into the melted chocolate, letting any excess drip off, then place them chocolate-side down on a parchment-lined tray. Use a fork or piping bag to drizzle the remaining chocolate over the tops for that iconic striped look. Let the chocolate set at room temperature or speed things up in the fridge.
How to Serve Homemade Samoas (Girl Scout Cookies)

Garnishes
For an extra touch, sprinkle a little flaky sea salt on the chocolate before it sets, or add a dusting of finely shredded coconut on top. These little flourishes make your Homemade Samoas (Girl Scout Cookies) look bakery-worthy and taste even more decadent.
Side Dishes
Pair your cookies with a tall glass of cold milk, a hot cup of coffee, or even a scoop of vanilla ice cream. The sweet and salty flavors of these cookies are the perfect match for creamy or slightly bitter drinks and desserts.
Creative Ways to Present
Arrange your Homemade Samoas (Girl Scout Cookies) on a vintage cake stand for a nostalgic feel, or package them in cellophane bags tied with ribbon for adorable edible gifts. For parties, stack them in a ring or set up a cookie bar with other homemade favorites.
Make Ahead and Storage
Storing Leftovers
Once your cookies have fully set, store them in an airtight container at room temperature for up to 5 days. If your kitchen runs warm, you can keep them in the fridge to maintain that perfect snap and chew.
Freezing
Homemade Samoas (Girl Scout Cookies) freeze beautifully! Layer them between sheets of parchment or wax paper in a freezer-safe container. They’ll keep for up to 2 months—just thaw at room temperature whenever you need a sweet fix.
Reheating
While these cookies are best enjoyed at room temperature, if you prefer your chocolate a little melty, pop a cookie in the microwave for about 5 seconds. It’ll taste like it just came out of the oven, with gooey caramel and warm chocolate.
FAQs
Can I make Homemade Samoas (Girl Scout Cookies) gluten-free?
Absolutely! Substitute your favorite 1:1 gluten-free flour blend for the all-purpose flour. The texture may be slightly different, but you’ll still get that signature taste and chew.
Can I use store-bought caramel sauce instead of melting caramels?
Store-bought caramel sauce can work in a pinch, but it may be a bit runnier than melted caramels. If you go this route, look for a thick, high-quality sauce, and reduce the added milk or cream slightly.
What can I do if I don’t have a round cutter?
No problem! Use a mason jar lid, drinking glass, or any circular object about 2 inches across. For the centers, a bottle cap or the wide end of a piping tip works great.
Do I need to temper the chocolate?
Tempering isn’t necessary for these cookies—just melt and use! If you want a super glossy finish and a crisp snap, you can temper, but the recipe works wonderfully with simple melted chocolate.
How can I make these dairy-free?
Swap in vegan butter for the shortbread, dairy-free caramels for the topping, and use a plant-based milk or cream. Plenty of dairy-free chocolate options are available, too—everyone can enjoy Homemade Samoas (Girl Scout Cookies)!
Final Thoughts
If you’ve ever dreamed of having Homemade Samoas (Girl Scout Cookies) year-round, this recipe is your golden ticket. They’re surprisingly simple, incredibly satisfying, and always a hit with friends and family. Give them a try—you’ll never look at store-bought cookies the same way again!
Print
Homemade Samoas (Girl Scout Cookies) Recipe
- Total Time: 1 hour 30 minutes
- Yield: 24 cookies 1x
- Diet: Vegetarian
Description
Homemade Samoas, inspired by the popular Girl Scout Cookies, are a delicious combination of buttery shortbread rings topped with toasted coconut and gooey caramel, finished with a rich chocolate coating. These indulgent treats are perfect for anyone craving a classic cookie that balances sweetness and texture beautifully.
Ingredients
For the Shortbread Cookies
- 1 cup (2 sticks) unsalted butter, softened
- ½ cup granulated sugar
- 2 cups all-purpose flour
- ¼ teaspoon baking powder
- ¼ teaspoon salt
- 2 tablespoons milk
- ½ teaspoon vanilla extract
For the Topping
- 3 cups sweetened shredded coconut
- 12 oz soft caramels (about 40)
- 3 tablespoons milk or heavy cream
- ¼ teaspoon salt
For the Chocolate Coating
- 10 oz semisweet or dark chocolate, chopped or chips
Instructions
- Preheat and Prepare: Preheat the oven to 350°F (175°C) and line two baking sheets with parchment paper to prevent sticking and ensure even baking.
- Make the Shortbread Dough: In a large bowl, cream the softened butter and granulated sugar together until light and fluffy. Then, mix in the all-purpose flour, baking powder, and salt until just combined. Add milk and vanilla extract, stirring until the dough forms a smooth consistency.
- Shape the Cookies: Roll out the dough on a floured surface to about ¼-inch thickness. Use a 2-inch round cutter to cut out circles, then use a smaller round cutter or a small bottle cap to cut out the centers, creating rings. Place the cookies on the prepared baking sheets.
- Bake the Cookies: Bake in the preheated oven for 10–12 minutes until the edges are lightly golden. Remove from oven and allow cookies to cool completely on wire racks.
- Toast the Coconut: Spread the shredded coconut evenly on a baking sheet and toast it in the oven for 5–7 minutes, stirring occasionally, until golden brown and fragrant. Be careful not to burn it.
- Melt the Caramel Topping: In a saucepan over low heat or in a microwave-safe bowl, melt the soft caramels with milk and salt, stirring frequently until smooth and creamy. Stir in the toasted coconut until well combined.
- Assemble the Cookies: Spread the coconut-caramel mixture generously over the top of each cooled shortbread ring.
- Melt the Chocolate: Melt the chocolate chips or chopped chocolate in a microwave or double boiler until smooth and glossy.
- Coat the Cookies: Dip the bottom of each cookie into the melted chocolate and place on parchment paper. Drizzle the remaining melted chocolate over the tops of the cookies in a decorative pattern.
- Set the Cookies: Allow the chocolate to set at room temperature or refrigerate until firm before serving or storing.
Notes
- If you don’t have a donut cutter for the centers, a small bottle cap works perfectly to create the ring shape.
- Store the cookies in an airtight container at room temperature for up to 5 days or refrigerate for extended freshness.
- For a richer caramel flavor, use heavy cream instead of milk when melting the caramels.
- To avoid coconut burning, keep a close eye while toasting and stir often.
- Prep Time: 45 minutes
- Cook Time: 12 minutes
- Category: Dessert
- Method: Baking
- Cuisine: American
Nutrition
- Serving Size: 1 cookie
- Calories: 210
- Sugar: 15g
- Sodium: 90mg
- Fat: 12g
- Saturated Fat: 8g
- Unsaturated Fat: 3g
- Trans Fat: 0g
- Carbohydrates: 24g
- Fiber: 1g
- Protein: 2g
- Cholesterol: 20mg


