
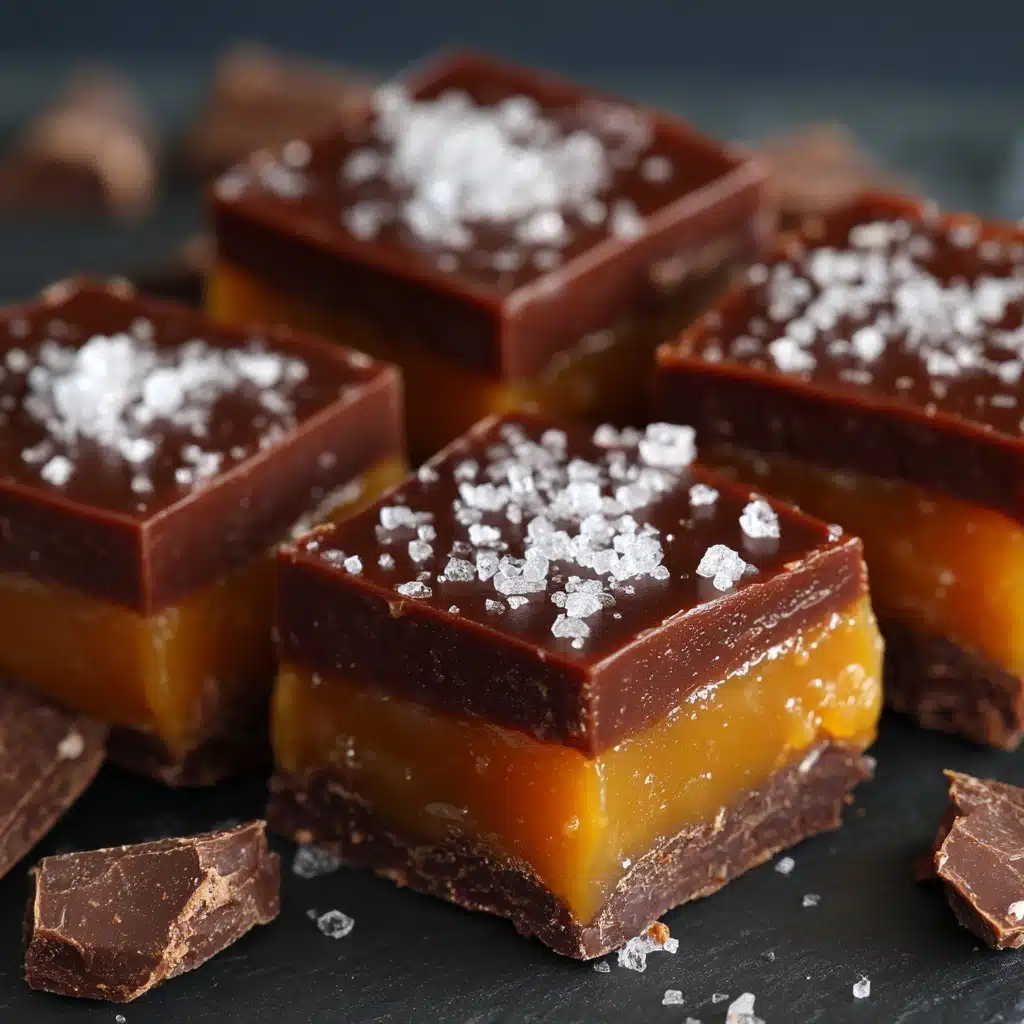
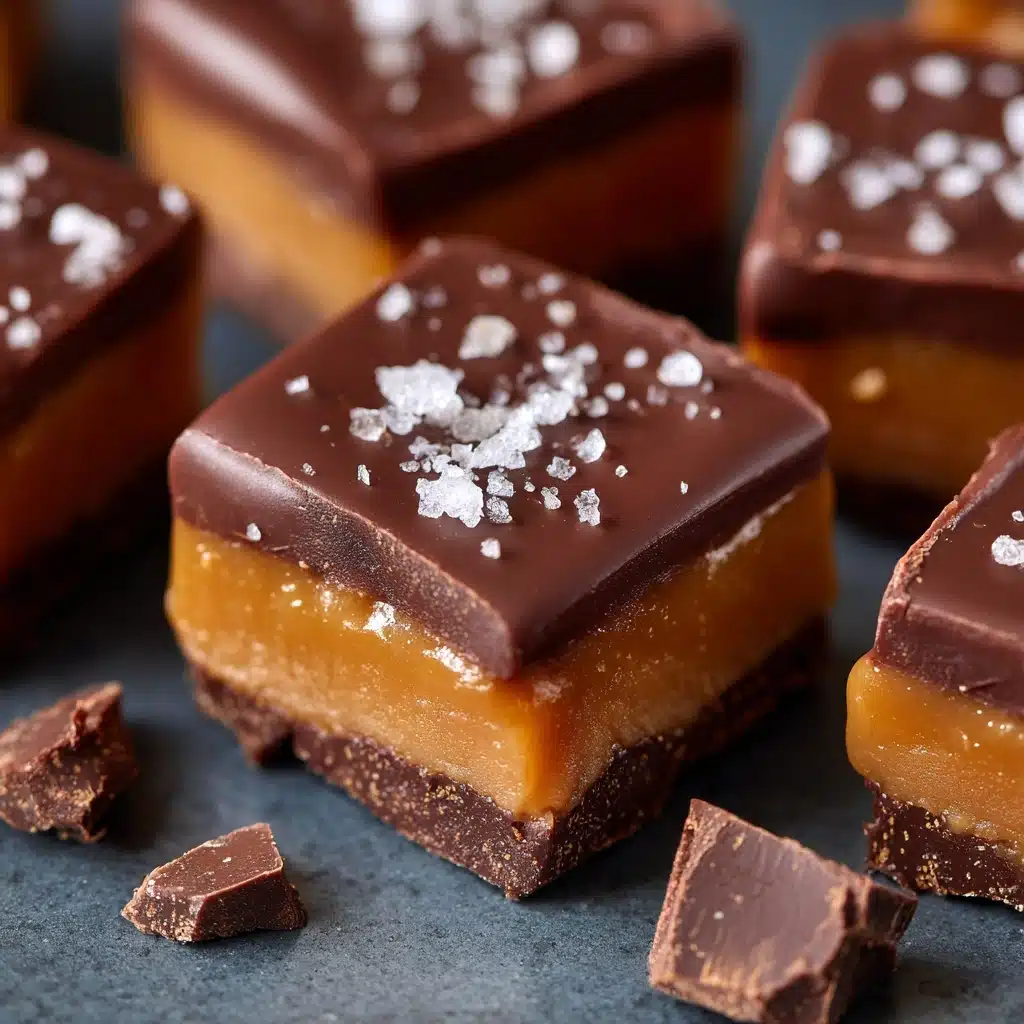
If you’ve ever dreamed of sinking your teeth into a perfectly chewy, chocolatey treat that’s blissfully rich and buttery, then Homemade Chocolate Caramels are about to become your new obsession! This recipe blends the deep, decadent flavor of chocolate with classic, silky caramel, resulting in little bites of pure happiness. Whether you’re hoping to impress at a holiday party, treat yourself on a cozy night in, or create an edible gift that’s sure to wow, these Homemade Chocolate Caramels are truly a labor of love—and absolutely worth every minute.
Ingredients You’ll Need
The beauty of Homemade Chocolate Caramels lies in their simplicity. Each ingredient plays a crucial role in building the luscious texture, glossy sheen, and unforgettable flavor. Gather these pantry staples, and you’re well on your way to confectionery heaven!
- Heavy Cream: Adds richness and ensures that signature melt-in-your-mouth creaminess in every bite.
- Unsalted Butter: Provides a velvety texture and a deep, buttery backdrop for the chocolate and caramel flavors.
- Salt: Just a pinch brings out the best in both the caramel and chocolate, balancing the sweetness beautifully.
- Granulated Sugar: The cornerstone of any caramel, it caramelizes into that golden, toasty sweetness we all crave.
- Light Corn Syrup: Keeps the caramel smooth and prevents unwanted crystallization, giving you that perfect chew.
- Water: Helps dissolve the sugar, ensuring even cooking and a silky texture.
- Semi-Sweet Chocolate Chips: The chocolatey star of the show, they melt seamlessly into the caramel for deep cocoa notes.
- Vanilla Extract: Rounds out the flavors with a warm, aromatic finish that lingers on the palate.
- Flaked Sea Salt (optional): Sprinkled on top, it adds a delightful crunch and a sophisticated salty contrast to the sweetness.
How to Make Homemade Chocolate Caramels
Step 1: Prepare Your Pan
Start by lining an 8×8-inch baking dish with parchment paper, making sure to leave an overhang on the sides. This little trick is a lifesaver when it’s time to lift out your finished caramels—no sticky struggles, just effortless removal and easy cleanup.
Step 2: Heat the Cream Mixture
In a small saucepan over medium heat, combine the heavy cream, butter, and salt. Stir occasionally until the butter melts and the mixture is hot but not boiling. This step infuses the cream with buttery goodness and ensures everything blends smoothly into your caramel later. Once heated, set it aside to keep warm.
Step 3: Cook the Sugar Base
In a large, heavy-bottomed saucepan, add the granulated sugar, light corn syrup, and water. Stir gently to combine, then bring the mixture to a boil over medium heat. Here’s where patience pays off: let it cook undisturbed until it reaches 320°F (160°C) on a candy thermometer and turns a gorgeous deep golden color. This is where the magic of caramelization happens!
Step 4: Add the Cream Mixture
Carefully (it will bubble up!) pour the warm cream mixture into your golden sugar syrup, stirring constantly. The mixture will hiss and rise—don’t worry, this is expected. Keep stirring, and cook until it reaches 245°F (118°C), the firm ball stage. This is the sweet spot for soft, chewy caramels.
Step 5: Finish with Chocolate and Vanilla
Remove the pan from heat and immediately stir in the semi-sweet chocolate chips and vanilla extract. Stir until everything is completely melted and the mixture is smooth, glossy, and irresistible. The chocolate melts right in, creating that signature Homemade Chocolate Caramels flavor.
Step 6: Pour and Cool
Quickly pour the hot caramel into your prepared pan, spreading it evenly. If you like, sprinkle flaked sea salt on top for a fancy finish. Let the caramel cool at room temperature for at least 4 hours, or until firm. This is the hardest part—waiting!
Step 7: Cut and Wrap
Once set, lift the caramel slab out using the parchment overhang and transfer to a cutting board. Slice into small squares, then wrap each piece in wax paper or store in an airtight container. Now you have perfect, gift-worthy Homemade Chocolate Caramels to share—or savor all to yourself.
How to Serve Homemade Chocolate Caramels
Garnishes
A sprinkle of flaked sea salt on top gives every piece a sophisticated crunch and a pop of flavor that instantly elevates your Homemade Chocolate Caramels. You can also experiment with a dusting of cocoa powder or a drizzle of melted chocolate for extra flair.
Side Dishes
While these caramels are delightful on their own, they pair beautifully with a cup of strong coffee, espresso, or even a scoop of vanilla ice cream. If you’re feeling extra fancy, serve them alongside a fruit platter for a sweet-and-savory dessert board.
Creative Ways to Present
Wrap each caramel in wax paper and tuck them into a decorative tin or glass jar for a heartfelt homemade gift. For parties, pile them high on a festive platter, or add them to a holiday cookie tray for a chocolate-caramel surprise. They’re also gorgeous nestled in mini cupcake liners for a boutique candy-shop vibe!
Make Ahead and Storage
Storing Leftovers
Homemade Chocolate Caramels keep beautifully at room temperature in an airtight container for up to two weeks. Layer them with parchment or wax paper to prevent sticking, and they’ll stay just as chewy and delicious as day one.
Freezing
If you want to save some for later (or prep ahead for holiday gifting), these caramels freeze wonderfully. Wrap each piece individually in wax paper, then place them in a zip-top bag or freezer-safe container. They’ll keep for up to three months—ready whenever you need a sweet treat!
Reheating
If your caramels become a bit too firm after storage, let them sit at room temperature for a few minutes to soften up. You can also warm them very gently in the microwave for just 5–10 seconds, but keep a close eye so they don’t melt.
FAQs
Can I use dark chocolate instead of semi-sweet?
Absolutely! Dark chocolate adds a more intense cocoa flavor to your Homemade Chocolate Caramels. Just keep in mind, the caramels will be a touch less sweet and slightly richer—perfect for true chocolate lovers.
Why do I need a candy thermometer?
A candy thermometer is your secret weapon for achieving that perfect chewy texture. Caramel can go from soft to rock-hard in a matter of degrees, so having a thermometer takes the guesswork out and ensures consistent results every time.
What if I don’t have light corn syrup?
If you’re out of light corn syrup, you can substitute golden syrup or even honey, though the flavor and texture may change slightly. The key is to keep the sugar mixture from crystallizing, so a liquid sweetener is essential.
How do I prevent my caramels from sticking together?
The trick is to wrap each piece individually in wax paper or parchment paper. This keeps your Homemade Chocolate Caramels from sticking and makes them easy to grab for a quick treat or to share with friends.
Can I double the recipe?
Yes, you can double the batch! Just use a larger pan and make sure it’s deep enough to avoid spills. Keep an extra-close eye on your candy thermometer, as larger batches may take a little longer to reach the right temperatures.
Final Thoughts
There’s something magical about making Homemade Chocolate Caramels from scratch—watching simple ingredients transform into glossy, chewy squares of joy is an experience worth savoring. Whether you’re sharing them with loved ones or treating yourself, these caramels are sure to become a sweet tradition in your kitchen. Give them a try and discover just how irresistible homemade candy can be!
Print
Homemade Chocolate Caramels Recipe
- Total Time: 4 hours 40 minutes
- Yield: 40 caramels 1x
- Diet: Vegetarian
Description
Delight in these rich and creamy homemade chocolate caramels, featuring a perfect balance of buttery caramel sweetness and smooth semi-sweet chocolate. This easy stovetop recipe results in soft, melt-in-your-mouth treats, ideal for holiday gifting or satisfying your sweet cravings.
Ingredients
Caramel Base
- 1 cup heavy cream
- 1/2 cup unsalted butter, cut into pieces
- 1/4 teaspoon salt
- 1 1/2 cups granulated sugar
- 1/4 cup light corn syrup
- 1/4 cup water
Chocolate and Flavoring
- 1/2 cup semi-sweet chocolate chips
- 1 teaspoon vanilla extract
Topping
- Flaked sea salt (optional)
Instructions
- Prepare the Pan: Line an 8×8-inch baking dish with parchment paper, leaving some overhang on the sides so the caramel can be easily lifted out once set.
- Heat the Cream Mixture: In a small saucepan over medium heat, combine the heavy cream, unsalted butter, and salt. Stir occasionally until the butter has melted and the mixture is hot but not boiling. Remove from heat and set aside.
- Cook the Sugar Mixture: In a large, heavy-bottomed saucepan, combine the granulated sugar, light corn syrup, and water. Stir gently to combine, then bring to a boil over medium heat without stirring. Cook until the mixture reaches 320°F (160°C) on a candy thermometer and turns a deep golden color.
- Add the Cream Mixture: Carefully pour the warm cream and butter mixture into the hot sugar syrup—it will bubble vigorously. Stir constantly to combine.
- Reach Firm Ball Stage: Continue cooking and stirring the combined mixture until it reaches 245°F (118°C), which is the firm ball stage on the candy thermometer. This ensures the caramels will have the perfect soft but firm texture.
- Incorporate Chocolate and Vanilla: Remove the saucepan from heat. Stir in the semi-sweet chocolate chips and vanilla extract until the chocolate is fully melted and the mixture is smooth and glossy.
- Set the Caramels: Immediately pour the caramel into the prepared baking dish and spread it evenly with a spatula. Let cool at room temperature for at least 4 hours or until firm.
- Add Toppings and Cut: If desired, sprinkle the top with flaked sea salt. Once set, lift the caramel slab out using the parchment paper overhang and cut into approximately 40 small squares.
- Store Properly: Wrap each piece in wax paper or store in an airtight container. Caramels keep well at room temperature for up to 2 weeks or can be refrigerated for extended shelf life.
Notes
- Use a candy thermometer for precise temperature control to ensure perfect texture.
- These caramels can be made ahead and make wonderful homemade gifts.
- Store caramels in an airtight container at room temperature for up to 2 weeks or refrigerate for longer freshness.
- If you prefer less salty treats, skip the flaked sea salt topping.
- Prep Time: 10 minutes
- Cook Time: 30 minutes
- Category: Dessert
- Method: Stovetop
- Cuisine: American
Nutrition
- Serving Size: 1 caramel
- Calories: 80
- Sugar: 9 g
- Sodium: 25 mg
- Fat: 5 g
- Saturated Fat: 3 g
- Unsaturated Fat: 2 g
- Trans Fat: 0 g
- Carbohydrates: 10 g
- Fiber: 0.3 g
- Protein: 0.5 g
- Cholesterol: 10 mg


