
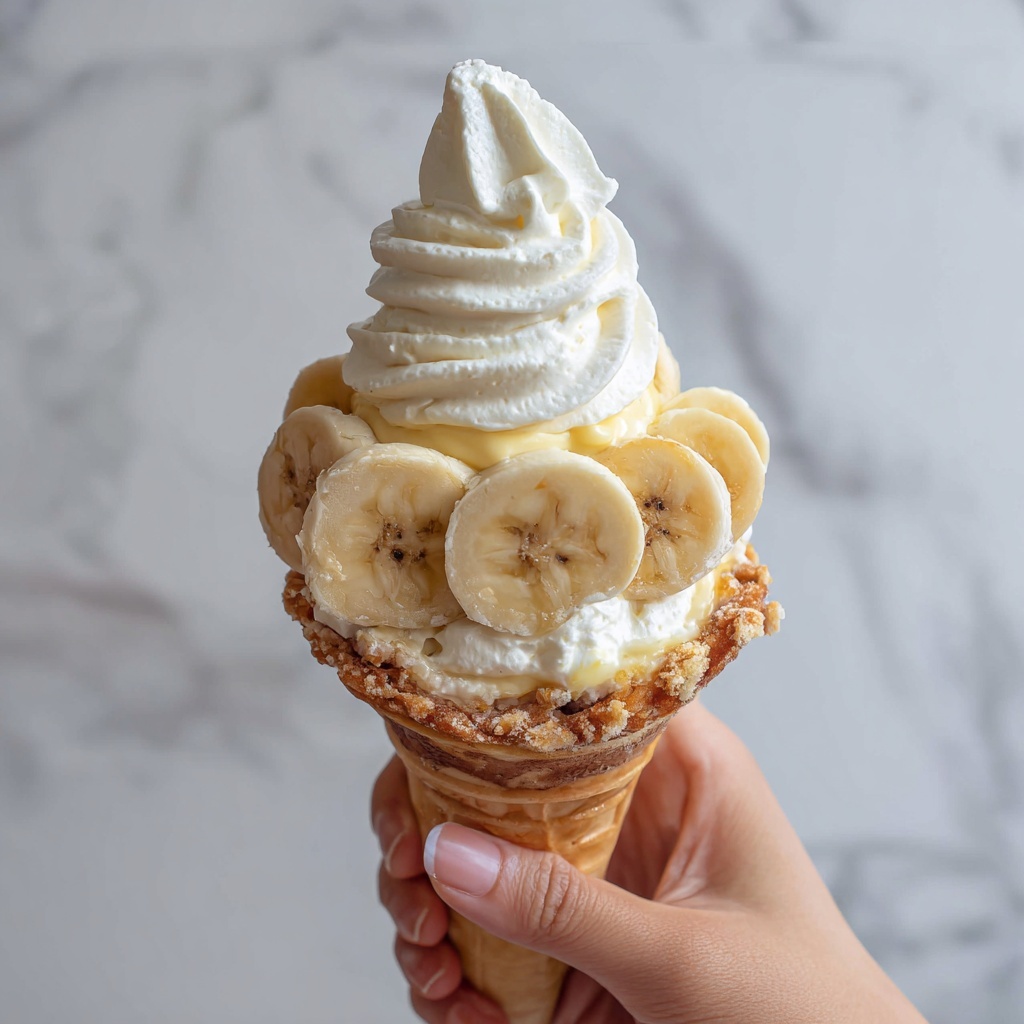
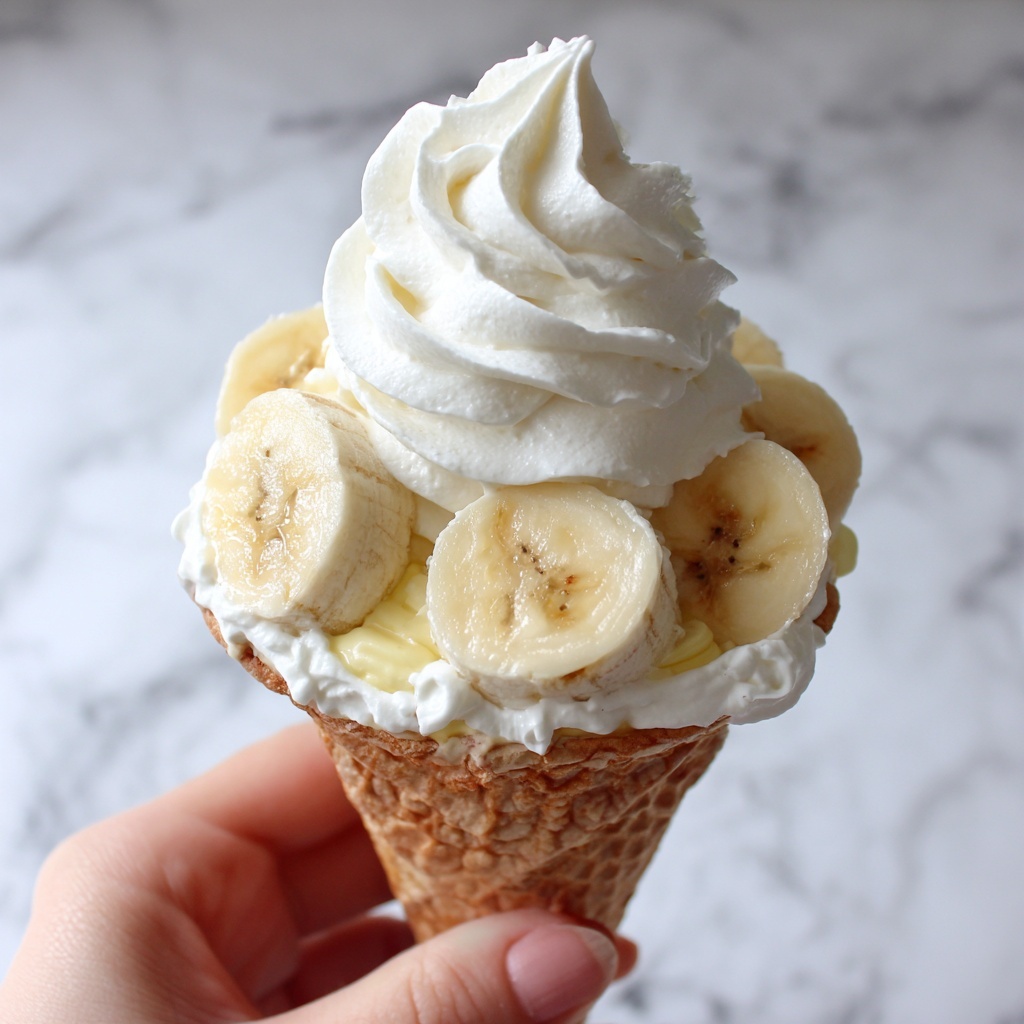
If you’re on the lookout for a dessert that’s as charming as it is delicious, the Banana Pudding Cheesecake Cones Recipe is about to become your new go-to. Imagine the silky creaminess of cheesecake blended with the mellow sweetness of ripe bananas, all nestled inside a crisp graham cracker cone. This delightful combination makes for a treat that feels both nostalgic and fresh at the same time. It’s perfect for impressing guests, brightening up a party, or just treating yourself to a sweet moment that’s honestly hard to beat.
Ingredients You’ll Need
Gathering these basic yet crucial ingredients is the first step to bring this delightful treat to life. Each element plays a unique role—from creating that buttery crust to delivering the creamy, smooth texture and fresh banana flavors that make this dessert irresistible.
- Crushed graham crackers: These form the crunchy base and add a classic, subtly sweet flavor that balances the creaminess.
- Melted butter: Helps bind the graham cracker crust together with a rich, buttery taste.
- Ripe bananas: Provide natural sweetness and a soft, fruity texture essential for the pudding element.
- Cream cheese (softened): The star ingredient that gives the cheesecake its luxuriously smooth and tangy character.
- Powdered sugar: Sweetens the cream cheese filling evenly without any grittiness.
- Whipped cream: Lightens the filling, making it fluffy and delicate.
- Vanilla extract: Adds a warm, aromatic depth to the cheesecake mix.
- Ice cream cones: The fun, edible vessel that holds all the layers together in an easy-to-enjoy format.
How to Make Banana Pudding Cheesecake Cones Recipe
Step 1: Prepare Your Cone Crust
Start by preheating your oven to 350°F (175°C). Mix the crushed graham crackers with the melted butter until the texture resembles wet sand. Press this mixture firmly into the bottom of each ice cream cone mold or directly into the cones if standing upright. Pop them into the oven for about five minutes to set the crust, then let them cool completely. This buttery crust provides the perfect crunchy foundation for your creamy layers.
Step 2: Make the Cheesecake Filling
In a large bowl, beat the softened cream cheese until it’s completely smooth and creamy—no lumps here! Add powdered sugar and vanilla extract, mixing thoroughly to combine all the flavors. Gently fold in the whipped cream, which will lighten the filling and give it that dreamy texture you want in a cheesecake. Take your time folding to preserve all that lovely fluffiness.
Step 3: Assemble the Banana Pudding Cheesecake Cones
Now comes the fun part. Begin with a layer of sliced bananas at the bottom of each cone. Then add a generous scoop of your cheesecake mixture on top, creating beautiful alternating layers. Repeat until the cone is filled, ending with a topping of whipped cream and a few banana slices for a lovely finish. These layered cones not only look stunning but promise an exciting bite every time.
Step 4: Chill and Serve
Place your assembled cones in the refrigerator and chill for at least one hour. This step is essential as it allows the cheesecake filling to firm up and the flavors to meld beautifully. Plus, it makes the cones easier to handle and even more refreshing on the palate!
How to Serve Banana Pudding Cheesecake Cones Recipe
Garnishes
To elevate your Banana Pudding Cheesecake Cones Recipe, add a dusting of cinnamon or nutmeg on top. Sprinkle some extra crushed graham crackers or even finely chopped nuts for a delightful crunch. Fresh mint leaves can offer a pop of green color and a refreshing contrast that brightens the overall flavor.
Side Dishes
These cheeky cones shine best when served with a light side. Think fresh berries or a simple berry compote to complement the creamy bananas and cheesecake. A chilled cup of tea or lightly brewed coffee also pairs beautifully, balancing sweetness with a subtle bitterness.
Creative Ways to Present
Presenting these cones in a whimsical stand or nestled in a berry-filled bowl makes a charming display for parties. Wrap the bottom with decorative napkins or tie little bows around the cones for a festive touch. You could even drizzle some chocolate or caramel sauce over the top for an extra indulgence that guests will adore.
Make Ahead and Storage
Storing Leftovers
Leftover Banana Pudding Cheesecake Cones Recipe can be stored in the refrigerator for up to two days. Keep them covered tightly with plastic wrap or in an airtight container to prevent the bananas from browning and the cones from becoming soggy.
Freezing
While freezing might alter the texture slightly, you can freeze the cones by wrapping each one individually in plastic wrap and placing them in a freezer-safe container. Thaw them in the fridge for a few hours before serving to enjoy a slightly firmer but still delicious dessert.
Reheating
This dessert is best served cold, so reheating is not recommended. Instead, simply allow frozen cones to thaw properly or enjoy them chilled straight from the fridge for optimum texture and flavor.
FAQs
Can I use regular bananas or do they need to be very ripe?
For the best sweetness and texture, it’s ideal to use ripe bananas. They’re soft with a natural sweetness that complements the creamy cheesecake filling perfectly. Regular bananas that are not ripe enough may taste starchy or bland in this dessert.
Are there alternatives to graham crackers for the crust?
Absolutely! Digestive biscuits or vanilla wafers can be great substitutes and offer a similar crunch and sweetness. Just make sure to crush them finely and mix well with melted butter to hold the crust together.
Can I make this recipe dairy-free?
Yes, with some swaps you can make it dairy-free. Use dairy-free cream cheese and whipped topping alternatives along with vegan butter for the crust. The flavor might be slightly different but still delicious!
Is it possible to prepare these cones without an oven?
If you prefer not to bake, you can skip the oven step and simply chill the cones after pressing the crust mixture. The crust may be a bit softer but will still hold together well once chilled and combined with the filling.
How long do these cones stay fresh once assembled?
Once prepared, the Banana Pudding Cheesecake Cones Recipe is best enjoyed within a day or two of assembling, as bananas tend to brown and moisture can affect the cone’s crispness over time.
Final Thoughts
There’s something truly delightful about the way the Banana Pudding Cheesecake Cones Recipe manages to capture the essence of a classic dessert with a playful twist. Whether you’re serving it up for a family gathering or treating yourself on a lazy afternoon, it promises creamy, crunchy, and fruity all at once. Give it a try—once you do, these cones will definitely become one of your favorite easy-to-make indulgences!
Print
Banana Pudding Cheesecake Cones Recipe
- Prep Time: 20 minutes
- Cook Time: 5 minutes
- Total Time: 1 hour 25 minutes
- Yield: 4 servings
- Category: Dessert
- Method: Baking
- Cuisine: American
- Diet: Vegetarian
Description
These Banana Pudding Cheesecake Cones combine creamy cheesecake filling with fresh banana slices and a crispy graham cracker crust, all served in a fun ice cream cone. Perfect for a delightful dessert that’s easy to prepare and sure to impress.
Ingredients
Crust
- 1 cup crushed graham crackers
- 1/4 cup melted butter
Filling
- 8 oz cream cheese, softened
- 1 cup powdered sugar
- 1 cup whipped cream
- 1 tsp vanilla extract
- 2 ripe bananas, sliced
Additional
- 4 ice cream cones
Instructions
- Preheat Oven: Preheat the oven to 350°F (175°C) to prepare for baking the crust in the cones.
- Prepare Crust Mixture: In a bowl, combine the crushed graham crackers with the melted butter until evenly mixed to form the crust base.
- Form Crust in Cones: Press the graham cracker mixture into the bottom of each ice cream cone mold to create a crust layer.
- Bake the Crust: Place the cones upright and bake them in the oven for 5 minutes, then remove and allow to cool completely.
- Make Cheesecake Filling: In a separate bowl, beat the softened cream cheese until smooth and creamy.
- Add Sweetness and Flavor: Mix in the powdered sugar and vanilla extract into the cream cheese, blending well for a sweet and aromatic filling.
- Fold in Whipped Cream: Gently fold the whipped cream into the cream cheese mixture until combined, ensuring a light and fluffy texture.
- Assemble Cones: Alternate layering slices of banana and cheesecake filling inside each cooled cone to maximize flavor and texture contrast.
- Garnish: Top each filled cone with a dollop of whipped cream and additional banana slices for an appealing presentation.
- Chill Before Serving: Refrigerate the assembled cones for at least 1 hour to allow them to set and the flavors to meld beautifully before serving.
Notes
- Ensure the cream cheese is softened to room temperature for smooth mixing without lumps.
- You can substitute whipped cream with whipped topping if preferred.
- The cones should be baked and cooled completely to maintain a crisp texture when filled.
- For added texture, sprinkle some nuts or chocolate chips inside the cones before layering.
- Serve chilled for the best taste and creamy consistency.


