
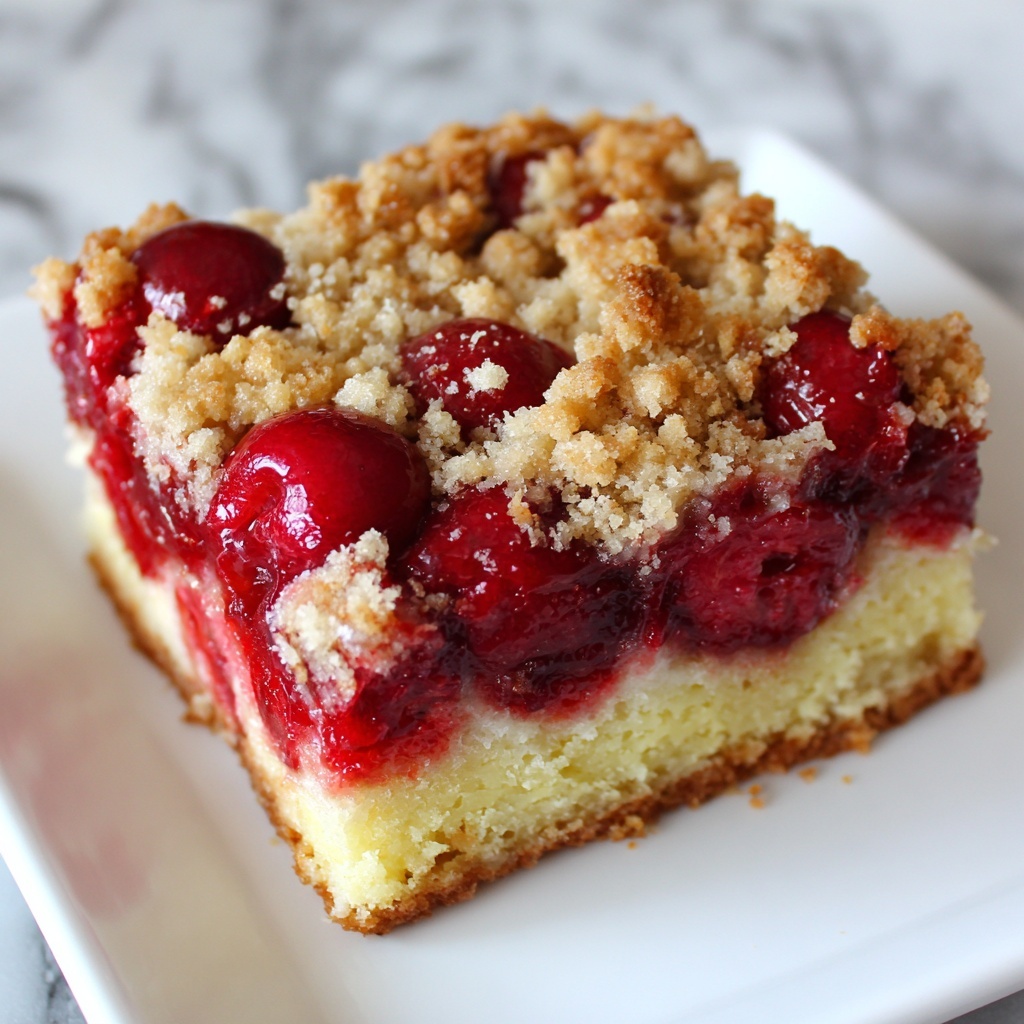
If you’re looking for that perfect dessert to whip up without fuss but still impress everyone at the table, this Cherry Dump Cake Recipe is your new best friend. With its luscious cherry pie filling bubbling away under a golden, buttery cake crust, this dessert is the ultimate comfort food that blends sweet, tart, and crunchy textures in one glorious bite. It’s incredibly simple, yet the flavors sing so beautifully together, making it a go-to for weeknight treats or spontaneous celebrations. Once you try this Cherry Dump Cake Recipe, it’s going to become a beloved staple in your kitchen too!
Ingredients You’ll Need
Gathering the ingredients for this Cherry Dump Cake Recipe is wonderfully straightforward, and each one plays a crucial role in creating its irresistible flavor and texture. From the rich cherry pie filling to the buttery cake topping, these essentials combine to make magic happen without complicated prep.
- 1 can cherry pie filling: This provides the juicy, sweet-tart cherry base that gives the cake its signature flavor and moisture.
- 1 box yellow cake mix: A convenient shortcut that forms the soft, crumbly cake layer on top and around the cherry filling.
- 1/2 cup butter, melted: Drizzled over the cake mix, it helps create a golden, crisp topping with a rich mouthfeel.
- 1/2 cup chopped nuts (optional): Adds a lovely crunch and a toasty flavor contrast that enhances the overall texture of the cake.
How to Make Cherry Dump Cake Recipe
Step 1: Preheat and Prepare Your Pan
Start by preheating your oven to 350°F (175°C) to ensure it’s hot and ready when your batter is assembled. Lightly grease a 9×13 inch baking dish to prevent sticking and help your dump cake slide out perfectly when it’s done.
Step 2: Spread the Cherry Pie Filling
Pour the entire can of cherry pie filling evenly into the bottom of your prepared baking dish. This juicy layer forms the heart of your Cherry Dump Cake Recipe and promises bursts of sweet cherry flavor in every bite.
Step 3: Sprinkle the Cake Mix
Next, sprinkle the dry yellow cake mix evenly over the cherry filling. Don’t worry about stirring — the cake mix will create that beautiful crumbly crust once baked.
Step 4: Drizzle Melted Butter
Pour the melted butter in small streams all over the cake mix layer. This step is crucial because the butter melts during baking to create a crispy, golden crust that adds delightful richness and texture to the cake.
Step 5: Add Nuts (Optional)
For a little extra crunch and nutty aroma, sprinkle chopped nuts over the top. This is optional, but it elevates the cake’s texture and flavor to the next level.
Step 6: Bake Until Golden
Place the baking dish in your preheated oven and bake for 30 to 35 minutes. You’ll know it’s ready when the top is golden brown and the cherry filling is bubbling gently around the edges—pure perfection!
Step 7: Cool Slightly Before Serving
Let your Cherry Dump Cake Recipe cool for a few minutes before serving. This helps the layers set and makes it easier to cut and serve without losing that gorgeous gooey filling.
How to Serve Cherry Dump Cake Recipe

Garnishes
Simple garnishes can take this dessert from great to unforgettable. A scoop of vanilla ice cream melting over a warm slice or a dollop of freshly whipped cream adds that creamy contrast your Cherry Dump Cake Recipe deserves. Fresh cherries or a sprinkle of powdered sugar are lovely finishing touches too.
Side Dishes
This dessert pairs beautifully with light, refreshing sides like a crisp green salad or fruit salad, which can balance out the sweetness of the cherry and cake. A cup of strong coffee or a light dessert wine also complements the flavors pleasantly for adults.
Creative Ways to Present
Want to impress? Serve the Cherry Dump Cake Recipe in individual ramekins or mason jars for a charming presentation. You can also add a drizzle of chocolate or caramel sauce on top, or sprinkle toasted coconut flakes for an exotic twist. The possibilities for showcasing this dessert are endless and fun to explore!
Make Ahead and Storage
Storing Leftovers
Leftover Cherry Dump Cake Recipe keeps wonderfully in the refrigerator for up to 4 days. Cover it tightly with plastic wrap or store in an airtight container to preserve its moistness and flavors.
Freezing
If you want to keep this delightful cake longer, freezing is an excellent option. Wrap portions or the entire cake securely in plastic wrap and aluminum foil, then freeze for up to 3 months. Thaw overnight in the fridge before enjoying.
Reheating
Reheat your leftover Cherry Dump Cake Recipe by warming it in the oven at 350°F for about 10-15 minutes or until heated through. For individual servings, a quick zap in the microwave works too—just be careful not to dry it out.
FAQs
Can I use fresh cherries instead of canned pie filling?
Fresh cherries can be used, but you’ll want to cook them down with sugar and a bit of cornstarch to create a filling similar to canned pie filling. This helps replicate the thick, sweet consistency that works best for the cake.
Is it necessary to use yellow cake mix?
Yellow cake mix is traditional and provides a buttery base that perfectly complements the cherries. However, you can experiment with white or spice cake mixes for interesting flavor variations.
Can I omit the nuts altogether?
Absolutely! The nuts are optional and mainly add texture and flavor contrast. If you have nut allergies or prefer a smoother topping, feel free to skip them without affecting the overall success of the cake.
How do I know when the cake is done?
Your Cherry Dump Cake Recipe is ready when the top is golden brown and you see bubbling around the edges. You can also insert a toothpick; it should come out mostly clean except for a few moist crumbs.
Can I make this dessert vegan or dairy-free?
Yes, by substituting the butter with a plant-based alternative and selecting a vegan-friendly cake mix, you can adapt this recipe for vegan or dairy-free diets while still enjoying delicious results.
Final Thoughts
I cannot recommend the Cherry Dump Cake Recipe enough—this dessert is a celebration of simple ingredients coming together in the most delightful way. It’s fast, fuss-free, and a guaranteed crowd-pleaser that brings a little slice of joy to any occasion. Give it a try soon; I promise you’ll be reaching for it again and again!
Print
Cherry Dump Cake Recipe
- Prep Time: 10 minutes
- Cook Time: 35 minutes
- Total Time: 45 minutes
- Yield: 12 servings
- Category: Dessert
- Method: Baking
- Cuisine: American
Description
Cherry Dump Cake is an effortless, crowd-pleasing dessert featuring a luscious cherry pie filling base topped with dry yellow cake mix and drizzled with melted butter, optionally finished with crunchy nuts. Baked until golden and bubbly, this sweet treat combines the comforting flavors of cherry pie and yellow cake in one easy-to-make dish perfect for any occasion.
Ingredients
Ingredients
- 1 can (21 oz) cherry pie filling
- 1 box (15.25 oz) yellow cake mix
- 1/2 cup (1 stick) unsalted butter, melted
- 1/2 cup chopped nuts (optional, such as pecans or walnuts)
Instructions
- Preheat the oven: Set your oven to 350°F (175°C) to ensure it reaches the proper temperature before baking.
- Prepare the base layer: Grease a 9×13 inch baking dish and spread the entire can of cherry pie filling evenly across the bottom.
- Add the dry cake mix: Sprinkle the entire box of dry yellow cake mix evenly over the cherry filling layer, covering it completely.
- Drizzle with butter: Pour the melted butter uniformly over the dry cake mix, allowing it to moisten the top layer well.
- Add nuts if desired: If using, sprinkle the chopped nuts evenly on top for added texture and flavor.
- Bake the cake: Place the dish into the preheated oven and bake for 30 to 35 minutes, or until the top is golden brown and the filling is bubbly.
- Cool and serve: Remove from the oven and allow the dump cake to cool slightly before serving warm.
Notes
- Using unsalted butter allows control over the salt content; you can substitute with salted butter if preferred.
- Chopped nuts add crunch but are optional for those with allergies or preferences.
- The dessert is best served warm, optionally topped with vanilla ice cream or whipped cream.
- Leftovers can be refrigerated for up to 3 days and reheated before serving.


