
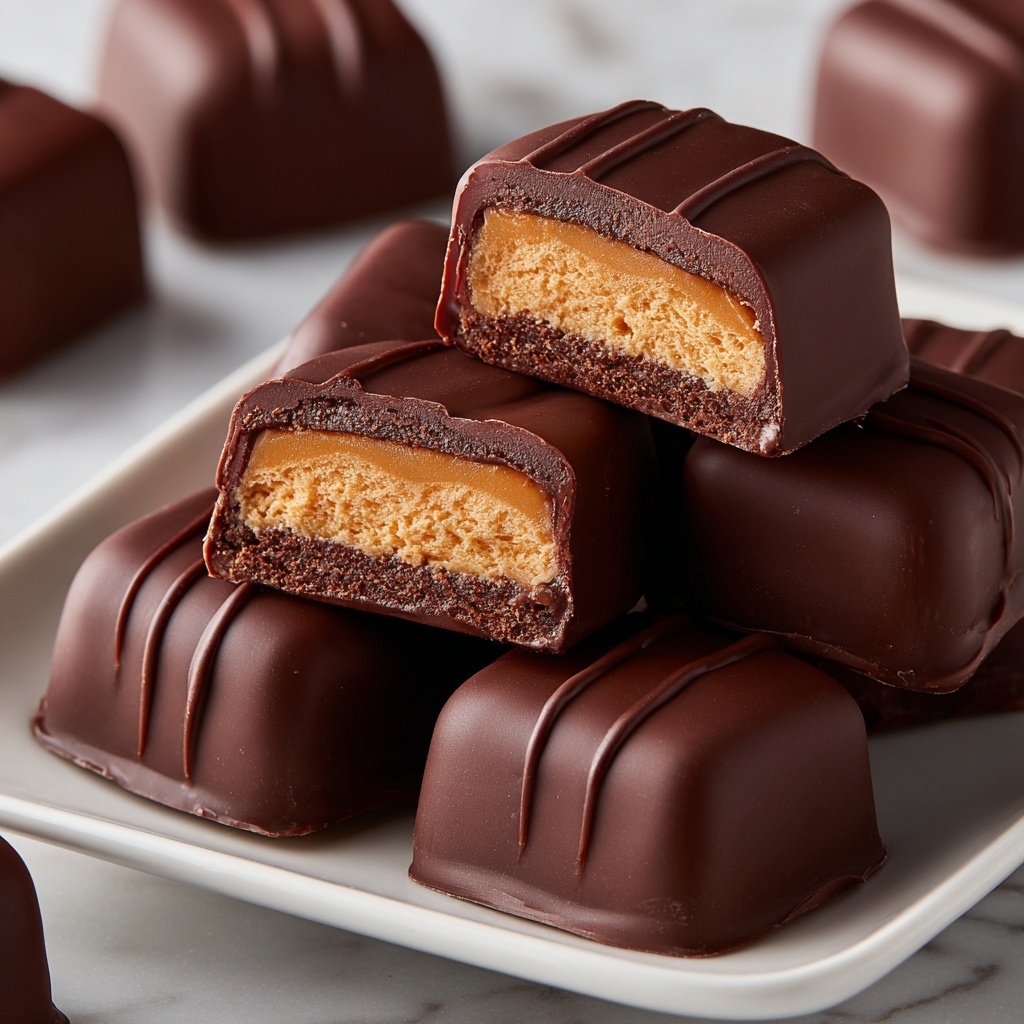
If you have a soft spot for the perfect combination of creamy peanut butter and rich chocolate, you are going to fall head over heels for this Chocolate Peanut Butter Candies Recipe. These little delights are irresistibly smooth and packed with luscious flavors, making them the ideal sweet treat for any occasion. Whether you want to impress guests, satisfy your own sweet tooth, or simply enjoy a nostalgic snack, this recipe brings an easy-to-make, melt-in-your-mouth experience that’s utterly addictive. Get ready to discover how simple ingredients come together to create something truly magical.
Ingredients You’ll Need
Gathering the right ingredients is the first step to creating these irresistible candies. Each component plays a crucial role, from the creamy texture brought by peanut butter to the glossy finish of the chocolate coating. With just a handful of pantry essentials, you’ll soon have a batch of homemade goodies that taste like they belong in a fancy chocolatier’s shop.
- 1 cup creamy peanut butter: Provides the rich, nutty base that melts in your mouth.
- 1/4 cup unsalted butter, softened: Adds smoothness and a slight creaminess to the filling.
- 1 1/2 cups powdered sugar: Sweetens and helps the candies hold their shape perfectly.
- 1 teaspoon vanilla extract: Lifts the flavor with a warm, aromatic touch.
- 2 cups semi-sweet chocolate chips: Creates the luscious, glossy coat; dark chocolate can be used for a more intense flavor.
- 1 tablespoon coconut oil or shortening (optional): Helps the chocolate melt smoothly and sets with a beautiful shine.
How to Make Chocolate Peanut Butter Candies Recipe
Step 1: Prepare the Peanut Butter Mixture
Start by combining the creamy peanut butter, softened unsalted butter, powdered sugar, and vanilla extract in a medium mixing bowl. Stir them together until the mixture is absolutely smooth and well blended. This creamy base is what makes your candies so delightfully soft yet firm enough to hold their shape.
Step 2: Shape the Peanut Butter Balls
Once your mixture is ready, roll it into small, bite-sized balls, about the size of a walnut. Place these on a parchment-lined baking sheet to keep everything neat and mess-free. Pop the tray into the freezer for 15 to 20 minutes—this chilling step is essential because it firms up the balls, so they hold their shape when dipped into chocolate.
Step 3: Melt the Chocolate Coating
While the peanut butter balls chill, melt your chocolate chips with the optional coconut oil in a microwave-safe bowl. Heat the mixture in 20-second intervals, stirring well after each burst, until the chocolate is perfectly smooth and glossy. This gentle melting process ensures your candies get that professional-looking coating everyone loves.
Step 4: Dip and Coat the Candies
Using a fork or dipping tool, gently submerge each peanut butter ball into the melted chocolate, making sure it’s fully covered. Lift it out and tap off any excess chocolate so your candies don’t get too heavy or messy. Return them carefully to your parchment-lined baking sheet. This is the step where your treats start to look like the chocolate peanut butter candies dreams are made of!
Step 5: Set the Chocolate to Finish
Pop the coated candies into the refrigerator and let them chill for another 15 to 20 minutes. This final cooling sets the chocolate shell into a crisp, beautiful coating that contrasts perfectly with the soft peanut butter center. Once firm, they’re ready to be enjoyed or gifted with love.
How to Serve Chocolate Peanut Butter Candies Recipe

Garnishes
If you want to add a little extra pizzazz, sprinkles of crushed peanuts, a light dusting of sea salt, or a drizzle of white chocolate right after dipping give these candies an elevated look and boost of flavor. These simple garnishes make your candies feel even more special when serving to friends or family.
Side Dishes
Chocolate Peanut Butter Candies pair beautifully with a hot cup of coffee or a creamy latte, giving you a lovely balance between bitter and sweet. They also complement vanilla ice cream or a fresh fruit platter, offering a delightful contrast to the fresh, juicy flavors.
Creative Ways to Present
For gifting, arrange your candies in decorative mini cupcakes or colorful paper liners inside a charming box lined with parchment. You can also stack them in a clear jar tied with a bright ribbon for a cute and thoughtful homemade present that everyone will appreciate.
Make Ahead and Storage
Storing Leftovers
Leftover candies can be stored in an airtight container in the refrigerator for up to two weeks. Keeping them chilled maintains their delightful texture—the chocolate stays crisp and the peanut butter center stays creamy yet firm.
Freezing
If you want to keep these candies fresh for longer, freezing is a great option. Place them in a single layer on a baking sheet to freeze initially, then transfer to a freezer-safe container or bag. They will keep well for up to three months and thaw quickly at room temperature.
Reheating
These candies are best enjoyed cold or at room temperature, but if you prefer a softer chocolate exterior, warming them gently for just a few seconds in the microwave will do the trick. Be careful not to melt them completely!
FAQs
Can I use crunchy peanut butter instead of creamy?
Absolutely! Using crunchy peanut butter will add a delightful texture inside the candies, giving each bite a little extra crunch and peanut flavor. Just be sure to mix the filling well to combine the bits evenly.
What if I don’t have coconut oil or shortening for the chocolate coating?
You can skip the coconut oil or shortening if you don’t have it—just melt the chocolate chips on their own. The chocolate may be a bit thicker and less shiny, but your candies will still taste fantastic!
How long do these candies last at room temperature?
Because of the peanut butter and butter in the filling, it’s best to store these candies in the refrigerator rather than at room temperature. Leaving them out for more than a couple of hours might make them too soft or risk spoilage.
Can I use white chocolate instead of semi-sweet chocolate chips?
Yes, white chocolate makes a delicious alternative if you prefer a sweeter, creamier coating. Just keep in mind it is softer than dark chocolate and might need a bit more chilling time to set firmly.
Is it possible to make these candies vegan or dairy-free?
For a vegan or dairy-free version, choose plant-based peanut butter and vegan chocolate chips. Substitute the butter with coconut oil or a dairy-free margarine, and make sure the powdered sugar is free from bone char processing.
Final Thoughts
There’s something undeniably joyful about making your own Chocolate Peanut Butter Candies Recipe from scratch. It’s a simple, satisfying project that rewards you with mouthwatering treats great for sharing or indulging all by yourself. Give it a try and watch these little gems disappear fast—they just might become one of your all-time favorite snacks!
Print
Chocolate Peanut Butter Candies Recipe
- Prep Time: 15 minutes
- Cook Time: 10 minutes
- Total Time: 40 minutes
- Yield: 24 servings
- Category: Dessert
- Method: No-Cook
- Cuisine: American
Description
Delicious homemade Chocolate Peanut Butter Candies combining creamy peanut butter and rich chocolate for a sweet, bite-sized treat. These no-bake candies are perfect for satisfying your sweet tooth with a smooth peanut butter center coated in melted semi-sweet chocolate.
Ingredients
Peanut Butter Mixture
- 1 cup creamy peanut butter
- 1/4 cup unsalted butter, softened
- 1 1/2 cups powdered sugar
- 1 teaspoon vanilla extract
Chocolate Coating
- 2 cups semi-sweet chocolate chips (or dark chocolate for a richer flavor)
- 1 tablespoon coconut oil or shortening (optional, for smoother chocolate coating)
Instructions
- Prepare the Peanut Butter Mixture: In a medium mixing bowl, combine the creamy peanut butter, softened unsalted butter, powdered sugar, and vanilla extract. Stir thoroughly until the mixture becomes smooth and well-combined.
- Form the Candy Balls: Roll the peanut butter mixture into small, bite-sized balls using your hands or a small scoop. Place the formed balls evenly spaced on a parchment-lined baking sheet. Freeze the balls for 15-20 minutes or until they become firm to the touch.
- Melt the Chocolate: While the peanut butter balls chill, combine the chocolate chips and coconut oil in a microwave-safe bowl. Heat the mixture in 20-second intervals, stirring well between each, until the chocolate is fully melted and smooth.
- Dip the Candy Balls: Using a fork, dip each chilled peanut butter ball into the melted chocolate, ensuring it is fully coated. Gently tap the fork to remove any excess chocolate and place the coated candies back on the parchment-lined baking sheet.
- Set the Chocolate Coating: Once all candies are coated in chocolate, refrigerate them for 15-20 minutes to allow the chocolate to harden and set properly before serving.
Notes
- For a richer chocolate flavor, substitute semi-sweet chocolate chips with dark chocolate.
- Coconut oil or shortening is optional but helps create a smoother and shinier chocolate coating.
- Store the candies in an airtight container in the refrigerator to keep them fresh and firm.
- These candies are great for gifting or as a quick homemade dessert treat.
- Allow candies to come to room temperature briefly before eating for best texture and flavor.
