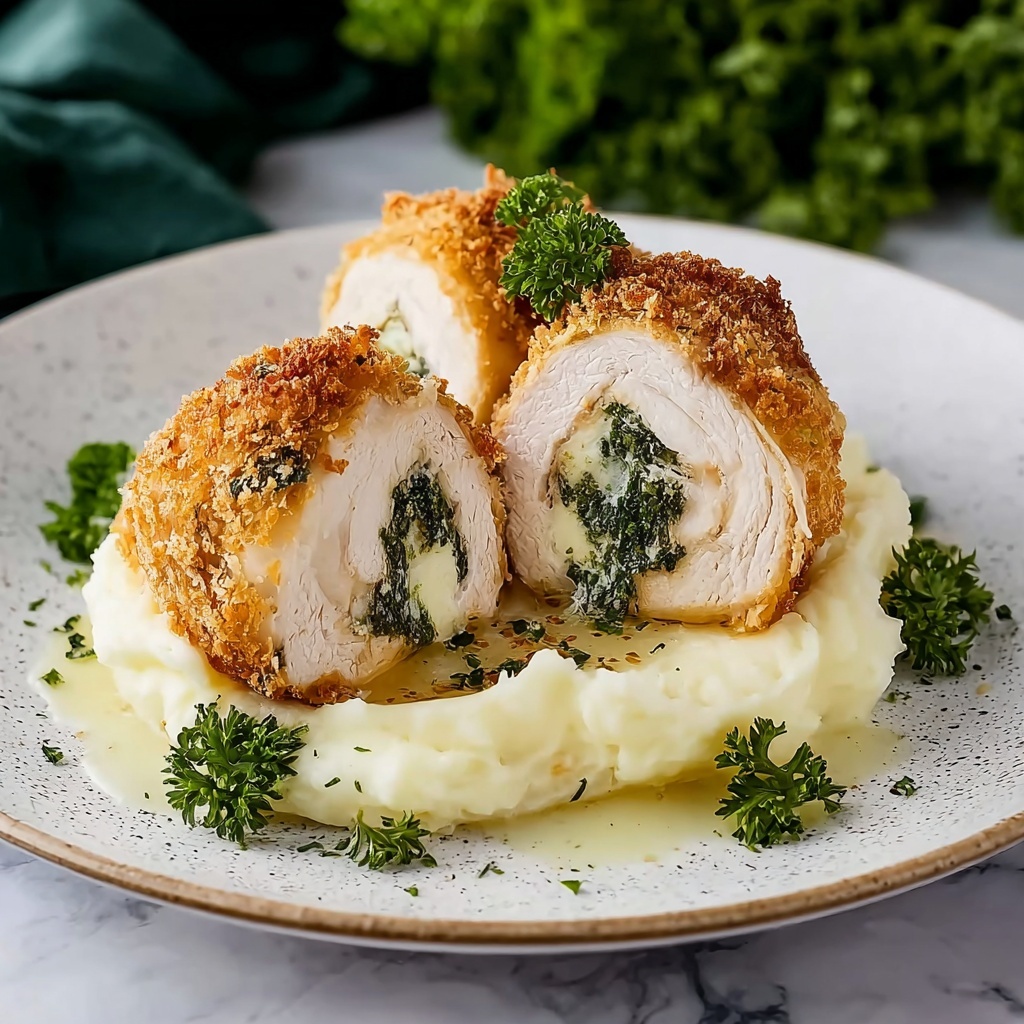
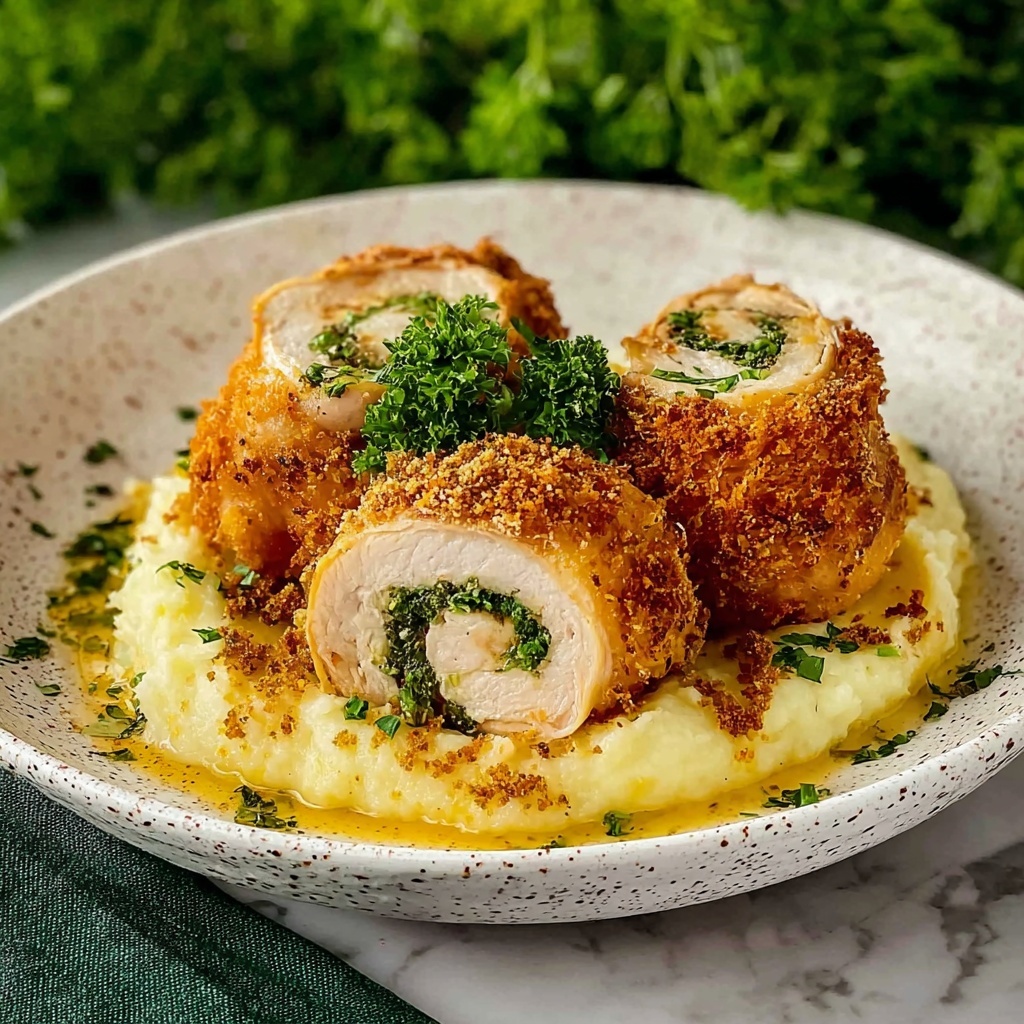
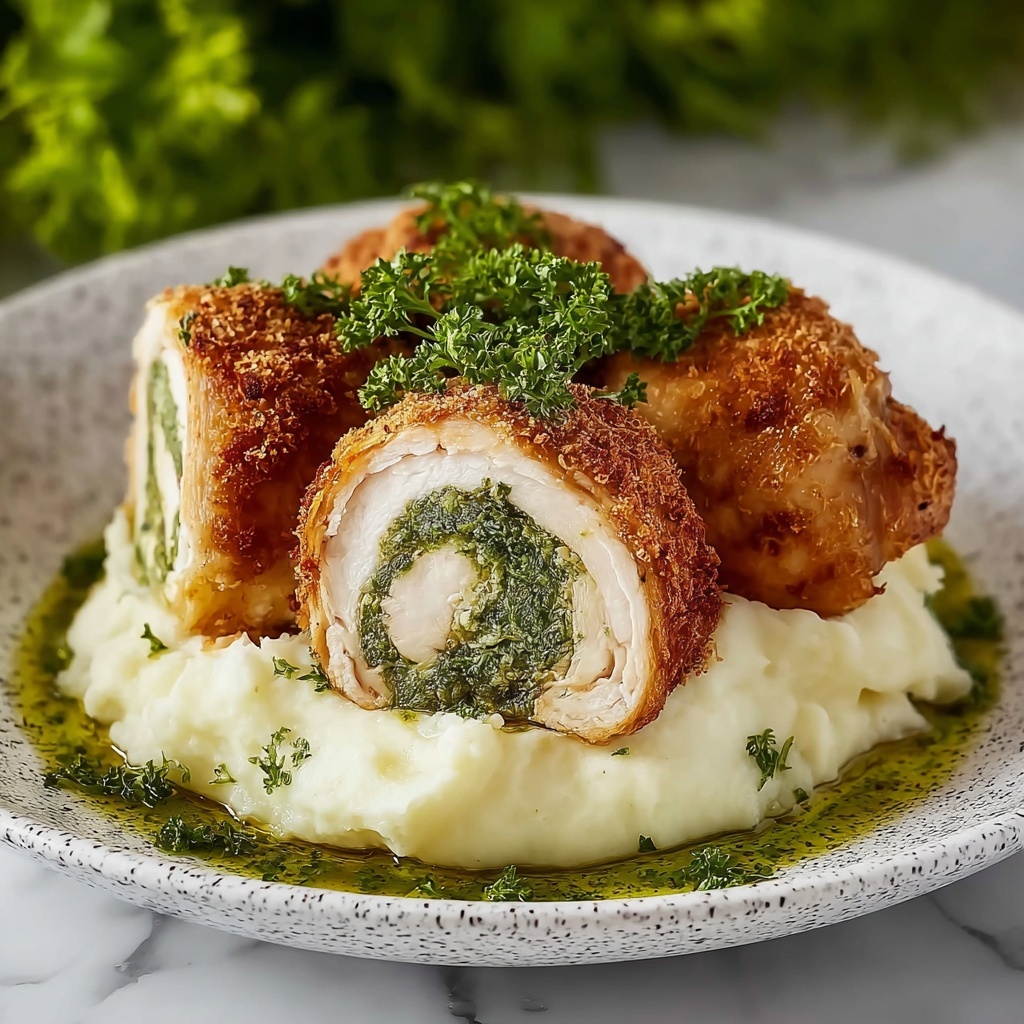
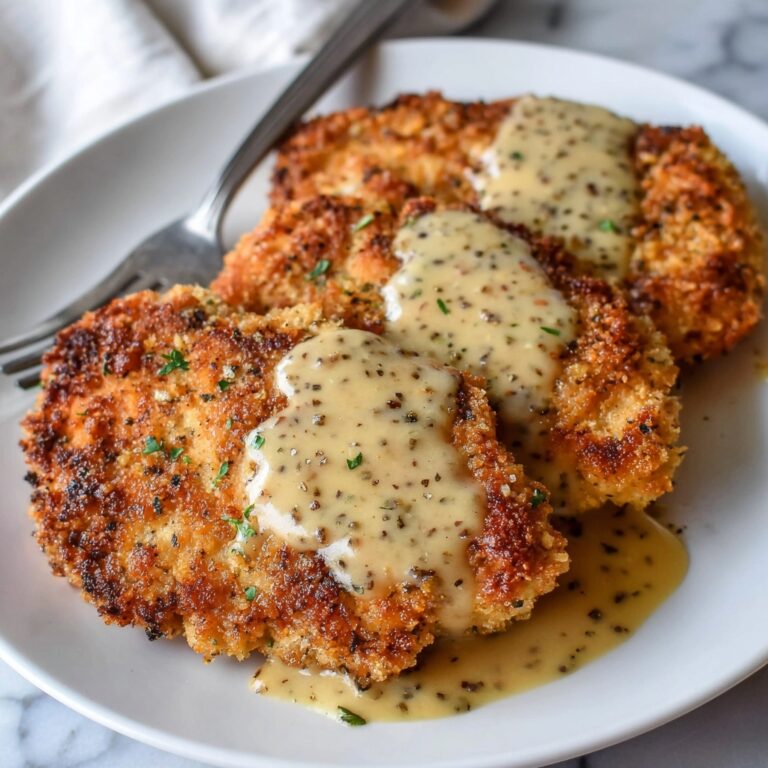
If you’ve been dreaming of a comfort dish that’s both elegant and bursting with flavor, you’re in for a treat with this Delicious Homemade Chicken Kiev Recipe. Picture tender chicken breasts wrapped around a decadent, garlicky herb butter that bursts in your mouth with every bite, all coated in a perfectly crispy golden crust. This recipe brings a classic favorite right into your kitchen, allowing you to impress family or friends with restaurant-quality food that feels like a warm hug. Trust me, once you try this Delicious Homemade Chicken Kiev Recipe, it will become a beloved staple in your recipe collection.
Ingredients You’ll Need
The secret to a truly amazing Chicken Kiev lies in its thoughtful yet simple ingredients. Each has a crucial role — from creating the luscious, flavorful butter center, to crafting the crispy, golden exterior that everyone loves. Here’s everything you’ll need to assemble this classic masterpiece that tastes as good as it looks.
- 4 boneless skinless chicken breasts (6-8 oz each): Choose breasts that are evenly sized for even cooking and tender results.
- Salt to taste: Essential to bring out the natural flavor of the chicken.
- Black pepper to taste: Adds just the right gentle kick.
- 8 tbsp unsalted butter, softened: The heart of the dish, blending herbs and garlic to make the unforgettable filling.
- 3 cloves garlic, pressed: Packed with aromatic punch to elevate the herb butter.
- 3 tbsp fresh minced parsley: Adds vibrancy and a fresh, green brightness.
- 2 tbsp minced chives: Gives a subtle onion-like flavor that pairs perfectly with the butter.
- 2 tbsp fresh minced dill weed: Provides a uniquely fragrant herbal note.
- Zest of 1 lemon: Lifts the butter with a fresh citrus spark.
- 4 eggs, whisked: Helps the breadcrumbs stick to create that irresistible crunchy texture.
- 3 cups Panko bread crumbs: For a light, airy, and ultra-crispy crust.
- 1 cup all-purpose flour: Creates the first layer for crispiness and helps the coating adhere.
- 1.5 tsp garlic powder: Adds depth and umami to the breading.
- 1 tbsp dried parsley: Enhances the herb profile on the outside.
- 0.5 tbsp dried dill weed (optional): Boosts the aromatic herb flavor in the coating.
- 2-3 cups canola oil: For frying to that gorgeous golden finish.
How to Make Delicious Homemade Chicken Kiev Recipe
Step 1: Soften and Prepare the Herb Butter
Start by letting your unsalted butter sit out until it’s soft and easy to mix. Combine it with fresh minced parsley, chives, dill, pressed garlic, lemon zest, salt, and pepper in a bowl until everything is beautifully blended and fragrant. Then, shape this herb butter into a log using plastic wrap, tightly wrapping it and placing it in the freezer for about 15 minutes so it firms up perfectly for stuffing.
Step 2: Butterfly and Pound the Chicken
Carefully slice each chicken breast horizontally almost all the way through, opening it like a book. Place the chicken inside a zip-lock bag to avoid mess, then gently pound it with a meat tenderizer until it’s about 1/4 to 1/8 inch thick. This not only helps the chicken cook evenly but also creates the perfect canvas for your filling.
Step 3: Season the Chicken
Sprinkle salt and black pepper generously on each side of the flattened chicken breasts. This simple seasoning step is crucial because it enhances the chicken’s natural flavors, complementing the rich butter inside wonderfully.
Step 4: Slice and Fill with Herb Butter
Take the chilled herb butter from the freezer and cut it into 8 equal pieces. Place two pieces on one edge of each chicken breast, then roll the chicken tightly while tucking in the sides to seal all that buttery goodness inside. Wrap each roll snugly in plastic wrap and refrigerate for at least 2 hours or overnight to let all those flavors really marry.
Step 5: Prepare for Breading and Frying
Preheat your oven to 350°F while simultaneously heating canola oil in a skillet to 350°F for frying. Set up three stations for breading: whisk eggs with salt and pepper in one bowl, mix the flour with garlic powder and seasoning in a second, and in a third, combine Panko crumbs with dried parsley and optional dried dill for extra aroma.
Step 6: Bread the Chicken Rolls
Unwrap your chicken rolls and dredge each one first in flour, shaking off excess, then dip into the egg wash, and finally coat thoroughly in the breadcrumb mixture. Repeat for all rolls, ensuring each is evenly coated to get that perfect crunch once fried.
Step 7: Fry and Bake to Perfection
Carefully lower the breaded chicken rolls into the hot oil and fry for 3-4 minutes on each side until you see a gorgeous golden crust forming. Then transfer them to a wire rack on a baking sheet and finish cooking in the oven for 20-24 minutes. This baking step not only cooks the chicken through but lets the flavors deepen and intensify.
How to Serve Delicious Homemade Chicken Kiev Recipe
Garnishes
A sprinkle of fresh chopped parsley or a few lemon wedges on the side really brighten the plate and enhance the flavors of the chicken Kiev. A little extra herb sprinkle can add a fresh pop of color and a subtle flavor boost that guests will appreciate.
Side Dishes
Classic accompaniments like buttery mashed potatoes, steamed green beans, or a light garden salad work beautifully to complement the richness of the chicken. For something more vibrant, try roasted asparagus or a tangy cucumber salad to balance the meal perfectly.
Creative Ways to Present
For a dinner party, slice the chicken Kiev crosswise to reveal that oozy herb butter center and place it on a drizzle of garlic-infused oil or a delicate lemon butter sauce. Stack the rolls or serve them whole for a rustic feel. Pair with a glass of chilled white wine to elevate the dining experience even further.
Make Ahead and Storage
Storing Leftovers
If you happen to have leftovers (which might be tough!), keep them wrapped tightly in the refrigerator for up to 2 days. This will preserve the moisture and flavors without drying out the chicken.
Freezing
Chicken Kiev is absolutely freezer-friendly. After assembling and breading but before frying, you can freeze each roll in a single layer on a baking sheet. Once frozen solid, transfer them to an airtight container or freezer bag for up to 3 months. When ready, cook directly from frozen by adding a few extra minutes to frying and baking times.
Reheating
To keep that crisp crust intact, reheat leftover Chicken Kiev in an oven set to 350°F for about 10-15 minutes. Avoid microwaving as it may soften the crust and cause the butter to leak prematurely.
FAQs
Can I use frozen chicken breasts for this recipe?
It’s best to use fresh or fully thawed chicken breasts. Partially frozen chicken can be difficult to butterfly and pound evenly, which might impact cooking and texture.
What if I don’t have Panko breadcrumbs?
Panko offers a light, airy crunch, but you can substitute with regular breadcrumbs or crush some cornflakes for a crispy alternative. Just keep in mind the texture might be a bit different.
How do I prevent the butter from leaking during cooking?
The key is in securing the chicken rolls tightly and chilling them thoroughly before frying and baking. Wrapping the chicken tightly in plastic wrap and refrigerating for at least 2 hours helps the butter firm up and stay sealed inside.
Can I bake the Chicken Kiev without frying first?
While frying gives the chicken that signature golden crust, you can bake directly to reduce oil usage. Coat the chicken as usual and bake at 375°F for 30-35 minutes, but be prepared for a slightly softer crust.
What kind of butter is best to use?
Unsalted butter is best as it allows you to control the saltiness of the dish. Using softened butter makes it easier to mix with herbs and spread into the perfect filling log.
Final Thoughts
This Delicious Homemade Chicken Kiev Recipe is truly a joy to prepare and enjoy. It’s one of those dishes that feels special yet surprisingly doable at home — a perfect way to bring a slice of classic comfort food to your dinner table. Whether you’re cooking for friends, family, or just treating yourself, this recipe promises satisfying flavors wrapped in crispy, buttery goodness. Give it a try and fall in love with Chicken Kiev all over again!
Print
Delicious Homemade Chicken Kiev Recipe
- Prep Time: 45 minutes
- Cook Time: 30 minutes
- Total Time: 2 hours 45 minutes
- Yield: 4 servings
- Category: Main Dish
- Method: Frying
- Cuisine: European
Description
This homemade Chicken Kiev is a classic dish featuring tender, pounded chicken breasts rolled around a flavorful herb and garlic butter, coated in crispy panko breadcrumbs, fried to golden perfection, and finished in the oven for a juicy, melt-in-your-mouth experience. Perfect for a special dinner, this recipe combines aromatic herbs with a delicate lemon zest for a deliciously indulgent yet approachable meal.
Ingredients
Chicken
- 4 pieces boneless skinless chicken breasts (6–8 oz. each)
- Salt, to taste
- Black pepper, to taste
Herb Butter
- 8 tbsp unsalted butter, softened
- 3 cloves garlic, pressed
- 3 tbsp fresh minced parsley
- 2 tbsp minced chives
- 2 tbsp fresh minced dill weed
- Zest of 1 lemon
Breading
- 4 eggs, whisked
- 3 cups Panko bread crumbs
- 1 cup all purpose flour
- 1.5 tsp garlic powder
- 1 tbsp dried parsley
- 0.5 tbsp dried dill weed (optional)
Frying
- 2–3 cups canola oil
Instructions
- Soften the Butter: Remove the unsalted butter from the refrigerator and allow it to sit at room temperature for 30-45 minutes until soft enough to blend smoothly.
- Mix the Herb Butter: In a bowl, thoroughly combine the softened butter with minced parsley, chives, dill weed, pressed garlic, lemon zest, salt, and pepper until the mixture is aromatic and evenly blended.
- Shape the Butter: Spread the herb butter onto a piece of plastic wrap in a log shape, wrap tightly, and freeze for about 15 minutes to firm it up for easier handling.
- Butterfly the Chicken: Using a sharp knife, slice each chicken breast horizontally almost through, then open it like a book. Place inside a zip-lock bag to contain it during pounding.
- Pound the Chicken: Gently pound the butterfly chicken breast with a meat tenderizer until it is about 1/4 to 1/8 inch thick, ensuring even thickness for uniform cooking.
- Season the Chicken: Generously season both sides of the pounded chicken breasts with salt and black pepper to enhance their natural flavor.
- Prepare the Butter Portions: Remove the herb butter from the freezer and slice it into 8 equal pieces, allocating 2 pieces per chicken breast.
- Assemble the Chicken Rolls: Lay each chicken breast flat on plastic wrap, place 2 slices of herb butter on one side, then roll tightly while tucking in the sides to seal the butter inside.
- Wrap and Refrigerate: Completely wrap each chicken roll in plastic wrap and refrigerate for a minimum of 2 hours, preferably overnight, to allow the flavors to meld and the butter to firm.
- Preheat Oven and Oil: Preheat your oven to 350°F. In a deep skillet, heat canola oil to 350°F for frying the chicken rolls.
- Set Up Breading Stations: Prepare three shallow bowls: one with whisked eggs seasoned with salt and pepper, one with a mixture of flour, garlic powder, salt, and pepper, and one with Panko breadcrumbs mixed with dried parsley and optional dill weed.
- Bread the Chicken Rolls: Unwrap the chilled chicken rolls, dredge each first in seasoned flour, then dip into the egg mixture, and finally coat thoroughly with the Panko breadcrumb mixture. Repeat for all rolls.
- Fry the Chicken: Carefully lower each breaded chicken roll into the hot oil and fry for 3-4 minutes per side until the coating turns a crispy, golden brown.
- Bake to Finish: Transfer fried chicken rolls to a wire rack set in a baking pan and bake in the preheated oven for 20-24 minutes to ensure the chicken is fully cooked and flavors develop.
Notes
- Freezing the herb butter before assembling helps prevent it from melting too quickly during frying.
- Use a meat thermometer to check that the chicken reaches an internal temperature of 165°F for safe consumption.
- Ensure the oil temperature is steady at 350°F to achieve a crispy coating without absorbing excess oil.
- Refrigerating the assembled rolls overnight enhances flavor and firmness, improving handling and final texture.
- Substitute canola oil with vegetable or peanut oil if preferred for frying.
