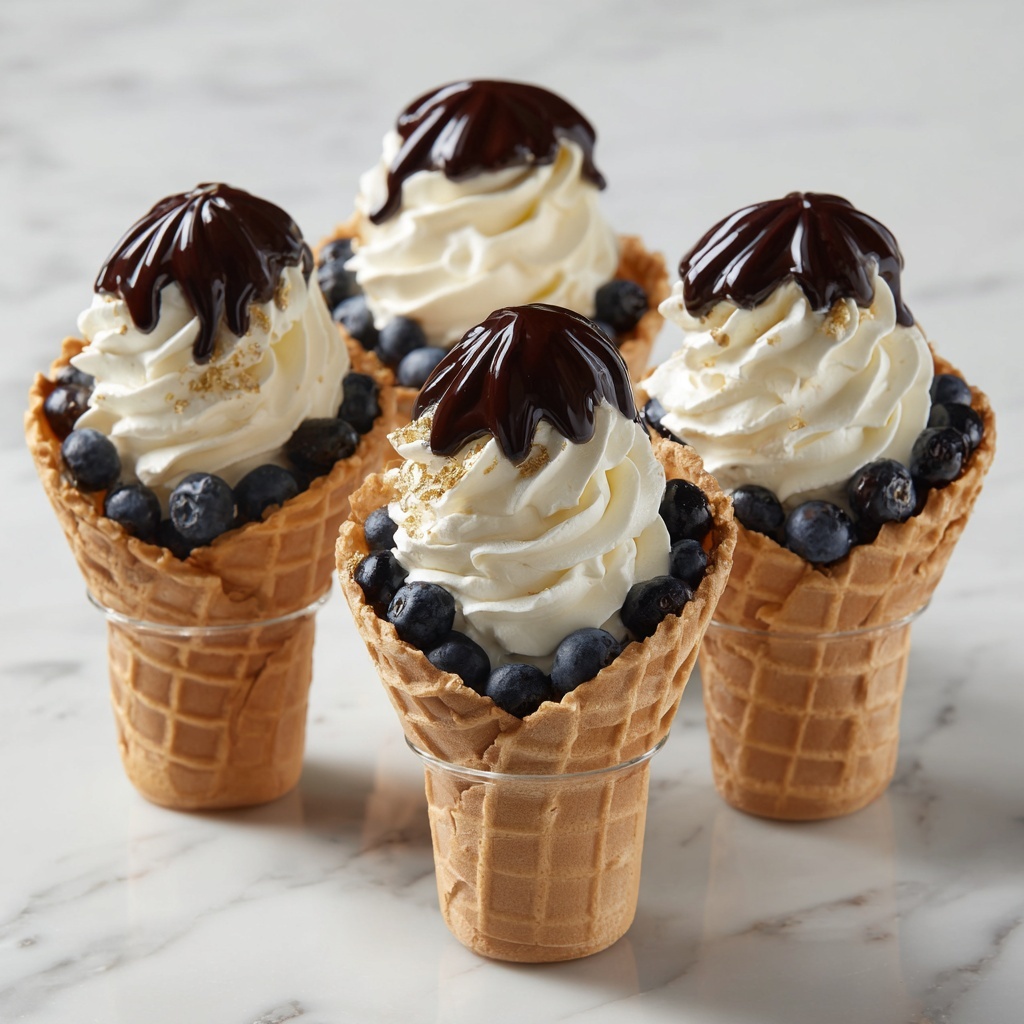
There is something truly delightful about indulging in a sweet treat that feels both elegant and fun, and this Deliciously Easy Cannoli Cones Recipe delivers just that with every bite. Imagine creamy, sweetened ricotta blended with bursts of mini chocolate chips, all nestled inside a crisp, chocolate-dipped sugar cone. It’s a whimsical twist on a classic Italian dessert that you can easily make in your own kitchen. Whether you’re serving it at a party or craving a simple, satisfying dessert, these cannoli cones are guaranteed to become a favorite fast thanks to their playful presentation and irresistible flavors.

Ingredients You’ll Need
The magic behind this Deliciously Easy Cannoli Cones Recipe lies in its straightforward yet carefully selected ingredients. Each element brings its own special touch—from the creamy richness of ricotta to the satisfying crunch of the cones—building layers of flavor and texture you’ll adore.
- 16 oz Whole milk ricotta cheese: Essential for that authentic, creamy base that defines cannoli filling.
- 0.5-0.67 cup Powdered sugar: Sweetens the ricotta perfectly without graininess.
- 0.5 teaspoon Vanilla extract: Adds a warm, inviting depth of flavor to the filling.
- 0.67 cup Mini chocolate chips: Little bursts of chocolate that bring a playful texture to each bite.
- 10 Sugar cones: Offer delightful crunch and serve as edible vessels for the rich filling.
- 0.75 cup Semisweet chocolate chips: Melted for dipping the cones, adding a glossy, chocolate coating that’s utterly irresistible.
How to Make Deliciously Easy Cannoli Cones Recipe
Step 1: Drain the Ricotta for Perfect Creaminess
The secret to a luscious cannoli filling starts with properly draining your ricotta. Place the ricotta in a fine mesh strainer lined with a paper towel or cheesecloth and let it drain in the fridge overnight. This removes excess moisture, ensuring your filling is thick and creamy rather than runny.
Step 2: Melt the Chocolate and Dip the Cones
Gently melt the semisweet chocolate chips in the microwave, stirring every 20-30 seconds to avoid burning. Once smooth and glossy, dip the top of each sugar cone into the melted chocolate. Set the cones upright on parchment paper or a cooling rack to let the chocolate harden—this creates a delicious chocolate cap that complements the ricotta filling beautifully.
Step 3: Prepare the Sweet Ricotta Filling
In a mixing bowl, combine your drained ricotta with powdered sugar and vanilla extract. Beat everything together until smooth and creamy. This simple but essential step ensures that the flavors meld together, crafting that perfect sweet and tangy filling your taste buds will celebrate.
Step 4: Fold in the Mini Chocolate Chips
Carefully fold the mini chocolate chips into the ricotta mixture. This adds delightful texture and little chocolate surprises throughout, elevating the filling from creamy to irresistibly decadent.
Step 5: Fill the Chocolate-Dipped Cones
Transfer the ricotta mixture into a piping bag or use a spoon to fill each chocolate-dipped cone generously. Filling the cones just before serving keeps everything crisp and fresh, ensuring each bite offers the perfect harmony of crunch and creamy sweetness.
How to Serve Deliciously Easy Cannoli Cones Recipe

Garnishes
Top your cannoli cones with a sprinkle of powdered sugar or a few extra mini chocolate chips for added charm. Fresh mint leaves or a light dusting of cinnamon can add a wonderful aroma and pop of color, making your presentation look as delightful as the taste.
Side Dishes
Pair these cannoli cones with a cup of robust espresso or a creamy cappuccino for a classic Italian vibe. Fresh berries or a small bowl of whipped cream can complement the cones perfectly, adding refreshing balance and variety to your dessert spread.
Creative Ways to Present
Set your cannoli cones upright in a decorative vase filled with sugar, rice, or even coffee beans to keep them stable and visually striking on the table. For gatherings, arrange them on a tiered stand for an elegant display that invites guests to indulge in these charming treats.
Make Ahead and Storage
Storing Leftovers
If you happen to have leftovers, store the filled cannoli cones in an airtight container in the refrigerator. They’re best enjoyed within 1-2 days, as the cones can begin to soften from the moisture in the filling.
Freezing
For longer storage, you can freeze the ricotta filling separately in a sealed container for up to a month. When ready to enjoy, simply thaw in the fridge overnight and refill freshly dipped cones for optimal texture.
Reheating
Since cannoli cones are best served chilled, reheating is not recommended. Instead, enjoy them straight from the fridge to savor the creamy filling and crisp cones at their best.
FAQs
Can I use a different type of cone?
Traditional sugar cones work best for their sturdy texture and crispness, but waffle cones can be a fun alternative if you prefer a sweeter, softer crunch. Just note they might get soggier faster when filled.
How long should I drain the ricotta for?
Draining overnight—about 8-12 hours—is ideal to achieve the perfect creamy yet thick consistency. Rushing this step can result in a watery filling that doesn’t set properly in the cones.
Can I prepare the cones ahead of time?
Yes, you can dip and allow the cones to dry a day ahead. Just store them in an airtight container at room temperature to keep the chocolate coating crisp before filling and serving.
Is there a substitute for ricotta cheese?
While ricotta is traditional and provides distinct creaminess, mascarpone or cream cheese mixed with a little milk can work as substitutes, though the flavor and texture will be slightly different.
What’s the best way to fill the cones neatly?
A piping bag is your best friend for neat and efficient filling, allowing you to control the amount and avoid spills. If you don’t have one, a spoon can work—just proceed carefully and fill slowly for the cleanest results.
Final Thoughts
Trying this Deliciously Easy Cannoli Cones Recipe will quickly become one of your favorite ways to enjoy a classic dessert with a fun, modern spin. It combines simplicity with sophistication perfectly, so don’t hesitate to whip up a batch and treat yourself and your loved ones to these stunning, scrumptious cones. The smiles and compliments that follow are all part of the joy!
Print
Deliciously Easy Cannoli Cones Recipe
- Prep Time: 12 hours
- Cook Time: 10 minutes
- Total Time: 12 hours 10 minutes
- Yield: 10 servings
- Category: Dessert
- Method: No-Cook
- Cuisine: Italian
Description
These Deliciously Easy Cannoli Cones offer a delightful twist on traditional cannoli. Creamy ricotta filling sweetened with powdered sugar and infused with vanilla blends perfectly with bursts of mini chocolate chips. The cones are dipped in melted semisweet chocolate for an irresistible, crunchy shell. This no-bake, make-ahead dessert is perfect for parties or anytime you want a taste of classic Italian pastry made simple and fun at home.
Ingredients
Filling
- 16 oz Whole milk ricotta cheese (Essential for authentic flavor.)
- 0.5–0.67 cup Powdered sugar (To sweeten the ricotta.)
- 0.5 teaspoon Vanilla extract (For added flavor.)
- 0.67 cup Mini chocolate chips (For bursts of chocolate.)
Cones
- 10 Sugar cones (For a delightful crunch.)
- 0.75 cup Semisweet chocolate chips (To dip the sugar cones.)
Instructions
- Drain the Ricotta: Place the ricotta cheese in a strainer lined with paper towels and let it drain overnight in the refrigerator to remove excess moisture, ensuring a thick and creamy filling.
- Melt the Chocolate: Melt the semisweet chocolate chips in the microwave in short bursts, stirring until smooth. Dip the pointed end of each sugar cone into the melted chocolate to coat, then set the cones aside to allow the chocolate to harden and form a delicious shell barrier.
- Mix the Filling: In a mixing bowl, beat the well-drained ricotta, powdered sugar, and vanilla extract together until smooth and creamy, creating the sweet cannoli filling base.
- Fold in Chocolate Chips: Gently fold the mini chocolate chips into the ricotta mixture to add bursts of chocolate flavor without breaking the creamy texture.
- Fill the Cones: Using a piping bag or spoon, carefully fill each chocolate-dipped sugar cone with the ricotta mixture, filling them generously for a satisfying treat.
Notes
- Draining ricotta overnight is essential to achieve the right consistency for the filling and prevent it from being watery.
- You can substitute mini chocolate chips with chopped pistachios or candied fruit for variations.
- Store filled cannoli cones in the refrigerator and consume within 24 hours for best freshness.
- For added elegance, dust the tops with powdered sugar or garnish with a small piece of candied orange peel.


