
“`html
If you have a soft spot for classic desserts that are both charming and simple to whip up, this Deliciously Easy Mini Cherry Pies Recipe is made just for you. Each bite-sized pie bursts with sweet, tart cherry filling nestled inside golden, flaky crusts that feel like a warm hug. Whether for an afternoon treat or a festive occasion, these mini pies are a delightful way to enjoy all the comfort of a full-sized cherry pie in a perfectly portable package. Plus, they come together quickly, making them as convenient as they are scrumptious.

Ingredients You’ll Need
Keeping this recipe straightforward means focusing on a handful of ingredients that deliver maximum flavor, texture, and that beautiful inviting color. Each component is essential to that perfect mini cherry pie experience.
- Store-Bought Pie Crust: A convenient base that ensures a flaky, buttery crust every time, but feel free to make your own for an extra personal touch.
- Large Egg White: Brushed on top to create a beautiful glossy finish that helps your mini pies brown to golden perfection.
- Cherry Pie Filling: The heart of the dish; choose a high-quality canned filling or make your own for an irresistible, fruity center.
- Sugar: Sprinkled on top, it adds a touch of sparkle and sweetness that balances the tart cherries.
How to Make Deliciously Easy Mini Cherry Pies Recipe
Step 1: Prepare Your Oven and Muffin Tin
First things first, preheat your oven to 350°F (175°C) so it’s ready when you are. Greasing the muffin tin ensures the pies lift out easily after baking, preserving those perfect mini shapes.
Step 2: Cut Out the Pie Crust Circles
Roll out your store-bought pie crust on a clean, lightly floured surface. Using a round cutter about 3 ½ to 4 inches in diameter, cut out circles that will fit neatly into each muffin cup. This step sets the foundation for your mini pies’ golden base.
Step 3: Press Dough Into Muffin Cups
Gently press each dough circle into one of the greased muffin cups, creating a little crust “bowl” to hold your cherry filling. Take your time so the dough doesn’t tear, making sure the edges are pressed just right.
Step 4: Fill with Cherry Pie Filling
Spoon your cherry pie filling into each dough-lined cup, filling them about two-thirds full. Overfilling can cause the juicy filling to bubble over during baking, so this is the sweet spot for a tidy mini pie.
Step 5: Add a Lattice Top (Optional)
If you have some dough left over, roll it out and cut into thin strips to create a charming lattice crust atop each pie. This not only looks beautiful but also lets steam escape, preventing sogginess while baking.
Step 6: Brush and Sprinkle
Brush the tops with beaten egg white – this simple step helps your pies develop that irresistible glossy shine. Then sprinkle the tops lightly with sugar for a delicate crunch and subtle sweetness.
Step 7: Bake to Golden Perfection
Bake your mini cherry pies for 25 to 30 minutes until the crust is golden brown and the cherry filling is bubbly. The aroma filling your kitchen at this point is enough to make anyone’s mouth water.
Step 8: Cool Before Serving
Let the pies cool in the tin for 15 to 20 minutes to set up. This cooling time makes it easier to gently lift the pies out without breaking their delicate crusts.
How to Serve Deliciously Easy Mini Cherry Pies Recipe

Garnishes
Adding a final flourish can take these pies from simple to spectacular. A dusting of powdered sugar, a dollop of whipped cream, or a small scoop of vanilla ice cream complements the warm cherries beautifully. Fresh mint leaves add a vibrant pop of color and freshness.
Side Dishes
These mini pies shine on their own but paired with a cup of freshly brewed coffee or a glass of cold milk, they become a full-fledged dessert experience. For an extra special treat, serve alongside a bowl of vanilla bean ice cream or a light citrus salad to contrast the cherry sweetness.
Creative Ways to Present
For parties or gift-giving, arrange your mini cherry pies on a rustic wooden board or colorful platter lined with parchment paper. Tying each pie with a delicate ribbon or serving them in individual decorative wrappers can add a personal touch that impresses guests and loved ones alike.
Make Ahead and Storage
Storing Leftovers
Once completely cooled, store any leftover mini cherry pies in an airtight container at room temperature for up to two days. This keeps the crust crisp and the filling fresh without losing flavor or texture.
Freezing
If you want to enjoy these pies later, they freeze wonderfully. Wrap each pie individually in plastic wrap and place them in a freezer-safe container or bag. Frozen mini cherry pies keep well for up to two months, making them perfect for last-minute dessert cravings.
Reheating
To reheat, place the pies on a baking sheet and warm them in a 350°F (175°C) oven for about 10 to 15 minutes. This brings back that freshly-baked aroma and restores the crust’s flaky texture, making them taste like they just came out of the oven.
FAQs
Can I make these mini cherry pies without canned pie filling?
Absolutely! You can make your own cherry pie filling with fresh or frozen cherries, sugar, lemon juice, and a bit of cornstarch or tapioca for thickening. Homemade fillings add a wonderful freshness and sweet-tart balance that’s hard to beat.
What can I use instead of egg white for brushing the crust?
If you prefer to avoid egg, a light brush of melted butter or milk can help the crust brown nicely. However, egg white provides a glossy finish and helps the sugar stick better, so it’s a great option when you can use it.
How do I prevent my mini pies from getting soggy?
Ensure not to overfill the pies to prevent spills and sogginess. Also, baking until the filling bubbles and the crust is golden helps evaporate excess moisture. Using a lattice top crust encourages steam to escape, keeping the crust crisp.
Can I use puff pastry instead of pie crust?
Puff pastry can work, but it will give a different texture—more airy and flaky rather than buttery and tender. If you love a light texture, give it a try, but keep an eye on baking times as puff pastry may brown faster.
Are these mini pies freezer-friendly before baking?
Yes! You can assemble your mini cherry pies and freeze them unbaked. Just wrap them well and bake directly from frozen, adding a few extra minutes to the baking time until golden and bubbly.
Final Thoughts
There is something truly joyful about making and sharing this Deliciously Easy Mini Cherry Pies Recipe. They bring an old-fashioned charm with an effortless twist—perfect for cozy evenings or special occasions alike. I hope you enjoy baking these little wonders and that they become a cherished part of your dessert repertoire as much as they are in mine!
“`
Print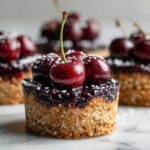
Deliciously Easy Mini Cherry Pies Recipe
- Prep Time: 20 minutes
- Cook Time: 30 minutes
- Total Time: 1 hour 5 minutes
- Yield: 12 servings
- Category: Dessert
- Method: Baking
- Cuisine: American
Description
These Deliciously Easy Mini Cherry Pies are the perfect sweet treat for any occasion. Made with store-bought pie crust and classic cherry pie filling, these bite-sized pies combine flaky crusts with a luscious, bubbly cherry filling. Topped with a glossy egg white wash and a sprinkle of sugar, they bake up golden and irresistible. Ideal for gatherings, dessert tables, or simply satisfying your sweet tooth in no time.
Ingredients
Pie Crust
- 1 package Store-Bought Pie Crust (feel free to make your own for added love)
Filling
- 1 can Cherry Pie Filling (opt for high-quality store-bought or homemade)
Topping
- 1 large Egg White (for brushing on top)
- 2 tablespoons Sugar (sprinkled on top for sweetness)
Instructions
- Preheat and Prepare Muffin Tin: Preheat your oven to 350°F (175°C) and grease a muffin tin thoroughly to prevent sticking and ensure easy removal of the mini pies.
- Cut Pie Crust Circles: Roll out your store-bought pie crust on a clean, flat surface. Using a round cutter measuring 3 ½–4 inches in diameter, cut out dough circles suitable to fit into the muffin cups.
- Form Mini Crusts: Gently press each dough circle into the greased muffin cups to create the mini pie crust bases, ensuring the dough lines the cups evenly without tearing.
- Add Cherry Filling: Spoon the cherry pie filling into each prepared crust, filling each about two-thirds full to leave space for bubbling during baking and the topping.
- Create Lattice Topping (Optional): If desired, roll out any leftover dough, cut into thin strips, and weave a lattice pattern over the filled pies for a decorative finish.
- Apply Egg Wash and Sugar: Brush the tops of the mini pies with the beaten egg white to give them a shiny, appealing finish. Then sprinkle sugar evenly on top for added sweetness and texture.
- Bake the Mini Pies: Place the muffin tin in the preheated oven and bake for 25 to 30 minutes until the crust turns golden brown and the cherry filling is bubbling, indicating it is cooked through.
- Cool and Serve: Allow the mini cherry pies to cool for about 15 to 20 minutes in the muffin tin before carefully lifting them out. Serve warm or at room temperature for best flavor.
Notes
- If you prefer a homemade touch, making your own pie crust enhances flavor and texture.
- Be cautious when brushing the egg white—too much can drip and cause uneven browning.
- The lattice topping is optional but adds a charming visual appeal.
- Allow pies to cool properly to avoid burning your mouth on hot filling.
- These mini pies freeze well; store in an airtight container for up to 2 months and reheat before serving.


