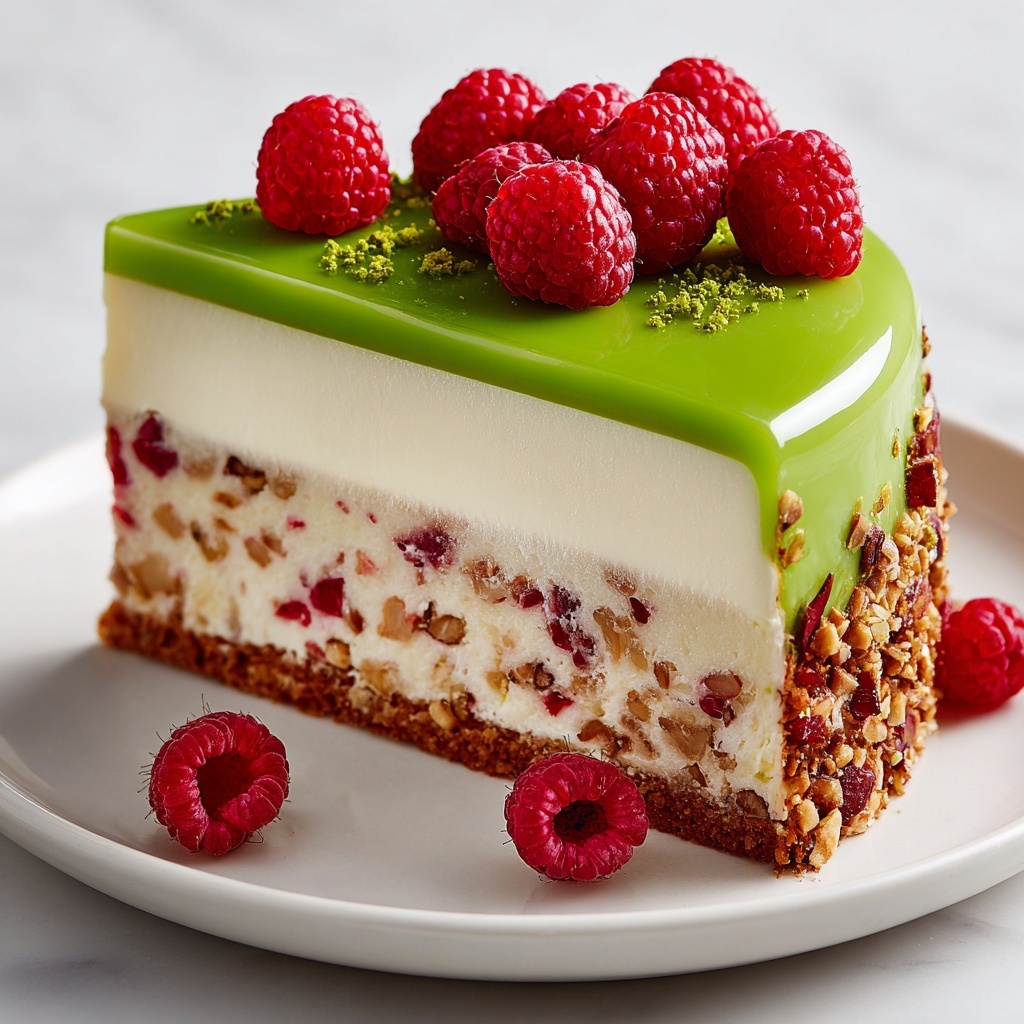
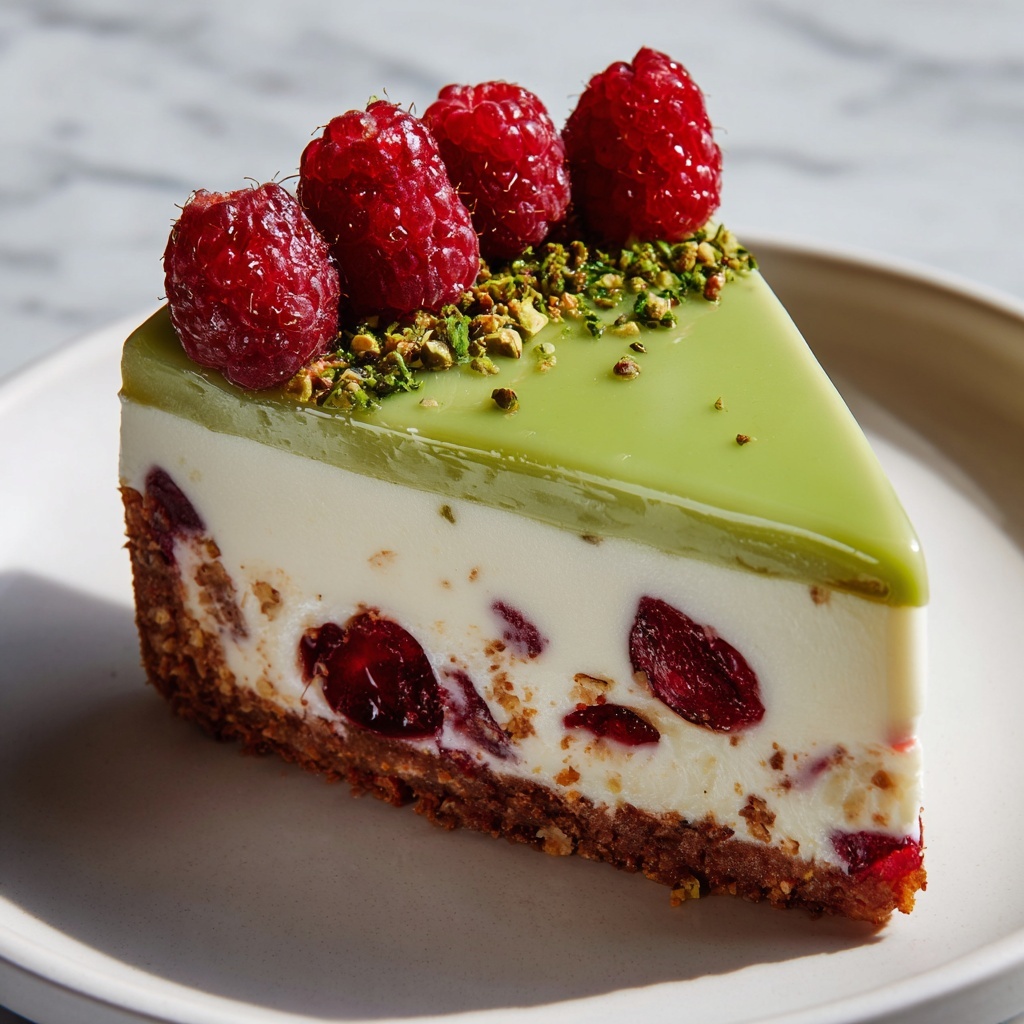
If you are searching for a stunning dessert that dazzles both the eyes and the palate, the Elegant Pistachio Raspberry Crunch Cheesecake Recipe is your new best friend in the kitchen. This cheesecake blends the rich creaminess of classic cheesecake with vibrant raspberry swirls and the nutty crunch of pistachios, creating a texture and flavor symphony that feels timeless yet refreshingly unique. It’s the perfect showstopper for special occasions, or whenever you want to treat yourself and friends to something truly magnificent and memorable.
Ingredients You’ll Need
Every ingredient in this recipe plays a delightful role, combining simplicity with sophistication to create a dish full of flavor, texture, and beautiful color contrasts. Each must-have item contributes something essential to the final masterpiece.
- Pistachios, 1 ½ cups, shelled and finely chopped: Adds a buttery crunch and a gorgeous green hue that brings elegance to the crust and topping.
- Graham cracker crumbs, 1 ¼ cups: Forms the base of the crust with sweet, slightly crunchy notes.
- Sugar, 3 tablespoons (for crust) + 1 cup granulated (for filling): Balances tartness with sweetness throughout the cake.
- Unsalted butter, 6 tablespoons melted: Binds the crust ingredients together and adds richness.
- Cream cheese, 24 oz (680g), softened: The creamy heart of the cheesecake providing that iconic velvety mouthfeel.
- Vanilla extract, 1 teaspoon: Brings warm, aromatic depth to the filling.
- Large eggs, 3: Necessary for binding while giving the cheesecake its smooth texture.
- Sour cream, ½ cup: Adds a slight tang and luxurious creaminess.
- Fresh raspberries, 1 cup plus extra for garnish: Bursting with fresh flavor and stunning color that complements pistachios beautifully.
- Raspberry jam, 2 tablespoons: Helps create that gorgeous raspberry swirl with concentrated sweetness and shine.
How to Make Elegant Pistachio Raspberry Crunch Cheesecake Recipe
Step 1: Prepare the Crust
Begin by preheating your oven to 325°F (160°C) and greasing a 9-inch springform pan. Combine the chopped pistachios, graham cracker crumbs, and sugar in a bowl. Stir in the melted butter until everything is moistened evenly. Press this mixture firmly into the pan’s base. Pop the crust into the fridge while you whip up the luscious filling — chilling ensures a sturdy, crunchy foundation for your cheesecake.
Step 2: Make the Cream Cheese Filling
In a large bowl, beat the softened cream cheese until it’s completely smooth and creamy. Gradually add the sugar, beating well after each addition to avoid lumps and create a glossy mixture. Next, stir in the vanilla extract, which will infuse a welcoming fragrance into your cheesecake batter. One at a time, add the eggs, beating gently after each addition to incorporate them without letting too much air in, which keeps the cheesecake dense but silky. Finish by folding in the sour cream until your batter is perfectly smooth and rich.
Step 3: Layer and Swirl the Raspberry
Pour half of the cream cheese mixture over your chilled crust, smoothing the surface carefully. In a smaller bowl, gently mash fresh raspberries together with raspberry jam, creating a vibrant, fruity swirl base. Spoon half of this raspberry mixture across the batter and lightly drag a knife through it to swirl lightly. Repeat this layering with the remaining cream cheese mixture and raspberry swirl, then create pretty swirls on top for that artistic, homemade look.
Step 4: Bake to Perfection
Place your beautiful creation into the oven and bake for 55 to 65 minutes. You want the edges to be set but the center to have a gentle jiggle to it — a sign of creamy perfection. Once baked, turn off the oven but leave the cheesecake inside with the door slightly open for one hour; this clever step helps prevent cracks while slowly cooling the dessert.
Step 5: Chill Thoroughly
Finally, remove the cheesecake from the oven and let it cool, then pop it into the refrigerator to chill for at least 4 hours, though overnight is even better. This chilling solidifies the texture and deepens the flavors, setting the stage for an unforgettable dessert experience.
How to Serve Elegant Pistachio Raspberry Crunch Cheesecake Recipe

Garnishes
Before serving, enhance the cheesecake’s beauty by decorating with fresh raspberries and a generous sprinkle of finely chopped pistachios. This adds a fresh burst of color, texture, and a nutty finish that complements the creamy filling perfectly.
Side Dishes
This cheesecake is indulgent enough to stand on its own, but if you want to balance the richness, serve it with a light herbal tea or a simple fruit salad featuring mint and citrus. These sides refresh the palate without overpowering the cheesecake’s delicate flavors.
Creative Ways to Present
Try serving this cake on a beautiful glass or ceramic cake stand to showcase the swirls and crunch visibly. You can slice it into individual portions and place each on small dessert plates with a drizzle of raspberry sauce or a dollop of lightly whipped cream, elevating the elegant vibe even further.
Make Ahead and Storage
Storing Leftovers
Keep any uneaten cheesecake tightly wrapped in plastic wrap or stored in an airtight container in the refrigerator. It will stay fresh and delicious for up to 4 days, making it easy to enjoy your Elegant Pistachio Raspberry Crunch Cheesecake Recipe at a relaxed pace.
Freezing
If you want to make this cheesecake ahead of time, it freezes beautifully. Wrap it tightly in plastic wrap and aluminum foil to protect it from freezer burn, then freeze for up to 2 months. Thaw overnight in the fridge before serving, so it retains its creamy texture without moisture loss.
Reheating
Since cheesecake is best served cold, we recommend enjoying it chilled right from the fridge. If you prefer a softer texture, allow slices to sit at room temperature for 15-20 minutes before diving in — that gentle warming enhances the flavors without losing the cheesecake’s signature creaminess.
FAQs
Can I substitute the sour cream in this cheesecake?
Yes, you can swap sour cream for Greek yogurt for a slightly tangier flavor and a thicker texture, but sour cream is preferred for its creaminess and smoothness in the Elegant Pistachio Raspberry Crunch Cheesecake Recipe.
What type of raspberries work best?
Fresh, ripe raspberries are ideal because they provide bright flavor and vibrant color. Avoid frozen berries as they can release excess moisture and affect the texture and appearance of the cheesecake.
How do I prevent cracks in my cheesecake?
Following the recipe’s instructions by not overmixing the batter, baking at a low temperature, and allowing the cake to cool gradually inside the oven with the door ajar all help to prevent cracking in this cheesecake.
Can I use pistachio flour instead of chopped pistachios?
While pistachio flour can add nutty flavor, the Elegant Pistachio Raspberry Crunch Cheesecake Recipe benefits from the textural contrast of chopped pistachios in the crust and topping, so it’s best to keep the crunch element intact.
Is it possible to make this cheesecake gluten-free?
Absolutely! Just use gluten-free graham cracker crumbs or substitute with almond meal to keep the crust crumbly and delicious while ensuring it’s safe for gluten-sensitive guests.
Final Thoughts
You really can’t go wrong making the Elegant Pistachio Raspberry Crunch Cheesecake Recipe your next baking project. With its harmonious balance of creamy, crunchy, sweet, and tangy, it’s a dessert that impresses every single time. Invite your loved ones around, share slices, and watch your kitchen fill with delight — this cheesecake truly turns moments into memories.
Print
Elegant Pistachio Raspberry Crunch Cheesecake Recipe
- Prep Time: 30 minutes
- Cook Time: 1 hour 10 minutes
- Total Time: 5 hours 40 minutes
- Yield: 12 servings
- Category: Dessert
- Method: Baking
- Cuisine: American
Description
This Elegant Pistachio Raspberry Crunch Cheesecake features a rich and creamy cream cheese filling swirled with fresh raspberry and jam, all set atop a crunchy pistachio and graham cracker crust. Perfectly baked to have a smooth texture with a slight jiggle at the center, this dessert is garnished with extra fresh raspberries and chopped pistachios for a sophisticated finish, ideal for special occasions or indulgent treats.
Ingredients
Crust
- 1 ½ cups pistachios, shelled and finely chopped
- 1 ¼ cups graham cracker crumbs
- 3 tablespoons sugar
- 6 tablespoons unsalted butter, melted
Cheesecake Filling
- 24 oz (680g) cream cheese, softened
- 1 cup granulated sugar
- 1 teaspoon vanilla extract
- 3 large eggs
- ½ cup sour cream
Raspberry Swirl
- 1 cup fresh raspberries, plus extra for garnish
- 2 tablespoons raspberry jam
Garnish
- Extra fresh raspberries
- Chopped pistachios
Instructions
- Preheat Oven and Prepare Pan: Preheat your oven to 325°F (160°C). Grease a 9-inch springform pan to ensure the cheesecake releases easily after baking.
- Make the Crust: In a medium bowl, mix the finely chopped pistachios, graham cracker crumbs, and sugar. Stir in the melted butter until all ingredients are evenly moistened. Press this mixture firmly and evenly into the bottom of the prepared springform pan to form the crust. Place it in the refrigerator to chill while you prepare the filling.
- Mix Cream Cheese: Using a large bowl, beat the softened cream cheese until it’s completely smooth and creamy. Gradually add the granulated sugar a little at a time, beating well after each addition for a creamy consistency. Stir in the vanilla extract for flavor.
- Add Eggs: Incorporate the eggs one at a time into the cream cheese mixture, gently beating after each addition. Be careful not to overmix to maintain the cheesecake’s smooth texture.
- Blend in Sour Cream: Add the sour cream to the mixture and beat until smooth and well combined, which helps create a rich and creamy filling.
- Layer Filling: Pour half of the cream cheese mixture over the chilled crust, spreading it evenly.
- Prepare Raspberry Swirl: In a small bowl, gently mash the fresh raspberries with raspberry jam to create a textured swirl mixture. Spoon half of this raspberry blend over the first layer of cheesecake batter and use a knife to gently swirl it into the filling.
- Add Second Layer: Pour the remaining cream cheese mixture on top of the raspberry swirl layer. Then add the rest of the raspberry swirl on top and create decorative swirls using a knife for an elegant appearance.
- Bake Cheesecake: Bake in the preheated oven for 55 to 65 minutes or until the edges of the cheesecake are set but the center still slightly jiggles when moved. To prevent cracking, turn off the oven, leave the cheesecake inside with the door slightly ajar, and let it sit for 1 hour.
- Chill the Cheesecake: Remove the cheesecake from the oven and refrigerate it for at least 4 hours, preferably overnight, to allow it to fully set and develop flavors.
- Garnish and Serve: Before serving, garnish the cheesecake with fresh raspberries and a sprinkle of chopped pistachios for an elegant and flavorful finish.
Notes
- Be careful not to overmix the batter after adding eggs to keep the cheesecake creamy and avoid cracks.
- Using a springform pan makes it easier to release the cheesecake without damaging the crust.
- Baking at a low temperature with a resting period inside the oven prevents cracks and ensures a smooth texture.
- Chilling overnight is recommended for best flavor and texture.
- Fresh pistachios and raspberries elevate the texture and taste — avoid pre-ground nuts for best crunch.


