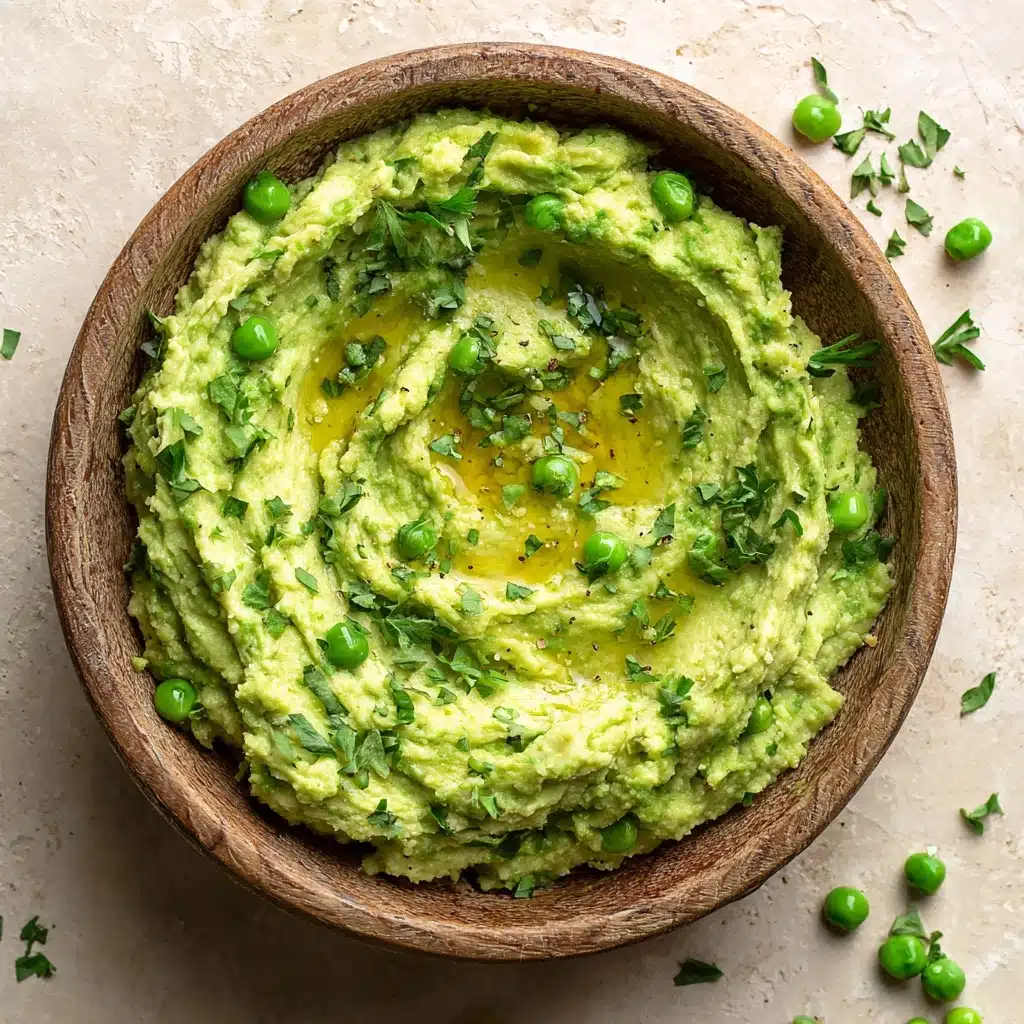
If you’re looking for a brilliantly vibrant side that’s as comforting as it is easy to whip up, Mashed Peas absolutely deserve a spot on your table. This dish transforms humble green peas into a rich, velvety mash, kissed with cream and a touch of butter, and sparkled with fresh mint for a lift of flavor. Whether you’re serving a classic British meal, need something simple for a busy weeknight, or want a new way to get extra greens into your menu, Mashed Peas promise to deliver color, nutrition, and satisfaction in every single spoonful!

Ingredients You’ll Need
The beauty of Mashed Peas is in its simplicity—every ingredient is chosen to complement and enhance the sweet, earthy flavor of fresh peas. A few pantry staples, a splash of cream, and a hint of fresh mint come together for a side that feels special but takes almost no time at all.
- Green peas (3 cups, fresh or frozen): Sweet, tender peas serve as the foundation, offering a burst of color and natural sweetness.
- Unsalted butter (2 tbsp): Adds richness and helps give the mash its luscious, silky texture.
- Heavy cream (2 tbsp, or milk): For extra creaminess and body; milk works for a lighter touch, but cream gives that indulgent finish.
- Salt (1/2 tsp): Balances the flavors and brings out the natural sweetness of the peas.
- Black pepper (1/4 tsp): Adds a gentle kick and warms up the flavor profile.
- Fresh mint leaves, chopped (1 tbsp, optional): For a bright, refreshing note that turns your Mashed Peas into a showstopper.
How to Make Mashed Peas
Step 1: Prepare the Peas
Start by bringing a pot of lightly salted water to a rolling boil. Whether you’re using fresh or frozen peas, you’ll want them tender but still vibrantly green for the best flavor and appearance. Toss the peas into the boiling water and let them cook for just 3–4 minutes, or follow package directions if using frozen. Drain thoroughly and make sure to give them a gentle shake to remove excess water—nobody wants a watery mash!
Step 2: Add the Good Stuff
After draining, return the peas to the warm pot. While they’re still hot, add the unsalted butter, heavy cream (or milk, if you prefer), salt, and black pepper. This is where the magic happens! The heat will melt the butter and allow the cream to soak right into those peas, promising a mash that’s rich and luscious.
Step 3: Mash to Perfection
Grab your trusty potato masher or break out a food processor—either tool gets the job done, depending on your preferred consistency. For rustic Mashed Peas with a bit of texture, give a few hearty presses with a masher. For something ultra-smooth and elegant, pulse it all in the processor. You’re aiming for a happy medium: creamy but with just enough bite to remind you of those lovely peas.
Step 4: Add Fresh Mint and Adjust Seasoning
If you’re feeling adventurous, now’s the time to stir in that freshly chopped mint. It instantly brightens the flavor and makes Mashed Peas sing. Taste and adjust seasoning as needed, and you’re ready to serve warm and delicious spoonfuls.
How to Serve Mashed Peas

Garnishes
For an eye-catching presentation, sprinkle an extra pinch of chopped mint or cracked black pepper right on top of your Mashed Peas. A drizzle of olive oil or a tiny pad of butter melting into the surface also adds a touch of luxury and restaurant-worthy appeal.
Side Dishes
Mashed Peas are wonderfully versatile and play well alongside a roast leg of lamb, golden roast chicken, or a perfectly baked fillet of salmon. They’re also amazing served with British classics like fish and chips, or tucked beside crispy sausages for a comforting, hearty meal.
Creative Ways to Present
Want to mix things up? Try using Mashed Peas as a vibrant base for poached eggs at brunch, or pipe them onto crostini for a pretty green appetizer. They shine as a colorful layer in savory parfaits or as a silky bed beneath grilled shrimp or pan-seared scallops.
Make Ahead and Storage
Storing Leftovers
If you have any extra Mashed Peas, transfer them to an airtight container and store in the refrigerator for up to three days. Their texture holds up beautifully, making them perfect for prepping ahead or enjoying as leftovers.
Freezing
Mashed Peas freeze surprisingly well! Cool them completely before spooning into a freezer-safe container or zip-top bag. Flatten for easy stacking, and freeze for up to two months. To maximize freshness, remove as much air as possible.
Reheating
When ready to enjoy again, simply rewarm Mashed Peas gently on the stovetop over low heat, stirring often. Add a splash of cream or milk to bring back their creamy texture, and adjust seasoning if needed before serving.
FAQs
Can I use canned peas for Mashed Peas?
While fresh or frozen peas give the brightest flavor and color, you can use canned peas in a pinch. Just be sure to rinse and drain them well, and adjust the cream and seasoning since canned peas are much softer and more salted.
Is there a vegan version of Mashed Peas?
Absolutely! Swap the butter for olive oil or a vegan butter, and use coconut cream or any non-dairy milk. The result is just as flavorful, with that signature creamy texture.
What type Side Dish
Spearmint is the traditional choice for Mashed Peas, providing a gentle, sweet herby note, but any fresh mint you have will work beautifully. Even a mix of herbs like parsley or dill can give a delightful twist.
Can I add other flavors to Mashed Peas?
Definitely! Sautéed garlic or shallots, a handful of grated Parmesan, or a squeeze of lemon juice are all fantastic enhancements. Personalize the mash to pair with your main dish or your family’s favorite flavors.
How do I prevent my Mashed Peas from turning out watery?
Always drain the peas thoroughly after boiling. If using frozen peas, pat them dry with a clean towel before mashing. A quick return to the pot to steam off excess moisture helps guarantee a lush, not watery, consistency.
Final Thoughts
If you’re craving a side that’s easy, vibrant, and guaranteed to put smiles around the table, give Mashed Peas a try! With just a handful of ingredients and minutes of effort, you’ll find their fresh, creamy flavor is an instant favorite. Enjoy every green, glorious bite!
Print
Mashed Peas Recipe
- Total Time: 10 minutes
- Yield: 4 servings 1x
- Diet: Vegetarian, Gluten-Free
Description
Creamy and flavorful, these mashed peas are a delightful side dish perfect for any meal. With a hint of fresh mint, they add a pop of color and taste to your plate. Easy to make and versatile, they complement a variety of main dishes.
Ingredients
Ingredients:
- 3 cups fresh or frozen green peas
- 2 tbsp unsalted butter
- 2 tbsp heavy cream (or milk for a lighter version)
- 1/2 tsp salt
- 1/4 tsp black pepper
- 1 tbsp fresh mint leaves, chopped (optional)
Instructions
- Boil Peas: Bring a pot of lightly salted water to a boil. Add peas and cook for 3–4 minutes until tender.
- Drain and Mash: Drain well and return peas to the pot. Add butter, cream, salt, and black pepper. Mash to desired texture.
- Finish and Serve: Stir in fresh mint if using. Adjust seasoning and serve warm.
Notes
- Mashed peas pair well with roasted meats, fish, or traditional British lamb dishes.
- For extra flavor, sauté a minced clove of garlic in the butter before adding peas.
- Prep Time: 5 minutes
- Cook Time: 5 minutes
- Category: Side Dish
- Method: Boiling, Mashing
- Cuisine: British
Nutrition
- Serving Size: 1/2 cup
- Calories: 110
- Sugar: 5 g
- Sodium: 240 mg
- Fat: 5 g
- Saturated Fat: 3 g
- Unsaturated Fat: 2 g
- Trans Fat: 0 g
- Carbohydrates: 14 g
- Fiber: 5 g
- Protein: 4 g
- Cholesterol: 15 mg


