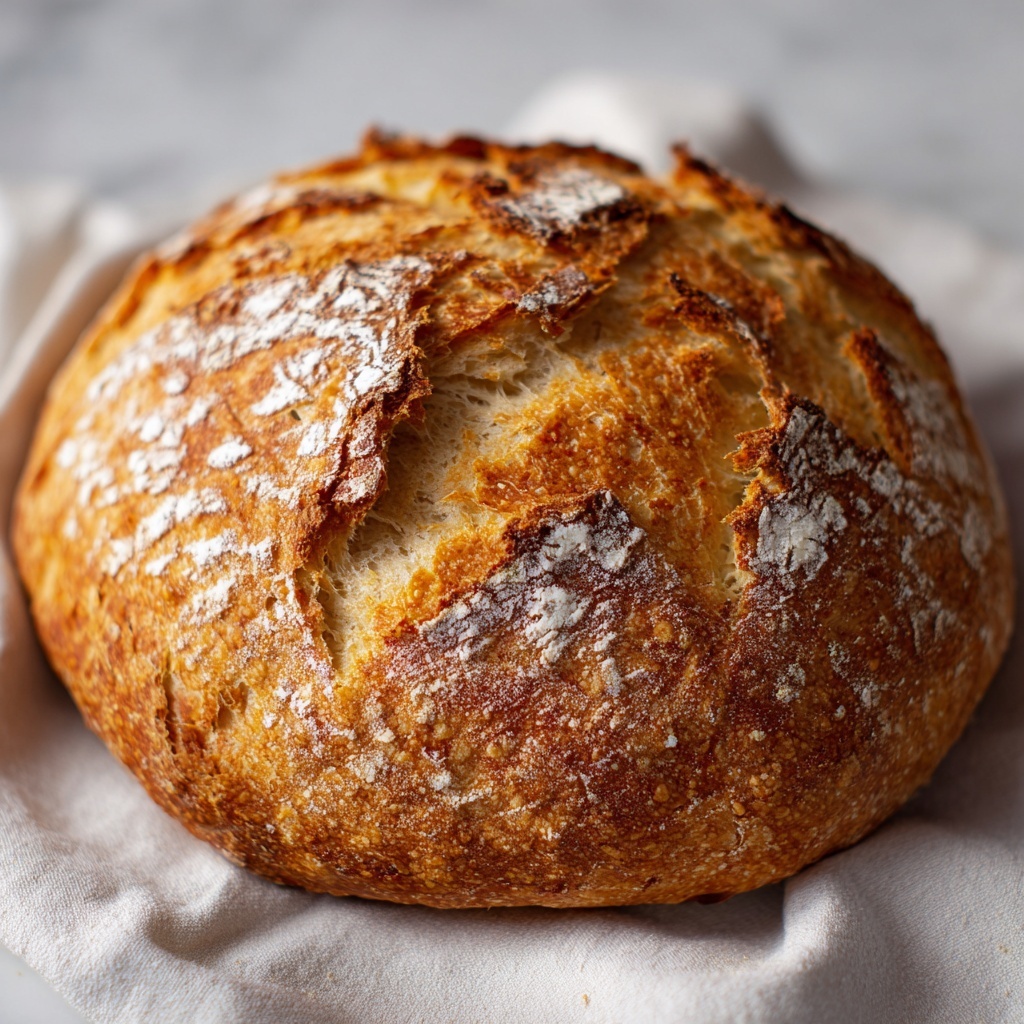
If you’ve ever dreamed of baking that perfect artisan bread without the hassle of kneading for ages or waiting all day, then you’re in for a treat with the Master No Knead Artisan Bread in Just 45 Minutes Recipe. This delightful loaf produces a beautiful crusty exterior with a soft, airy crumb inside, capturing that rustic bakery feel right in your own kitchen. Whether you’re a seasoned baker or a kitchen newbie, this recipe promises incredible results with minimal effort, making fresh homemade bread wonderfully accessible and fast.

Ingredients You’ll Need
This recipe keeps things simple but that’s exactly what makes this bread shine. Each ingredient serves a vital purpose in delivering the authentic homemade taste, perfect texture, and that irresistible golden color.
- 2 cups All-purpose flour: Backbone of your loaf providing structure and chewiness.
- 2 tablespoons All-purpose flour: Added for dusting and shaping the dough without sticking.
- 1 cup Lukewarm water (100-110°F): Perfect temperature to activate the yeast and kickstart fermentation.
- 1 teaspoon Active dry yeast: The key player responsible for making your dough rise and develop flavor.
- 1 teaspoon Sugar: Nourishes the yeast, boosting its activity and resulting in a tender crumb.
- 1 teaspoon Salt: Balances flavors and enhances the bread’s aroma and texture.
- Extra flour: A handy helper to keep your hands and surfaces floured during shaping and handling.
How to Make Master No Knead Artisan Bread in Just 45 Minutes Recipe
Step 1: Bloom the Yeast
Start by dissolving the sugar into lukewarm water—this quick trick wakes up the yeast and helps it bloom. Sprinkle the yeast on top and let it sit for 10 to 15 minutes until it becomes frothy and bubbly, signaling it’s ready to work its magic.
Step 2: Mix Dry Ingredients
In a large bowl, whisk together the flour and salt. Pour your frothy yeast mixture into the bowl and stir gently until everything comes together into a soft, sticky dough. No kneading needed here—just good mixing!
Step 3: Shape the Dough
Lightly oil a clean bowl to prevent sticking. Turn your dough onto a floured surface and shape it into a rough ball. This step is incredibly satisfying and sets the stage for that lovely artisan shape.
Step 4: First Rise
Place your dough ball into the oiled bowl, cover it with plastic wrap, and let it rise. Ideal rising time is about 2 hours or until it has doubled in size. This is when your dough develops flavor and a beautiful airy texture.
Step 5: Prepare for the Second Rise
If you refrigerated your dough overnight for convenience, bring it back to room temperature. Give it a gentle reshaping back into a ball, then allow it to rise once more for about an hour. This second rise ensures your bread gets that perfect lift before baking.
Step 6: Preheat the Oven
Crank your oven up to 450°F to create that ideal environment for a crispy, golden crust. A hot oven is key for that impressive artisan finish.
Step 7: Heat the Casserole
Place your baking casserole or Dutch oven in the oven while it preheats. When it’s screaming hot, carefully remove it and transfer your dough—on a piece of parchment paper—into the casserole. Cover it back with the lid to trap steam and produce a crusty surface.
Step 8: Bake the Bread
Bake covered for 25 to 30 minutes, then remove the lid for the last 5 to 10 minutes. This uncovered baking helps brown the crust beautifully for that mouth-watering finish.
Step 9: Cool and Enjoy
Once baked, place your bread on a wire rack and allow it to cool completely. This resting time lets the interior set properly while the crust crisps up further—patience here is a virtue!
How to Serve Master No Knead Artisan Bread in Just 45 Minutes Recipe

Garnishes
A simple sprinkle of flaky sea salt or brushing the top with melted herb butter right after baking adds a delectable touch. Fresh herbs like rosemary or thyme can also be sprinkled atop the dough before baking to infuse your bread with irresistible aroma.
Side Dishes
This artisan bread pairs perfectly with soups, stews, or your favorite dips. Imagine dipping warm, crusty slices into a creamy tomato bisque or creamy spinach dip—it’s pure comfort in every bite.
Creative Ways to Present
Slice thickly and toast it for a rustic bruschetta topped with fresh tomatoes and basil. Alternatively, hollow out the center and use it as a bread bowl for your favorite chili or creamy potato soup—presentation will wow your guests and loved ones alike.
Make Ahead and Storage
Storing Leftovers
Wrap leftover bread tightly in plastic wrap or store in an airtight container at room temperature for up to two days. This keeps your bread soft inside while maintaining its crust as best as possible.
Freezing
If you can’t finish the loaf right away, slice the bread and freeze it in a resealable bag for up to 3 months. When you’re ready, just pull out the number of slices you need and toast or thaw gently.
Reheating
To revive your artisan loaf’s fresh-from-the-oven taste, sprinkle a little water on the crust and warm it in the oven at 350°F for about 10 minutes. This brings back that crispy crust and soft inside beautifully.
FAQs
Can I use bread flour instead of all-purpose flour?
Absolutely! Bread flour has a higher protein content, which can create a chewier texture and more structure. Feel free to swap it in or even combine both for your ideal loaf.
Why does the recipe only take 45 minutes if the dough needs to rise for hours?
Great question! The 45 minutes refers to the active preparation and baking time once the dough is ready. The longer rising times can be done ahead or overnight, making this a wonderfully flexible recipe.
Can I make this recipe gluten-free?
This particular recipe works best with all-purpose or bread flour. However, you can experiment with gluten-free flour blends designed for bread baking, keeping in mind rising times and texture may vary.
Do I really need to use a casserole or Dutch oven to bake this bread?
Using a covered casserole or Dutch oven traps steam during baking, which is essential for that signature crispy crust and moist crumb. If you don’t have one, a heavy pan covered with foil can work, but results may differ slightly.
Is this recipe suitable for beginners?
Definitely! The Master No Knead Artisan Bread in Just 45 Minutes Recipe is designed to be foolproof and easy, perfect for anyone wanting to bake delicious artisan bread at home without any complicated techniques.
Final Thoughts
There is something truly magical about pulling fresh, crusty artisan bread from your own oven, and with the Master No Knead Artisan Bread in Just 45 Minutes Recipe, that magic is more accessible than ever. It’s easy, fast, and packed with flavor making it a joy to bake and even more satisfying to share. So grab your ingredients, get your oven ready, and treat yourself to this fantastic homemade bread experience—you’ll wonder why you ever bought bread from the store again!
Print
Master No Knead Artisan Bread in Just 45 Minutes Recipe
- Prep Time: 15 minutes
- Cook Time: 30 minutes
- Total Time: 2 hours 45 minutes
- Yield: 8 servings
- Category: Bread
- Method: Baking
- Cuisine: American
- Diet: Vegetarian
Description
This Master No Knead Artisan Bread recipe lets you enjoy freshly baked, crusty artisan bread at home with minimal effort. Using simple ingredients and no kneading required, this method produces a soft, airy interior and a crunchy golden crust in just about 45 minutes of active hands-on time plus rise periods. Perfect for beginners and bread lovers seeking a rustic, homemade loaf with a professional bakery feel.
Ingredients
Dry Ingredients
- 2 cups All-purpose flour
- 2 tablespoons All-purpose flour (for dusting and shaping)
- 1 teaspoon Active dry yeast
- 1 teaspoon Sugar
- 1 teaspoon Salt
- Extra flour as needed (to prevent sticking)
Wet Ingredients
- 1 cup Lukewarm water (100-110°F for activating yeast)
Instructions
- Bloom the Yeast: Dissolve the sugar in lukewarm water, then sprinkle the active dry yeast on top. Let the mixture sit for 10-15 minutes until it becomes frothy, indicating the yeast is active and ready to use.
- Mix Dry Ingredients: In a large bowl, combine 2 cups of all-purpose flour with the salt. Pour in the yeast mixture and stir until it forms a soft, sticky dough.
- Shape the Dough: Lightly spray a bowl with oil. Turn the sticky dough out onto a floured board, sprinkle extra flour to prevent sticking, and shape it gently into a smooth ball.
- First Rise: Place the dough in the oiled bowl and cover tightly with plastic wrap. Allow it to rise at room temperature for about 2 hours or until it has doubled in size.
- Prepare for Second Rise: If the dough has been refrigerated, bring it back to room temperature. Shape it again into a ball and let it rise for an additional hour, allowing for better texture and flavor development.
- Preheat Oven: Preheat your oven to 450°F, which is ideal for developing a crispy, golden crust on the bread.
- Heat the Casserole: Place a covered casserole or Dutch oven in the oven while preheating. When hot, carefully remove it from the oven and transfer the dough onto parchment paper inside the casserole. Cover with the lid and return it to the oven.
- Bake the Bread: Bake the bread covered for 25-30 minutes. Remove the lid for the last 5-10 minutes of baking to allow the crust to brown and crisp up beautifully.
- Cool and Enjoy: Remove the bread from the oven and transfer it to a wire rack. Let it cool completely before slicing for the best texture and flavor.
Notes
- The key to this recipe is allowing the dough to rise fully, which develops flavor without the need to knead.
- Using a covered casserole or Dutch oven traps steam and helps form a crispy crust.
- Ensure the water temperature is lukewarm, about 100-110°F, to activate the yeast without killing it.
- You can refrigerate the dough after the first rise and bake it the next day, just allow it to come to room temperature before baking.
- Use parchment paper to easily transfer the dough and prevent sticking inside the hot casserole.


