
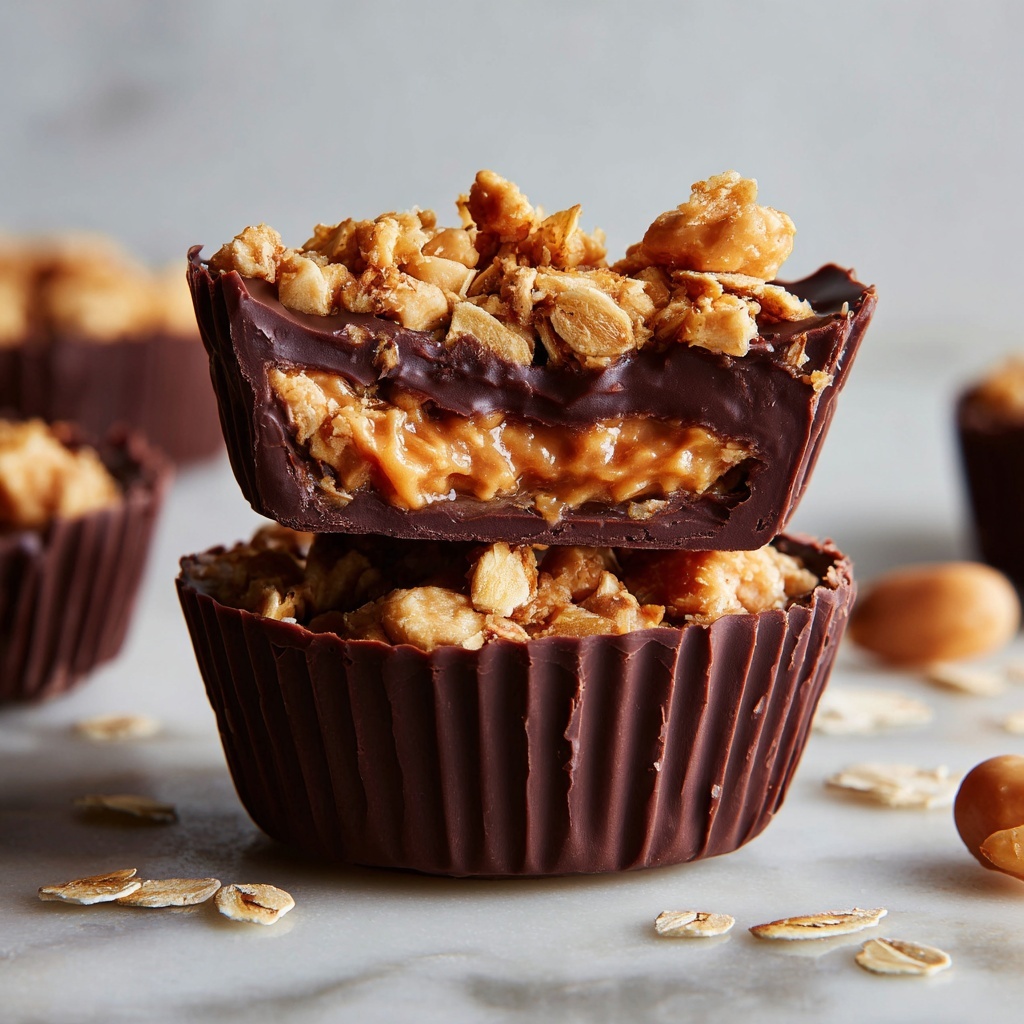
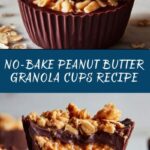
If you’re looking for a sweet treat that’s bursting with peanut buttery goodness but without turning on your oven, this No-Bake Peanut Butter Granola Cups Recipe is exactly what you need. These delightful little cups combine the crunchy texture of oats with the creamy richness of peanut butter filling, making them an irresistible snack or dessert that everyone will rave about. Perfectly balanced between wholesome and indulgent, they come together quickly and are ideal for those moments when you want something satisfying yet simple to prepare.
Ingredients You’ll Need
Every ingredient here plays a crucial role, whether it’s adding texture, sweetness, creaminess, or that irresistible chocolate touch. Their simplicity is what makes this recipe so approachable yet delicious.
- Rolled oats: The hearty, chewy base that provides crunch and fiber.
- Honey: A natural sweetener that binds everything together with a glossy finish.
- Creamy peanut butter: Infuses the cups and filling with that iconic nutty flavor.
- Coconut oil: Helps melt ingredients smoothly and adds a subtle tropical note.
- Vanilla extract: Enhances sweetness and depth without overpowering.
- Salt: Balances the flavors and brings out the peanut butter’s richness.
- Mini chocolate chips (optional): For an added chocolatey surprise in each bite.
- Powdered sugar: Sweetens the filling with a silky texture.
- Heavy cream: Whips the filling into a luxuriously smooth consistency.
- Melted chocolate (optional): Perfect for drizzling on top for extra decadence.
- Chopped peanuts (optional): Offers crunch and an appealing garnish.
How to Make No-Bake Peanut Butter Granola Cups Recipe
Step 1: Prepare the Granola Cups
Start off by heating honey, peanut butter, and coconut oil together in a large saucepan over medium heat. Stir gently until everything melts into a silky, combined mixture. This is the magic glue that holds the granola cups perfectly together.
Step 2: Add Flavors
Remove the pan from heat and stir in vanilla extract and a pinch of salt. These small additions make a big difference, enhancing the overall flavor profile with warmth and balance.
Step 3: Mix in the Oats and Chocolate Chips
Fold in the rolled oats until every flake is coated in that luscious peanut butter and honey blend. If you want a little chocolatey twist, toss in the mini chocolate chips now so they distribute evenly.
Step 4: Form the Cups
Line a muffin tin with paper liners. Press the granola mixture firmly into each cup, shaping them carefully so they hold like sturdy little bowls. This step sets the foundation for your delicious peanut butter filling.
Step 5: Refrigerate to Set
Place the muffin tin in the refrigerator for about 20 minutes to let the cups firm up while you prepare the filling — easy and multitasking at its best.
Step 6: Prepare the Peanut Butter Filling
In a separate bowl, beat together creamy peanut butter, powdered sugar, and heavy cream until you achieve a smooth, fluffy filling that’s pure peanut butter bliss.
Step 7: Assemble and Chill
Spoon or pipe the filling into each chilled granola cup. For an extra touch of indulgence, drizzle some melted chocolate on top and sprinkle with chopped peanuts. Pop them back into the fridge for at least an hour so everything sets beautifully.
Step 8: Serve and Enjoy
Once firm, these No-Bake Peanut Butter Granola Cups are ready to be devoured. Serve them chilled for the perfect creamy, crunchy bite every time.
How to Serve No-Bake Peanut Butter Granola Cups Recipe

Garnishes
A simple drizzle of melted chocolate, a sprinkle of chopped peanuts, or even a dusting of powdered sugar can elevate the look and taste. Adding these garnishes not only makes your presentation stunning but also adds layers of texture and flavor that guests will love.
Side Dishes
While these cups shine as a stand-alone snack, pairing them with a cool glass of milk or a cup of freshly brewed coffee creates a perfect snack break. They also complement light fruit salads beautifully if you want a balanced yet indulgent spread.
Creative Ways to Present
Serve them in decorative mini cupcake liners for a party or pack them in bento boxes for on-the-go treats. You can even arrange them on a dessert platter with fresh berries and edible flowers to make the table pop with color and inviting aromas.
Make Ahead and Storage
Storing Leftovers
Keep any leftovers refrigerated in an airtight container. They stay fresh and delicious for up to 5 days, making them perfect for snacking throughout the week without losing that freshly made vibe.
Freezing
You can freeze these cups for up to a month. Simply place them on a baking sheet to freeze individually before transferring to a freezer-safe container. When you want one, just thaw in the fridge overnight for a ready-to-eat treat.
Reheating
These cups are best enjoyed chilled, so reheating isn’t really necessary. If you prefer a softer filling, just let them sit at room temperature for 10 minutes before indulging.
FAQs
Can I substitute the peanut butter with another nut butter?
Absolutely! Almond butter or cashew butter work wonderfully, though it will slightly change the flavor and texture. Just choose a creamy variety to keep the filling smooth.
Is it necessary to use coconut oil?
You can substitute coconut oil with butter or even a neutral oil like vegetable oil, but coconut oil adds a nice subtle flavor and helps the cup set more firmly when chilled.
Can I make these cups vegan?
Yes, swap honey for maple syrup or agave nectar, and use a plant-based cream substitute to make this recipe vegan-friendly without sacrificing the creamy texture.
How long do these granola cups keep in the fridge?
Stored in an airtight container, they generally stay fresh for around 5 days, maintaining both texture and flavor until you’re ready for another bite.
Can I add other mix-ins to the granola cups?
Definitely! Try adding chopped dried fruit, seeds, or shredded coconut for extra texture and flavor. Just ensure the additions pair well with peanut butter for the best results.
Final Thoughts
This No-Bake Peanut Butter Granola Cups Recipe embodies the perfect balance of crunchy, creamy, and sweet, all without needing to heat up your kitchen. They’re simple to whip up, easy to store, and infinitely customizable. Give them a try and watch how quickly they become your new favorite snack to share with family and friends.
Print
No-Bake Peanut Butter Granola Cups Recipe
- Prep Time: 15 minutes
- Cook Time: 10 minutes
- Total Time: 1 hour 15 minutes
- Yield: 12 servings
- Category: Dessert
- Method: Stovetop
- Cuisine: American
Description
These No-Bake Peanut Butter Granola Cups are a delicious and easy-to-make treat perfect for a quick snack or dessert. Combining crunchy oats, creamy peanut butter, and a hint of chocolate, these cups come together without any baking, requiring just chilling time to set.
Ingredients
Granola Cups
- 2 1/2 cups rolled oats
- 1/2 cup honey
- 1/2 cup creamy peanut butter
- 1/4 cup coconut oil
- 1 teaspoon vanilla extract
- 1/4 teaspoon salt
- 1/2 cup mini chocolate chips (optional)
Peanut Butter Filling
- 1/2 cup creamy peanut butter
- 1/4 cup powdered sugar
- 1/4 cup heavy cream
Optional Toppings
- Melted chocolate
- Chopped peanuts
Instructions
- Prepare the Granola Cups: In a large saucepan over medium heat, combine honey, peanut butter, and coconut oil. Stir continuously until the mixture is smooth and the ingredients are melted and fully combined.
- Add Flavorings: Remove the saucepan from heat. Stir in vanilla extract and salt evenly to distribute the flavors throughout the mixture.
- Mix Oats and Chocolate Chips: Add the rolled oats to the saucepan and mix until all oats are fully coated with the peanut butter mixture. Stir in mini chocolate chips if desired for added sweetness and texture.
- Form the Cups: Line a muffin tin with paper liners. Evenly divide the granola mixture among the cups, pressing firmly to shape and compact the mixture into a sturdy cup form that will hold the filling.
- Chill to Set: Place the filled muffin tin in the refrigerator and chill until the granola cups are firm, which takes about 30 minutes. This step helps the cups hold their shape.
- Prepare the Peanut Butter Filling: In a medium mixing bowl, beat together the peanut butter, powdered sugar, and heavy cream until the filling is smooth and creamy, perfect for spooning into the granola cups.
- Assemble the Cups: Spoon the prepared peanut butter filling into each granola cup evenly.
- Add Optional Toppings: Drizzle melted chocolate over the filled cups and sprinkle chopped peanuts on top if using to add flavor and decoration.
- Final Chill: Refrigerate the assembled granola cups for at least 1 hour or until the filling is firm and the cups are fully set, ready for serving.
- Serve and Enjoy: Serve chilled as a delightful snack or dessert that combines textures and flavors in every bite.
Notes
- You can substitute honey with maple syrup for a vegan option.
- Use natural peanut butter to reduce added sugars.
- Mini chocolate chips can be omitted or replaced with raisins for variation.
- For a crunchier texture, toast the oats lightly before mixing.
- Store the granola cups in an airtight container in the refrigerator for up to one week.
