
If you have ever dreamed of a cake that bursts with tropical flavor and melts gently in your mouth, look no further than the Pineapple Heaven Cake: 7 Steps to Pure Bliss Recipe. This delightful dessert brings together the perfect harmony of soft, moist cake layered with luscious crushed pineapple and fluffy whipped cream. Every bite feels like a mini-vacation, delivering bright, juicy sweetness balanced by the rich, tender crumb. Whether you’re celebrating a special occasion or simply craving something extraordinary, this recipe is your passport to pure bliss in dessert form.

Ingredients You’ll Need
These ingredients are wonderfully straightforward, yet each one plays a crucial role in making this cake shine. From the tenderizing richness of butter to the tropical zing of crushed pineapple, every element contributes to the taste, texture, and inviting appearance of this treat.
- 2 cups all-purpose flour: Provides the perfect structure for a soft, fluffy cake.
- 1 cup sugar: Sweetens the cake, balancing the pineapple’s natural tartness.
- 1/2 cup unsalted butter, softened: Adds richness and moistness to the batter.
- 1 cup milk: Keeps the cake tender and adds just the right amount of moisture.
- 3 eggs: Binds the ingredients together for a light, airy texture.
- 2 teaspoons baking powder: The leavening agent that helps the cake rise beautifully.
- 1 teaspoon vanilla extract: Offers subtle warmth and enhances other flavors.
- 1 can (20 oz) crushed pineapple, drained: Delivers juicy sweetness and tropical flair without sogginess.
- 1 cup whipped cream: The luscious topping that makes every forkful heavenly.
How to Make Pineapple Heaven Cake: 7 Steps to Pure Bliss Recipe
Step 1: Preheat and Prepare
Start by heating your oven to 350°F (175°C) and greasing and flouring two 9-inch round cake pans. This simple prep ensures your cakes won’t stick and will have perfect edges once baked. Taking the time here guarantees easy removal and beautiful layers down the road.
Step 2: Cream Butter and Sugar
In a large bowl, cream together the softened butter and sugar until the mixture is light and fluffy. This step is key because it incorporates air into the batter, setting the stage for a tender, moist cake. Don’t rush it; patience here rewards you with cake that practically floats.
Step 3: Add Eggs and Vanilla
Add the eggs one at a time, beating well after each addition to fully incorporate and create a smooth mixture. Then stir in the vanilla extract, which adds a gentle aromatic note that heightens the pineapple’s tropical brightness throughout the dessert.
Step 4: Mix Dry Ingredients
In a separate bowl, sift together the flour and baking powder. This ensures even distribution of the leavening agent and prevents clumps, giving your cake a consistent crumb. Taking this extra step is like giving your cake the foundation it needs to rise perfectly.
Step 5: Combine Wet and Dry
Gradually add your dry ingredients to the wet, alternating with milk. Start and end with the flour mixture. This back-and-forth method keeps the batter smooth and silky without overworking the gluten, which can make cakes tough. A gently mixed batter is the secret to delicate texture.
Step 6: Fold in Crushed Pineapple
Finally, fold in the drained crushed pineapple with a spatula. Mixing gently retains the juicy bursts in the cake without washing down its structure. The pineapple is the star ingredient, infusing the cake layers with tropical sweetness and moisture that make every bite delightful.
Step 7: Bake and Assemble
Divide the batter evenly between the two prepared pans and bake for 25-30 minutes. You’ll know it’s ready when a toothpick inserted in the center comes out clean. Let the cakes cool in the pans for 10 minutes before removing them to a wire rack. Once completely cool, layer the cakes with whipped cream between and on top for that signature Pineapple Heaven Cake: 7 Steps to Pure Bliss Recipe finish.
How to Serve Pineapple Heaven Cake: 7 Steps to Pure Bliss Recipe

Garnishes
Elevate your presentation by garnishing with fresh pineapple slices, toasted coconut flakes, or even a sprig of mint. These little touches not only add visual appeal but also layer additional textures and flavors, making the experience extra special for your guests.
Side Dishes
This cake pairs wonderfully with light sides like a scoop of vanilla ice cream or a fresh fruit salad. These accompaniments keep the tropical vibe going and provide a cool balance to the cake’s sweetness and creamy whipped topping.
Creative Ways to Present
Try serving individual slices in pretty clear dessert plates with a drizzle of pineapple syrup or a dusting of powdered sugar. For a festive occasion, decorate the cake with tropical-themed cupcake picks or edible flowers. The Pineapple Heaven Cake: 7 Steps to Pure Bliss Recipe is a canvas waiting for your creative flair.
Make Ahead and Storage
Storing Leftovers
Keep any leftover cake tightly covered in the refrigerator to maintain freshness. Stored properly, it will stay moist and flavorful for up to three days. The whipped cream topping means refrigeration is essential to keep everything safe and delicious.
Freezing
You can freeze the cake layers before assembling by wrapping them well in plastic wrap and foil. When ready to enjoy, thaw in the refrigerator overnight, then add whipped cream and assemble just before serving for best results. This makes the Pineapple Heaven Cake: 7 Steps to Pure Bliss Recipe a perfect make-ahead option.
Reheating
This cake is best enjoyed cold or at room temperature due to the whipped cream topping. If you prefer, you can let slices sit at room temperature for about 20-30 minutes before serving. Avoid microwaving, which could melt the whipped cream and alter the texture.
FAQs
Can I use fresh pineapple instead of canned?
Yes, fresh pineapple can be used, but be sure to drain it very well to avoid making the batter too wet. Fresh fruit adds a wonderful bright flavor that pairs perfectly with this cake.
Is it possible to make this cake gluten-free?
Absolutely! Substitute the all-purpose flour with a gluten-free flour blend that includes xanthan gum, and your cake will turn out just as moist and delightful.
Can I replace whipped cream with frosting?
While whipped cream is traditional and light, you could use cream cheese frosting or buttercream if you prefer a richer topping. It will change the cake’s character slightly but still be delicious.
How long does the Pineapple Heaven Cake last?
When stored properly covered in the fridge, the cake remains fresh for up to three days. Because of the whipped cream, it’s best enjoyed sooner rather than later for optimal texture and flavor.
Can I make this recipe into cupcakes?
Yes! Simply spoon the batter into cupcake liners and bake for about 18-22 minutes. Top with whipped cream once cooled, and you have adorable Pineapple Heaven mini treats.
Final Thoughts
Trying the Pineapple Heaven Cake: 7 Steps to Pure Bliss Recipe is like inviting a tropical escape right into your kitchen. Its simplicity and incredible flavor make it a joy to bake and share. I can’t wait for you to experience how this cake can brighten your day, whether for a weekend treat or a festive gathering. Go ahead, make it your next favorite dessert!
Print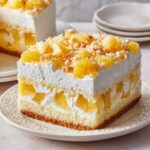
Pineapple Heaven Cake: 7 Steps to Pure Bliss Recipe
- Prep Time: 15 minutes
- Cook Time: 30 minutes
- Total Time: 45 minutes
- Yield: 8 servings
- Category: Dessert
- Method: Baking
- Cuisine: American
Description
Pineapple Heaven Cake is a moist and fluffy layered cake bursting with the tropical flavor of crushed pineapple, complemented by a light whipped cream frosting. This delightful cake combines a tender vanilla-infused crumb with juicy pineapple for a heavenly dessert perfect for any occasion.
Ingredients
Cake Batter
- 2 cups all-purpose flour
- 1 cup sugar
- 1/2 cup unsalted butter, softened
- 1 cup milk
- 3 eggs
- 2 teaspoons baking powder
- 1 teaspoon vanilla extract
- 1 can (20 oz) crushed pineapple, drained
Frosting
- 1 cup whipped cream
Instructions
- Preheat Oven: Preheat your oven to 350°F (175°C) to ensure it reaches the proper temperature for baking the cakes evenly.
- Prepare Pans: Grease and flour two 9-inch round cake pans to prevent the cake from sticking and allow for easy removal after baking.
- Cream Butter and Sugar: In a large bowl, cream together the softened butter and sugar until the mixture is light and fluffy, which helps incorporate air for a tender cake texture.
- Add Eggs: Add eggs one at a time, mixing well after each addition to fully incorporate them and maintain the batter’s consistency.
- Add Vanilla: Stir in the vanilla extract to infuse the batter with a warm, aromatic flavor.
- Mix Dry Ingredients: In a separate bowl, combine the all-purpose flour and baking powder thoroughly to ensure even distribution of the leavening agent.
- Combine Wet and Dry Ingredients: Gradually add the dry ingredients to the wet mixture, alternating with milk, starting and ending with the dry ingredients. Mix gently to avoid overworking the batter.
- Fold in Pineapple: Gently fold the drained crushed pineapple into the batter to distribute fruit evenly without deflating the mixture.
- Fill Pans: Pour the batter evenly into the prepared cake pans, smoothing the tops to promote even rising.
- Bake: Bake in the preheated oven for 25-30 minutes, or until a toothpick inserted in the center comes out clean, indicating the cakes are fully cooked.
- Cool Cakes: Allow the cakes to cool in pans for 10 minutes, then carefully remove them and let cool completely on a wire rack to prevent sogginess before frosting.
- Assemble and Frost: Once the cakes are completely cooled, layer them by spreading whipped cream between the layers and generously on top for a light, creamy finish.
Notes
- Ensure pineapple is well-drained to avoid adding excess moisture that can affect cake texture.
- Use room temperature ingredients for better mixing and batter consistency.
- For an extra touch, garnish the top with pineapple chunks or toasted coconut flakes.
- Store the cake refrigerated due to the whipped cream frosting and consume within 2-3 days for freshness.
- Make sure not to overmix the batter to keep the cake tender and fluffy.


