
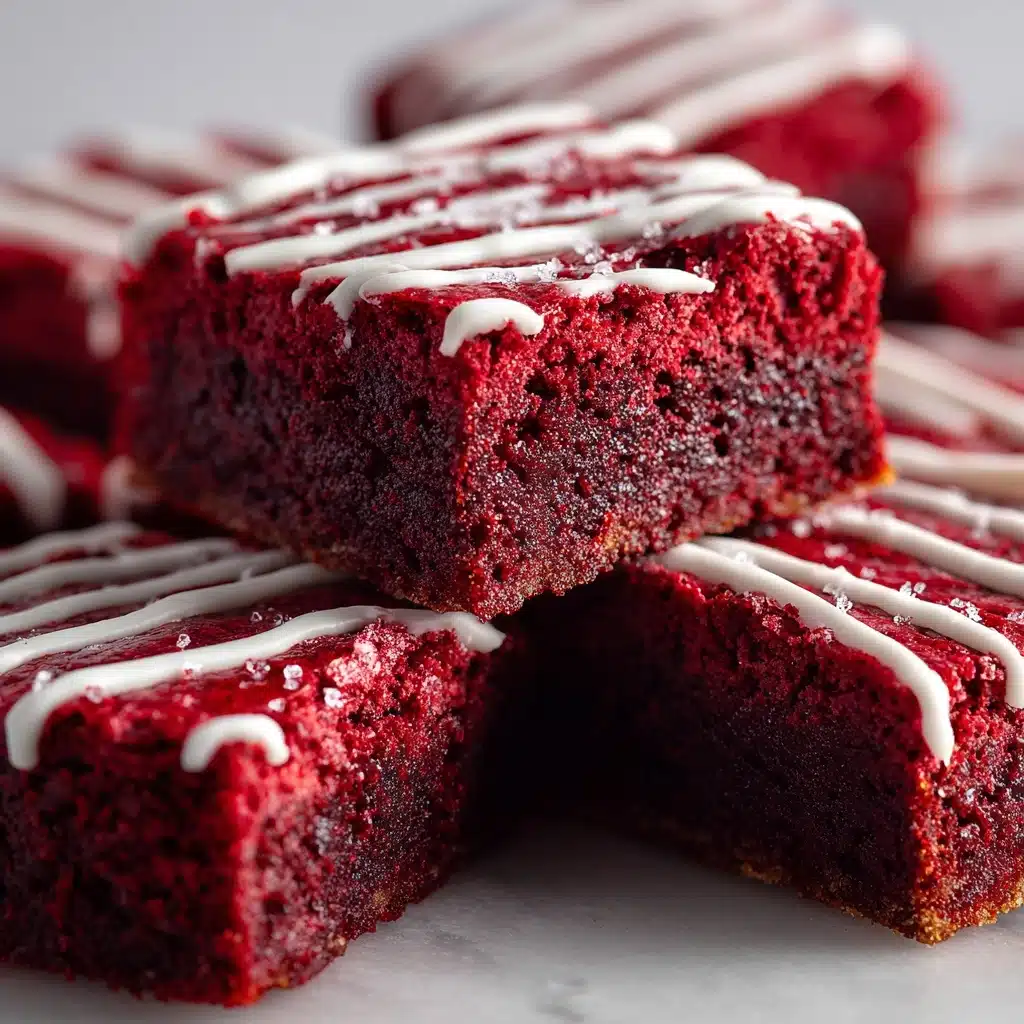
If you’re on the hunt for a dessert that’s as stunning as it is irresistibly delicious, this Red Velvet Brownies Recipe is about to become your new favorite showstopper. With their signature ruby color, irresistibly fudgy bite, and just the right hint of cocoa, these brownies blend nostalgia and indulgence in every square. They deliver everything you love about classic red velvet cake, but in the compact, decadent form of brownies you can share (or keep all to yourself!).
Ingredients You’ll Need
Red velvet magic starts with a handful of simple staples, but every ingredient plays a crucial role. Here’s why each one matters—they create the vibrant color, rich taste, and drool-worthy texture that a perfect Red Velvet Brownies Recipe promises.
- Unsalted Butter (melted, 1/2 cup): Melted butter guarantees that classic brownie chew and all-around richness.
- Granulated Sugar (1 cup): This sweetens the brownies and helps create their signature crackly top.
- Large Eggs (2): Eggs add structure and keep the brownies moist and tender.
- Red Food Coloring (1 tablespoon): The secret to eye-catching, vibrant scarlet hue in this Red Velvet Brownies Recipe.
- Vanilla Extract (1 teaspoon): Adds depth and that familiar, cozy vanilla aroma.
- Unsweetened Cocoa Powder (1/4 cup): Brings the subtle cocoa flavor red velvet is famous for—don’t skip it.
- All-Purpose Flour (3/4 cup): Just enough to hold everything together without drying out the brownies.
- Salt (1/4 teaspoon): Makes all the flavors pop and balances the sweetness.
- White Vinegar (1/2 teaspoon): Enhances the color and adds authentic tanginess.
- White Chocolate Chips or Cream Cheese Frosting Swirl (1/2 cup, optional): A swoon-worthy addition for extra decadence—your choice!
How to Make Red Velvet Brownies Recipe
Step 1: Prepare Your Pan
Start by preheating your oven to 350°F (175°C). Line an 8×8-inch baking pan with parchment paper for easy removal, or lightly grease it if you don’t have parchment handy. This tiny step saves big on cleanup and helps you get perfectly neat brownies every time.
Step 2: Mix Wet Ingredients
Grab a mixing bowl and whisk together the melted butter and sugar until the mixture looks glossy and well-combined. This is the first key to a shiny, crinkly brownie top!
Step 3: Add Eggs and Flavorings
Next, add the eggs one at a time, whisking well after each addition. Stir in the red food coloring, vanilla extract, and vinegar. The food coloring brings that signature red color, while the splash of vinegar gives it an authentic red velvet tang.
Step 4: Sift and Combine Dry Ingredients
In a separate bowl, sift together the cocoa powder, flour, and salt. Sifting ensures the brownies bake up evenly, with no dry pockets of cocoa or flour—totally worth the extra minute.
Step 5: Bring It All Together
Gently add the dry ingredients to your wet mixture. Stir just until there are no dry streaks—overmixing can mean tough brownies. If you want extra decadence, gently fold in half a cup of white chocolate chips or dollop and swirl in little spoonfuls of cream cheese frosting here.
Step 6: Pour and Smooth
Pour the vivid red batter into your prepared pan. Use a spatula to nudge it evenly into all the corners. This even layer helps your Red Velvet Brownies Recipe bake up uniformly for perfect squares.
Step 7: Bake and Test
Slip the pan into your preheated oven and bake for 25 to 30 minutes. Check doneness by inserting a toothpick in the center—it should emerge with a few moist crumbs, not dry. Remember, red velvet brownies are best when fudgy and moist, so don’t overbake!
Step 8: Cool and Slice
Let the brownies cool completely in the pan before lifting them out, thanks to that handy parchment paper. Once cool, slice into 9 neat squares. They’re ready to serve, devour, or share if you’re feeling generous.
How to Serve Red Velvet Brownies Recipe

Garnishes
For a bakery-worthy finish, dust your brownies with a little powdered sugar, drizzle with melted white chocolate, or go all in with a silky cream cheese glaze. Fresh berries scattered on top also add an elegant pop of color and tartness.
Side Dishes
Elevate your dessert plate by pairing these beauties with a scoop of vanilla ice cream, a dollop of whipped cream, or a tall glass of cold milk. The creamy and cool sides let the rich flavor of your Red Velvet Brownies Recipe truly shine.
Creative Ways to Present
For parties, cut the brownies into bite-sized cubes and skewer them with fresh strawberries. Or, layer chunks into parfait glasses with sweetened whipped cream for an impressive red velvet trifle. The vibrant red makes any arrangement festive and fun!
Make Ahead and Storage
Storing Leftovers
Once cool, keep your brownies in an airtight container at room temperature for up to 3 days. They’ll stay moist and fudgy, ready for whenever that sweet craving strikes.
Freezing
These brownies freeze beautifully! Wrap individual squares tightly in plastic wrap, then store in a freezer bag or container. They’ll be good for up to 2 months—just thaw at room temperature when you’re ready for a treat.
Reheating
If you love a warm brownie, pop a square in the microwave for about 10-15 seconds. The chocolate chips get melty again, and the whole thing turns gooey—heavenly, especially with ice cream!
FAQs
Can I use natural instead of Dutch-processed cocoa powder?
Absolutely! Either cocoa works well since the vinegar keeps the classic red velvet tang. Just use whichever you have on hand—natural cocoa brings slightly more acidity, while Dutch-processed is a bit smoother and darker.
How can I make this Red Velvet Brownies Recipe gluten-free?
Swap the all-purpose flour for your favorite 1:1 gluten-free baking blend. The texture may be just a bit softer, but it’ll still taste wonderful and rich.
Why do you add vinegar to red velvet brownies?
Vinegar interacts with the cocoa powder and helps enhance that classic red color, while also providing an extra hint of tanginess that makes red velvet treats so distinctive.
Do I have to add food coloring?
Nope! The food coloring is purely for that nostalgic red appearance. If you’d rather skip it, your brownies will still be absolutely delicious—just a little more chocolatey-brown than red.
What’s the best way to get clean brownie squares?
Let the brownies cool completely, then use a sharp knife wiped clean between each cut. For extra tidiness, chill the brownies in the fridge for 30 minutes before slicing them into squares.
Final Thoughts
If you crave something visually stunning and drool-worthy, you really have to try this Red Velvet Brownies Recipe! Each gooey square delivers pure joy—rich cocoa, signature red color, and that extra love baked in. Go ahead, bake a batch and share the happiness—your friends and family will thank you!
Print
Red Velvet Brownies Recipe
- Total Time: 40 minutes
- Yield: 9 brownies 1x
- Diet: Vegetarian
Description
Indulge in the decadent delight of Red Velvet Brownies. These fudgy treats are a twist on the classic cake, with a rich red color and a hint of cocoa. Perfect for satisfying your sweet tooth!
Ingredients
Dry Ingredients:
- 3/4 cup all-purpose flour
- 1/4 cup unsweetened cocoa powder
- 1/4 teaspoon salt
Wet Ingredients:
- 1/2 cup unsalted butter, melted
- 1 cup granulated sugar
- 2 large eggs
- 1 tablespoon red food coloring
- 1 teaspoon vanilla extract
- 1/2 teaspoon white vinegar
Optional:
- 1/2 cup white chocolate chips or cream cheese frosting swirl
Instructions
- Preheat Oven: Preheat oven to 350°F (175°C) and prepare a baking pan.
- Mix Wet Ingredients: Whisk melted butter and sugar, then add eggs, food coloring, vanilla, and vinegar.
- Combine Dry Ingredients: Sift cocoa, flour, and salt together; add to wet mixture.
- Add Optional: Fold in white chocolate chips or swirl in cream cheese frosting.
- Bake: Spread batter in pan and bake for 25–30 minutes.
- Cool and Serve: Let cool before cutting into squares.
Notes
- Do not overbake for moist, fudgy brownies.
- Consider adding a cream cheese glaze for extra indulgence.
- Prep Time: 10 minutes
- Cook Time: 30 minutes
- Category: Dessert
- Method: Baking
- Cuisine: American
Nutrition
- Serving Size: 1 brownie
- Calories: 240
- Sugar: 20g
- Sodium: 100mg
- Fat: 11g
- Saturated Fat: 6g
- Unsaturated Fat: 5g
- Trans Fat: 0g
- Carbohydrates: 32g
- Fiber: 1g
- Protein: 3g
- Cholesterol: 55mg


