
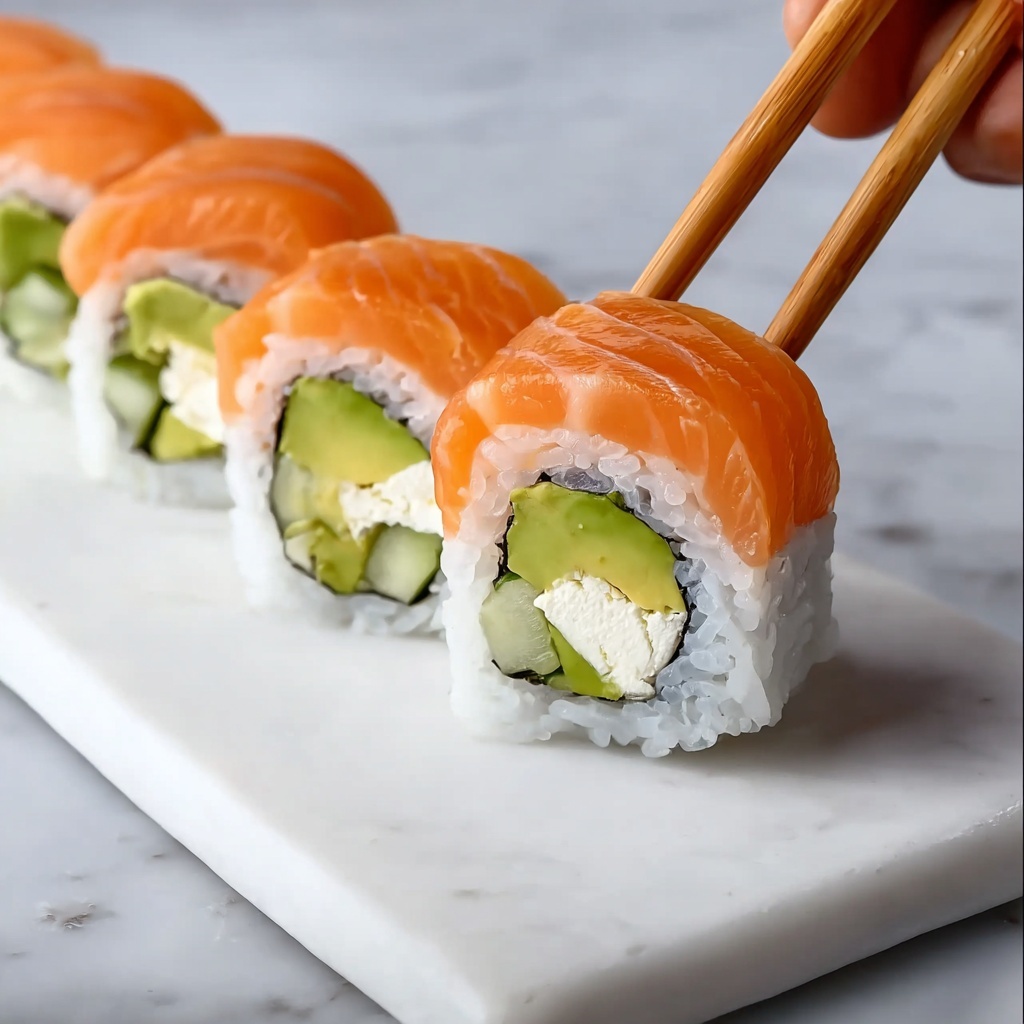
If you have been craving a delightful sushi experience at home, this Salmon and Cream Cheese Sushi Roll Recipe is an absolute game-changer. It combines the silky smoothness of cream cheese with the fresh, buttery texture of salmon, perfectly balanced by crisp cucumber and creamy avocado. Every bite bursts with a medley of flavors and textures that feel both luxurious and comforting. Whether you’re a sushi lover or just exploring new dishes, this recipe is simple enough for beginners yet exciting enough to impress your friends and family. Get ready for your taste buds to take a joyful journey!
Ingredients You’ll Need
These ingredients are straightforward yet essential in creating the perfect Salmon and Cream Cheese Sushi Roll Recipe. Each one brings something unique to the dish, from the tender salmon to the creamy richness of the cheese, all wrapped up in the delightful chewiness of sushi rice and crisp, fresh veggies.
- 1 cup Sushi Rice (cooked): The sticky, slightly sweet base that holds everything together in this sushi roll.
- 1 sheet Nori Seaweed: Adds a savory, oceanic flavor and wraps the ingredients neatly.
- 1 Tablespoon Cream Cheese: Provides smooth, creamy richness that contrasts beautifully with fresh salmon.
- 1 Salmon Fillet (cut into 6 thin slices): The star protein offering a buttery, melt-in-your-mouth sensation.
- ½ Avocado (cut into 3 slices): Adds a luscious, creamy texture while balancing flavors.
- ⅓ Cucumber (peeled and cut lengthwise into quarters): Brings a refreshing crunch and slight sweetness.
How to Make Salmon and Cream Cheese Sushi Roll Recipe
Step 1: Prep Ingredients
First things first, gather and prepare your ingredients by slicing the avocado, cucumber, and salmon exactly as described. Having the sushi rice cooked and ready at this stage makes the assembly smooth and stress-free. Cutting salmon into thin slices ensures each bite will have a delicate, tender texture.
Step 2: Make Sushi Rice
Cook the sushi rice according to your preferred method or recipe. The key is to have it warm and sticky enough to spread evenly over the nori without falling apart. Perfectly cooked rice is the secret heart of the Salmon and Cream Cheese Sushi Roll Recipe, creating that authentic sushi feel.
Step 3: Slice Avocado and Cucumber
Cut the avocado into thin, elegant slices and peel the cucumber before slicing it into long strips. These veggies contribute essential color and crunch, balancing the creaminess of the salmon and cream cheese beautifully.
Step 4: Prepare the Nori
Lay a single sheet of nori on a bamboo sushi mat wrapped in plastic wrap. This prevents sticking and provides a sturdy base for rolling. Proper placement at this stage ensures that your sushi roll will be neat and tightly bound.
Step 5: Spread Rice on Nori
Evenly spread almost all your cooked sushi rice over the nori sheet using your fingers to gently press it down. A thin, uniform layer makes rolling easier and ensures every bite gets a perfect rice-to-filling ratio.
Step 6: Spread Rice on the Other Side
Flip the nori sheet so the rice faces down, then spread 2 to 3 tablespoons of rice on one half of the exposed nori, leaving a 1-inch gap at the lower edge. This step creates the foundation for your sushi fillings and the roll’s seal.
Step 7: Add Cream Cheese
Spread a thin line of cream cheese along the center of the rice-covered nori half. This creamy layer will melt slightly to bind the other ingredients, giving a silky contrast to the fresh veggies and fish.
Step 8: Arrange Vegetables
Place your cucumber strips over the cream cheese line, then lay the avocado slices neatly in a row on top. This arrangement ensures a balanced bite of crisp, creamy, and rich flavors.
Step 9: Roll the Sushi
Using your plastic-wrapped bamboo mat, pick up the edge closest to you and begin rolling the sushi tightly, pressing gently as you go. A tight roll holds the ingredients together and forms the classic sushi shape you’ll instantly recognize.
Step 10: Press and Seal
Roll completely and press firmly with the mat to create a compact sushi roll. This extra pressure makes sure the roll won’t fall apart when sliced or served.
Step 11: Add Salmon Topping
Lay the sliced salmon pieces evenly on top of the roll. This topping highlights the star ingredient and adds a luxurious texture and flavor.
Step 12: Mold with Mat
Gently press down on the roll with the bamboo mat again to help the salmon adhere and form a perfect, smooth top. This finishing touch ups the presentation and infuses each bite with salmon.
Step 13: Cut Sushi Roll
Remove the roll from the mat and slice it into eight approximately one-inch-thick pieces. Use a sharp knife dipped in water to make clean cuts without squishing your masterpiece.
Step 14: Serve
Arrange the sushi slices beautifully on a plate and serve with soy sauce, wasabi, and pickled ginger for dipping. This classic trio heightens the flavors and makes your Salmon and Cream Cheese Sushi Roll Recipe a full experience to savor.
How to Serve Salmon and Cream Cheese Sushi Roll Recipe

Garnishes
Garnish your sushi rolls with finely chopped scallions, sesame seeds, or a drizzle of spicy mayo to add flavor, texture, and vibrant color. These simple touches elevate both the visual appeal and taste of your Salmon and Cream Cheese Sushi Roll Recipe.
Side Dishes
Serve your sushi with traditional sides like miso soup or a refreshing seaweed salad. These dishes complement sushi’s clean flavors without overpowering the delicate salmon and cream cheese combination.
Creative Ways to Present
Try serving your salmon and cream cheese sushi roll atop lightly dressed greens for a sushi salad, or create bite-sized pieces to serve as elegant party appetizers. Rolling with colorful veggies or adding a touch of fresh herbs inside can also transform this recipe into an exciting twist on the classic.
Make Ahead and Storage
Storing Leftovers
If you have any leftovers from your Salmon and Cream Cheese Sushi Roll Recipe, store them tightly wrapped in plastic wrap in the refrigerator. Consume within 24 hours for the best texture and freshness. Sushi is best enjoyed fresh, but careful storage can extend its life slightly.
Freezing
Freezing sushi rolls with raw fish is not recommended, as it affects texture and can compromise quality. If you want to prepare ahead, consider making the components separately and assembling fresh before serving.
Reheating
Since sushi is best eaten cool, reheating is not ideal for this salmon and cream cheese combination. Instead, enjoy leftovers chilled for the freshest taste and texture.
FAQs
Can I use smoked salmon instead of fresh salmon?
Absolutely! Smoked salmon offers a different flavor profile that’s delicious and easier to handle for beginners. It pairs wonderfully with cream cheese and can make the Salmon and Cream Cheese Sushi Roll Recipe simpler to assemble.
Is cream cheese common in sushi?
While cream cheese is not traditional in Japanese sushi, it has become popular in Western-style rolls like the Philadelphia roll, adding a creamy, tangy richness that perfectly complements salmon and avocado.
How can I keep my sushi rice from sticking to my hands?
Keep a small bowl of water nearby and wet your fingers before handling the rice. This prevents the rice from sticking to your hands and makes spreading it on the nori much easier.
What can I substitute if I don’t have a bamboo sushi mat?
You can use a clean kitchen towel wrapped tightly with plastic wrap as a makeshift rolling mat. It helps apply even pressure for rolling and shaping your sushi without sticking.
Is this sushi roll gluten-free?
The basic ingredients in this Salmon and Cream Cheese Sushi Roll Recipe are gluten-free, but check your soy sauce as many brands contain gluten. Opt for a gluten-free tamari sauce to keep the whole dish safe for gluten-sensitive diners.
Final Thoughts
Making the Salmon and Cream Cheese Sushi Roll Recipe at home is such a rewarding culinary adventure. The balance of flavors and textures never fails to impress, whether for a casual lunch or a special occasion. I hope you enjoy crafting and savoring this sushi roll as much as I do—it’s truly a delightful way to bring a sushi bar experience right into your kitchen!
Print
Salmon and Cream Cheese Sushi Roll Recipe
- Prep Time: 10 minutes
- Cook Time: 15 minutes
- Total Time: 25 minutes
- Yield: 1 sushi roll (8 pieces)
- Category: Roll
- Method: No-Cook
- Cuisine: Japanese
- Diet: Low Fat
Description
A simple and delicious Salmon and Cream Cheese Sushi Roll recipe that combines tender salmon slices, creamy cheese, fresh avocado, and crisp cucumber wrapped in sushi rice and nori seaweed. Perfect for a quick homemade sushi treat.
Ingredients
Main Ingredients
- 1 cup Sushi Rice (cooked, see Notes)
- 1 sheet Nori Seaweed (see Notes)
- 1 Tablespoon Cream Cheese
- 1 Salmon Fillet (cut into 6 thin slices, about 1–1.5 inches broad each)
- ½ Avocado (cut into 3 slices)
- ⅓ Cucumber (peeled and cut lengthwise into quarters)
Instructions
- Prep Ingredients: Prepare all ingredients by slicing the avocado, cucumber, and salmon as directed. Ensure the sushi rice is cooked and ready to use.
- Make Sushi Rice: Cook sushi rice according to your preferred method or recipe. Keep it warm until ready to spread on the nori.
- Slice Avocado and Cucumber: Cut the avocado into thin slices. Peel the cucumber and cut it lengthwise into quarters to create long strips.
- Slice Salmon: Slice the salmon fillet into six thin pieces approximately 1 to 1.5 inches wide and similar in thickness to banana skin.
- Prepare the Nori: Place one sheet of nori seaweed on a plastic-wrapped bamboo sushi mat to prevent sticking during rolling.
- Spread Rice on Nori: Spread almost all the cooked sushi rice evenly over the nori sheet, fully covering it. Use your fingers to gently press the rice into the nori.
- Spread Rice on the Other Side: Flip the nori so the rice is facing down, then spread 2 to 3 tablespoons of rice on one half of the exposed seaweed, leaving a 1-inch gap at the bottom edge.
- Add Cream Cheese: Spread a thin line of cream cheese along the center of the rice on the exposed nori half.
- Arrange Vegetables: Place the cucumber strips directly over the cream cheese line, then layer the three avocado slices in a row on top of the cucumber.
- Roll the Sushi: Using the bamboo mat wrapped in plastic, hold the nori edge closest to you and start rolling the sushi tightly, pressing down slightly as you roll.
- Press and Seal: Roll completely, pressing firmly to create a tight sushi roll that holds together well.
- Add Salmon Topping: Lay the sliced salmon pieces evenly on top of the rolled sushi.
- Mold with Mat: Press down gently on the sushi roll with the bamboo mat to help the salmon adhere and shape the roll.
- Cut Sushi Roll: Remove the sushi roll from the mat and slice it into 8 pieces roughly 1 inch thick each.
- Serve: Arrange the sushi slices on a plate and serve with soy sauce, wasabi, and pickled ginger for dipping.
Notes
- Cooking sushi rice properly is key; rinse rice until water runs clear and use a rice cooker or stovetop method for best results.
- Use fresh, high-quality salmon, ideally sushi-grade or previously frozen to ensure safety.
- Wrapping the bamboo sushi mat in plastic wrap prevents rice from sticking to the mat, making rolling easier and cleaner.
- Sliced avocado should be ripe but firm to hold shape in the roll.
- Keep a damp cloth nearby to wet your fingers when handling sushi rice to prevent sticking.
- Serve sushi immediately or keep refrigerated and consume within a few hours for best freshness.


