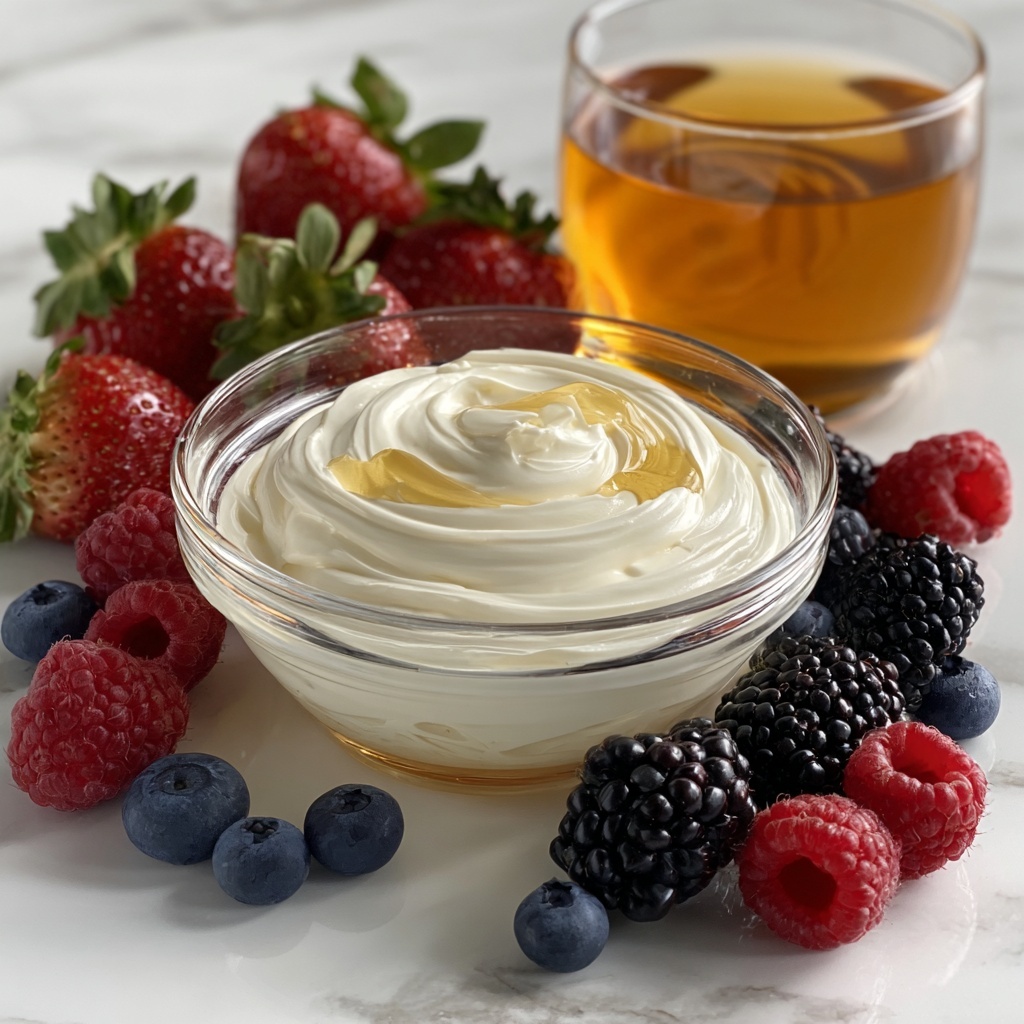
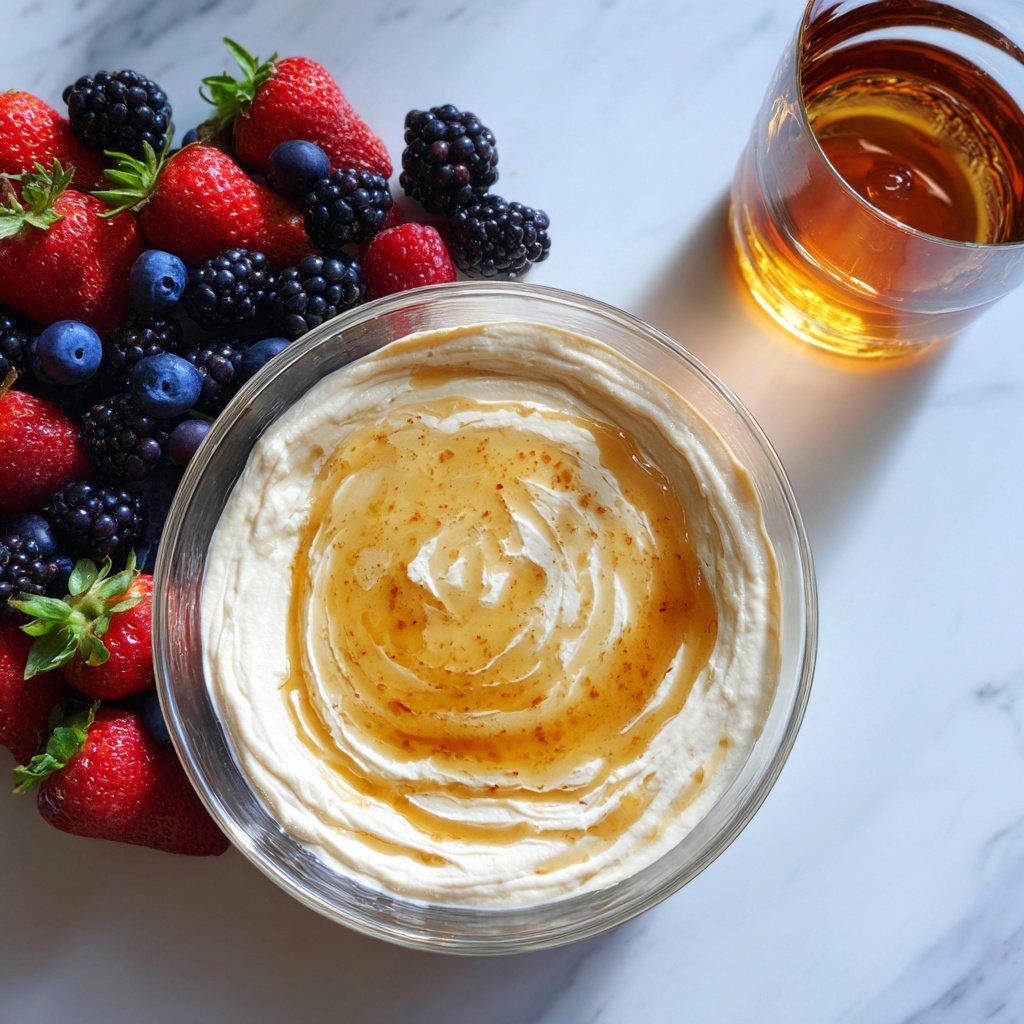
There is something truly magical about whipping up your own dairy-free delights, and the Creamy Vegan Mascarpone Cheese (No Nuts) Recipe is just one of those treasures. Silky, rich, and perfectly tangy, this mascarpone alternative brings all the indulgence of traditional mascarpone without a single nut in sight. Whether you’re crafting a luscious vegan tiramisu or looking to elevate your pasta dishes, this recipe offers a wonderful balance of creaminess and freshness that feels both luxurious and wholesome.
Ingredients You’ll Need
These ingredients are simple pantry staples, yet each plays a vital role in creating the perfect taste, texture, and color of this vegan mascarpone. With wholesome plant-based essentials, it’s a breeze to bring this creamy masterpiece to life.
- 400 ml can of full-fat coconut milk: Adds rich creaminess and a smooth texture without overpowering flavors.
- 400 ml soy milk: A subtle, neutral plant milk that helps balance and blend all components flawlessly.
- 200 g vegan Greek-style yogurt or skyr: Brings tanginess and thickness, enhancing the mascarpone’s authentic cheesy character.
- 1 ½ tablespoons apple cider vinegar: A gentle acid that helps curdle the mixture, creating that classic mascarpone bite.
- 1 ½ tablespoons lemon juice (freshly squeezed): Adds brightness and freshness, perfectly rounding out the flavor profile.
How to Make Creamy Vegan Mascarpone Cheese (No Nuts) Recipe
Step 1: Combine and Warm the Base
Start by pouring the entire can of full-fat coconut milk, soy milk, and vegan Greek-style yogurt into a saucepan. Whisk them together gently but thoroughly, ensuring the mixture is smooth. Warm this blend slowly over medium-low heat for about 10 minutes until it reaches a cozy 85-90°C (185-194°F). This warming step is key to getting the right texture, unlocking the creamy magic that will define your mascarpone.
Step 2: Add Acids and Encourage Curdling
Remove the pot from the heat and stir in the apple cider vinegar and freshly squeezed lemon juice. Then place the pot back on medium heat, but resist stirring—the mixture should bubble and foam, and you will see curds beginning to separate from the liquid. After about 10 minutes, take the pot off the heat and let everything cool to room temperature, around 30-40 minutes. This resting period allows the curds to fully develop, thickening the base beautifully.
Step 3: Strain to Perfection
Now it’s time to line a fine-mesh sieve or colander with cheesecloth and place it over a large mixing bowl. Carefully transfer your cooled mixture onto the cheesecloth, cover it loosely with foil or a plate, and refrigerate for 12 to 24 hours. This slow straining removes excess liquid, transforming your curds into a thick, luscious mascarpone cream.
Step 4: Finish with a Whisk
After the chilling period, you’ll notice a watery liquid collected in the bowl—that’s perfectly normal and can be reserved for soups or pasta sauces. The creamy mascarpone remaining in the cheesecloth is your prize. Transfer it into a mixing bowl and whisk vigorously for 3 to 5 minutes until smooth and silky, with a spreadable consistency that’s simply irresistible.
How to Serve Creamy Vegan Mascarpone Cheese (No Nuts) Recipe

Garnishes
This vegan mascarpone shines when garnished with fresh herbs like basil or mint for savory dishes, or dusted lightly with cocoa powder and caviar-like pomegranate seeds for sweet desserts. A drizzle of agave or maple syrup adds a gentle sweetness that perfectly complements the creamy richness.
Side Dishes
Pair your fluffy mascarpone with freshly baked sourdough bread or crispy crackers for a simple, delightful snack. It also makes a heavenly topping on roasted vegetables or a flavorful component in tomato-based pasta dishes. For dessert, serve alongside fresh berries or poached fruits to create a balanced and elegant plate.
Creative Ways to Present
Use this Creamy Vegan Mascarpone Cheese (No Nuts) Recipe as a base for vegan tiramisu—layer it with coffee-soaked ladyfingers for a classic crowd-pleaser. You can also fold in a touch of vanilla or cinnamon for a unique twist or dollop it onto pancakes, waffles, or even vegan cheesecakes as a luscious filling or topping.
Make Ahead and Storage
Storing Leftovers
Your creamy vegan mascarpone can be stored in an airtight container in the refrigerator for up to 5 days. Keep it chilled and covered to preserve its smooth texture and delicate flavor, making it easy to enjoy whenever inspiration strikes.
Freezing
While freezing is possible, it may change the consistency slightly, resulting in a grainier texture once thawed. It’s best to freeze only if you plan to use it in cooked dishes where texture changes won’t be noticeable.
Reheating
Since this mascarpone is best served cold or at room temperature, avoid reheating it directly. For warm dishes, stir the mascarpone in at the final step to keep its rich creaminess intact without curdling.
FAQs
Can I use other types of plant milk for this recipe?
Yes! While soy milk and full-fat coconut milk provide the best texture and creaminess, you can experiment with oat or almond milk. Just ensure your plant milk is unsweetened and unflavored for the best results.
Why does the mixture need to be heated twice?
The initial gentle heating activates the thickening agents in the yogurt and coconut milk, while the second heating after adding acids encourages the curdling process, essential for that mascarpone-like texture.
Is this recipe suitable for people with soy allergies?
Since this recipe uses soy milk and soy-based yogurt, it’s not recommended for those with soy allergies. However, you could try substituting with coconut yogurt and other plant milks, but results might vary.
Can I make this recipe sweeter or more tangy?
Absolutely! Add 1-2 tablespoons of agave syrup or maple syrup for sweetness, or increase lemon juice slightly for a tangier finish. Adjust to your taste after whisking the final mascarpone cream.
What can I do with the leftover liquid after straining?
Don’t throw that liquid away! It’s a flavorful, light cream that works wonderfully in pasta sauces, smoothies, or even as a base for creamy soups.
Final Thoughts
How wonderful it is to create a Creamy Vegan Mascarpone Cheese (No Nuts) Recipe that feels indulgent, fresh, and nourishing—all at home with simple ingredients. This recipe makes it easy to enjoy classic culinary treats with a compassionate twist. Give it a try and watch your dishes come alive with velvety, dairy-free goodness that everyone will adore!
Print
Creamy Vegan Mascarpone Cheese (No Nuts) Recipe
- Prep Time: 10 minutes
- Cook Time: 20 minutes
- Total Time: 40 minutes plus 12-24 hours chilling time
- Yield: 12 servings
- Category: Cheese/Dairy Alternative
- Method: Stovetop
- Cuisine: Vegan, Dairy-Free
- Diet: Vegan
Description
This creamy vegan mascarpone cheese recipe uses full-fat coconut milk, soy milk, and vegan Greek-style yogurt to create a smooth, rich, and dairy-free alternative to traditional mascarpone. Perfect for enhancing vegan desserts like tiramisu, cheesecakes, or savory dishes such as pasta and pizza, this no-nut mascarpone is simple to prepare and naturally dairy-free, making it suitable for vegan diets.
Ingredients
Dairy-Free Cream Base
- 1 x 400 ml can full-fat coconut milk
- 400 ml soy milk
- 200 g vegan Greek-style yogurt or skyr (e.g., Alpro plain Greek-style soy yogurt)
Acidic Coagulants
- 1 ½ tablespoons apple cider vinegar
- 1 ½ tablespoons freshly squeezed lemon juice
Instructions
- Combine and Heat Ingredients: Add the full can of coconut milk, soy milk, and vegan Greek-style yogurt into a saucepan. Whisk thoroughly to combine. Slowly heat the mixture over medium-low heat for about 10 minutes, ensuring the temperature reaches between 85-90°C (185-194°F).
- Add Vinegar and Lemon Juice: Remove the saucepan from the heat and stir in the apple cider vinegar and freshly squeezed lemon juice. Return the pot to medium heat and continue heating gently for another 10 minutes without stirring. The mixture should become bubbly and foamy on top and you will notice curds starting to separate from the liquid.
- Cool the Mixture: Remove the pot from heat again and allow it to cool completely to room temperature for 30-40 minutes. If preparing a double batch, extend cooling time to about one hour. The mixture will appear curdled and thickened in some parts.
- Strain the Cheese: Place a fine-mesh sieve or colander lined with cheesecloth over a large mixing bowl. Transfer the cooled cream mixture into the lined sieve. Secure the cheesecloth with a rubber band or loosely cover with foil or a large plate. Refrigerate for 12-24 hours to allow the liquid to drain and thicken the cheese.
- Separate and Reserve Liquid: After chilling and straining, pour off the remaining liquid whey from the bowl; it can be saved for use in other recipes such as pasta dough. The thickened mascarpone will remain in the cheesecloth.
- Whisk and Smooth: Transfer the mascarpone cheese to a large mixing bowl and whisk vigorously for 3-5 minutes until the texture is smooth and creamy.
- Serving Suggestions and Storage: Use this vegan mascarpone in desserts like tiramisu or vegan cheesecake, spread on toast with a drizzle of agave or maple syrup, or add to savory dishes like pizza and pasta. For a sweeter version, fold in 1-2 tablespoons of agave or maple syrup or whisk in 2 tablespoons of confectioner’s sugar. Store the mascarpone in an airtight container in the refrigerator for up to 5 days.
Notes
- Use full-fat coconut milk to achieve the right creamy texture and richness.
- Make sure not to agitate the mixture after adding lemon juice and vinegar to allow curds to form properly.
- Straining time (12-24 hours) affects thickness; longer times yield firmer mascarpone.
- Reserved liquid whey can be used in pasta recipes or smoothies.


