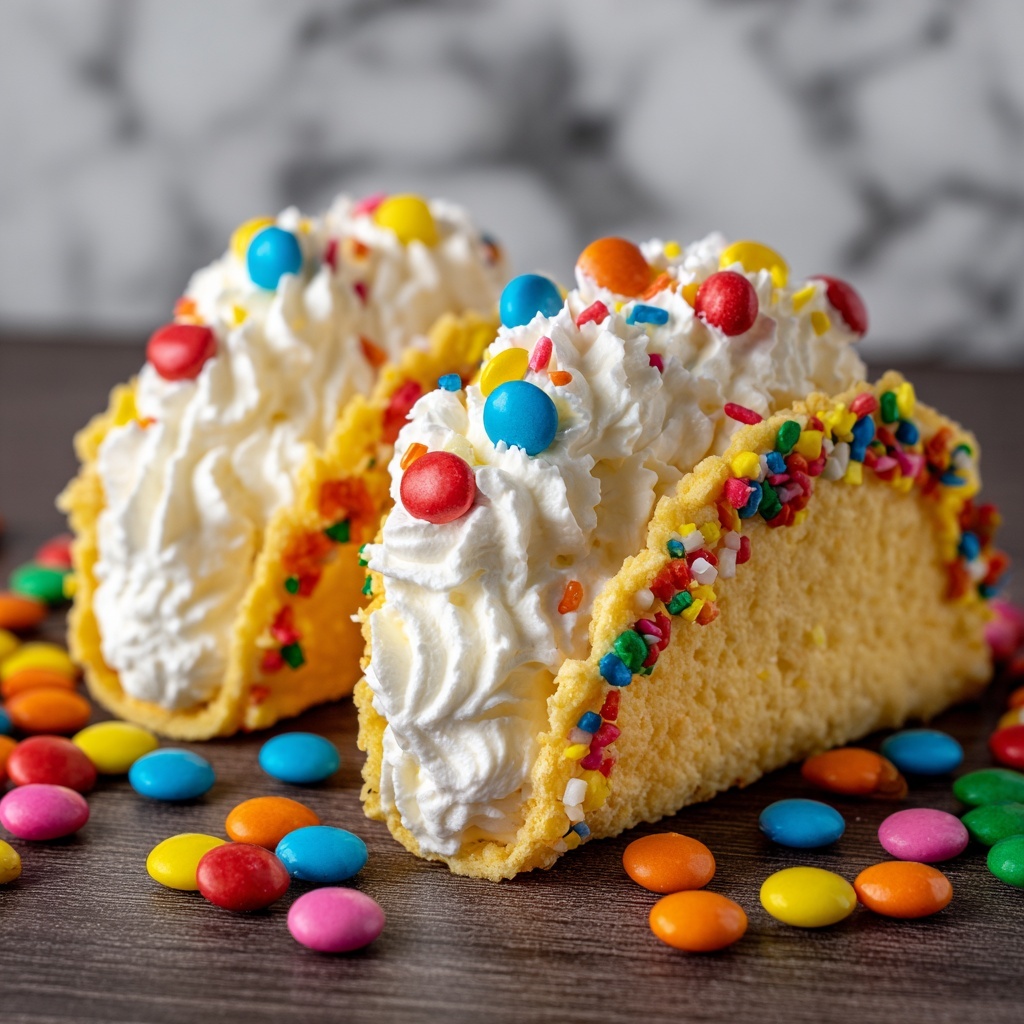
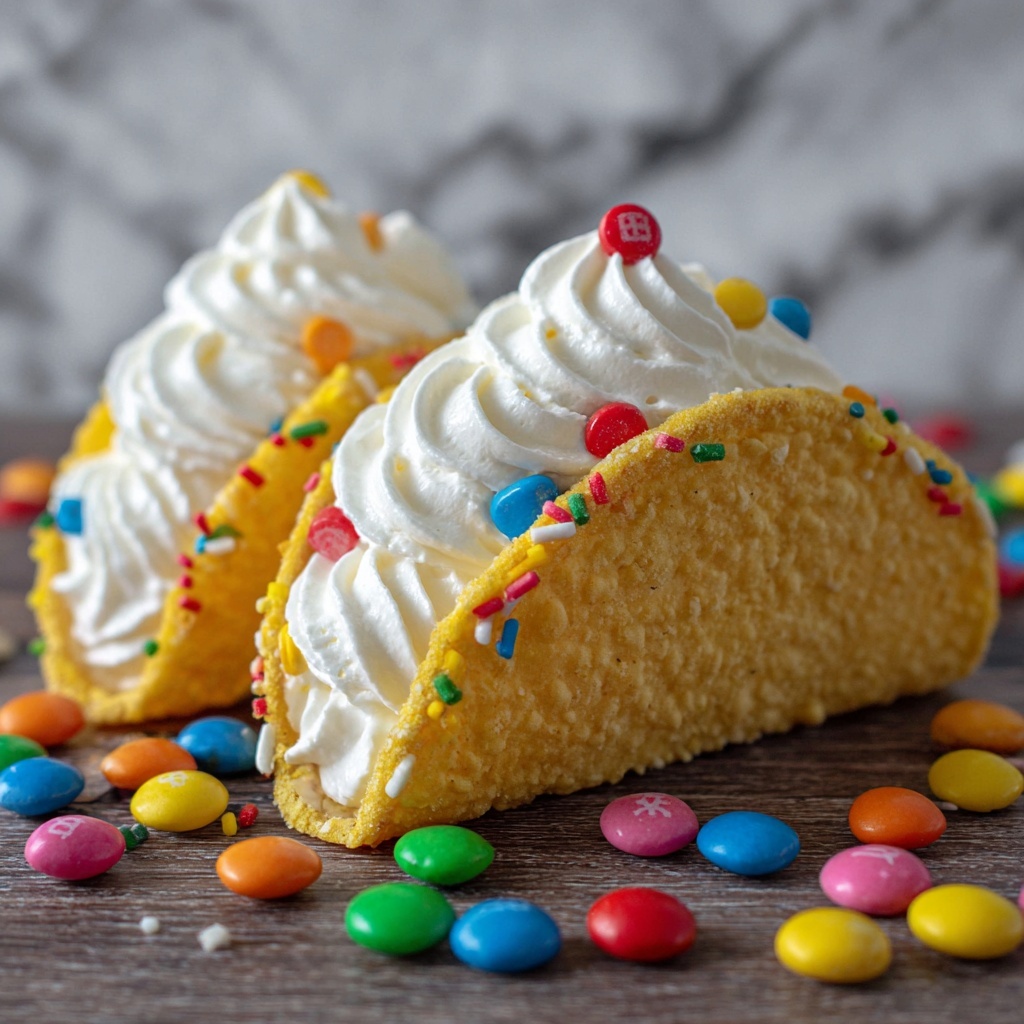
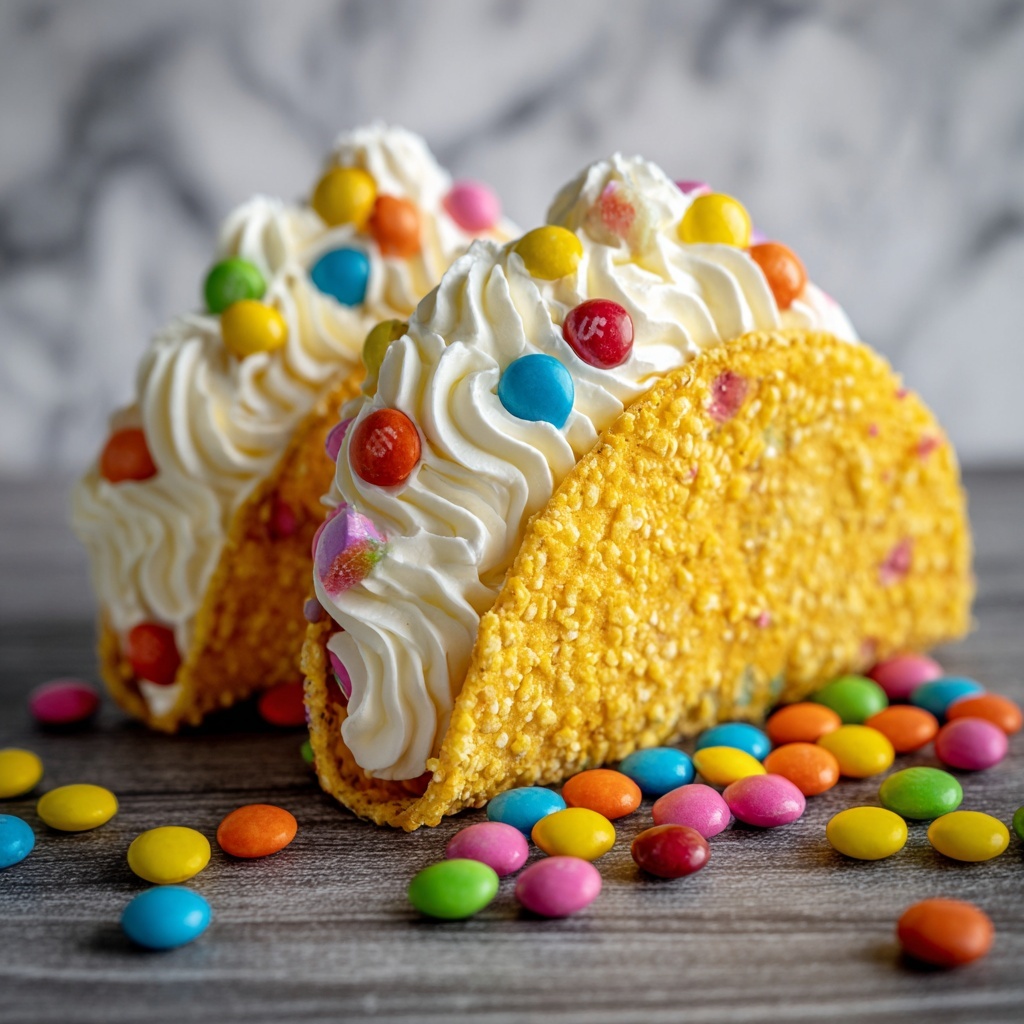
If you’re looking for a playful, colorful twist on classic desserts, the Fruity Pebbles Cheesecake Tacos Recipe is going to be your new obsession. Imagine vibrant, crunchy taco shells made entirely from Fruity Pebbles cereal hugging a rich, creamy cheesecake filling that’s lightly sweetened and fluffy. This recipe is the perfect combination of nostalgic cereal fun and indulgent cheesecake delight, turning an everyday treat into a fiesta of textures and flavors. Whether for a casual gathering or a whimsical dessert surprise, these cheesecake tacos will steal the show and bring smiles all around.
Ingredients You’ll Need
These ingredients are wonderfully simple yet come together to create a dessert that’s both visually striking and delicious. Each one plays a crucial role in balancing crunch, creaminess, sweetness, and that unmistakable Fruity Pebbles flair.
- 3 cups colorful Fruity Pebbles cereal: The star ingredient that forms those crispy and colorful taco shells, making every bite fun and nostalgic.
- ½ cup unsalted butter, melted: Acts as the binding agent for the cereal shells, helping them firm up while adding a subtle richness.
- 8 oz cream cheese, softened: Creates the smooth and tangy base for the cheesecake filling; make sure it’s softened for easy mixing.
- ½ cup powdered sugar, sifted: Adds the perfect sweetness without any graininess, keeping the cheesecake silky smooth.
- 1 tsp pure vanilla extract: Enhances the flavor depth of the cheesecake filling with warm, comforting notes.
- 1 cup whipped cream: Folded into the cream cheese mixture for a light, airy texture that contrasts beautifully with the crunchy shells.
- Additional Fruity Pebbles cereal for garnish: A colorful finishing touch that adds extra crunch and visual excitement.
How to Make Fruity Pebbles Cheesecake Tacos Recipe
Step 1: Create the Fruity Pebbles Taco Shells
Start by tossing the colorful Fruity Pebbles cereal in the melted butter until every piece is well-coated. This buttery layer is what helps the cereal stick together when molded into taco shapes. Firmly press this mixture into taco-shaped molds or a muffin tin to form a uniform ¼ inch shell thickness. Chilling these in the refrigerator for at least 30 minutes allows the shells to harden and hold their shape, ready to cradle your luscious filling.
Step 2: Prepare the Cheesecake Filling
Using an electric mixer, beat the softened cream cheese until you achieve a smooth and fluffy consistency, which usually takes about two minutes. Gradually blend in the sifted powdered sugar and vanilla extract, scraping down the sides of the bowl to ensure even mixing. This careful process guarantees a creamy base that’s sweet but balanced, setting the stage for the whipped cream to bring lightness and airiness.
Step 3: Fold in the Whipped Cream
Gently fold the whipped cream into the cream cheese mixture with a spatula, carefully combining the ingredients without deflating the whipped texture. This step is key to creating that dreamy, cloud-like cheesecake filling that pairs beautifully with the crisp taco shells made from Fruity Pebbles.
Step 4: Assemble Your Fruity Pebbles Cheesecake Tacos
Once the taco shells are firm and chilled, spoon or pipe the creamy cheesecake filling generously into each shell, allowing it to slightly overflow like a creamy burst of joy. Top each taco with a sprinkle of extra Fruity Pebbles cereal, pressing lightly so they stick to the filling. These colorful garnishes not only boost the visual appeal but add that irresistible first crunch.
How to Serve Fruity Pebbles Cheesecake Tacos Recipe
Garnishes
Sprinkling additional Fruity Pebbles on top is an obvious and delightful choice, but feel free to experiment! Fresh berries, a drizzle of berry sauce, or even mini marshmallows can complement the sweetness and elevate the fun factor. The key is to keep it vibrant and inviting.
Side Dishes
These cheesecake tacos shine best on their own as a playful dessert, but if you’re aiming for a complete party spread, think light and fresh sides like fruit salad or a tangy citrus sorbet. The contrast between the creamy, crunchy tacos and refreshing fruit keeps the palate energized and happy.
Creative Ways to Present
Consider serving these in mini taco holders or colorful plates to enhance the festive vibe. You might also line the serving tray with a layer of Fruity Pebbles cereal or edible confetti for extra celebration flair. For parties, set up a DIY taco bar where guests can fill their own shells with cheesecake and toppings – an interactive twist everyone will adore.
Make Ahead and Storage
Storing Leftovers
After assembling your Fruity Pebbles Cheesecake Tacos Recipe, store leftovers in an airtight container in the refrigerator. Keep them chilled and consume within 2 days for the best texture. Note that the cereal shells may soften over time as they absorb moisture from the filling, so it’s ideal to enjoy them fresh.
Freezing
Freezing isn’t recommended for this dessert because the creamy filling and cereal shell can change texture and become soggy once thawed. The fresh, crunchy integrity of the taco shells is a big part of the charm, so it’s best to prepare and serve them fresh.
Reheating
Since this is a cold dessert, reheating isn’t necessary or advisable. Keep the cheesecake tacos refrigerated until ready to serve, allowing the creamy filling to stay silky and the cereal shell to maintain as much crispness as possible.
FAQs
Can I use a different cereal if I don’t have Fruity Pebbles?
While Fruity Pebbles are what give this recipe its iconic colorful crunch, you can experiment with other crispy, sweet cereals like Fruity Loops or Rice Krispies. Keep in mind, cereal texture and flavor will alter the taco shell experience.
How do I make taco-shaped molds if I don’t have one?
If you don’t have specific taco-shaped molds, try using a small muffin tin pressed with plastic wrap or shape the cereal mixture gently over inverted ramekins to create shell-like shapes before chilling.
Is this dessert suitable for kids’ parties?
Absolutely! The Fruity Pebbles Cheesecake Tacos Recipe is colorful, fun, and kid-approved. It’s a wonderful way to serve cheesecake in a playful format that children love.
Can I prepare the shells ahead of time?
Yes, you can prepare the cereal shells up to a day in advance and keep them chilled in an airtight container. Just assemble the filling shortly before serving to keep everything fresh.
What’s the best way to get the filling into the taco shells neatly?
Using a piping bag or a resealable plastic bag with a corner cut off helps you pipe the cheesecake filling cleanly and evenly into each shell, making assembly easier and more fun!
Final Thoughts
Your kitchen is about to become a bright, joyful playground with the Fruity Pebbles Cheesecake Tacos Recipe. It’s not just a dessert; it’s an experience—bringing color, texture, and creamy sweetness together in a way that delights all ages. I can’t wait for you to try making these crunchy, creamy tacos at home and share the smiles they’ll surely inspire. Trust me, once you’ve had one, you’ll be dreaming up excuses to make them again and again.
Print
Fruity Pebbles Cheesecake Tacos Recipe
- Prep Time: 15 minutes
- Cook Time: 0 minutes
- Total Time: 55 minutes
- Yield: 6 servings
- Category: Dessert
- Method: No-Cook
- Cuisine: American
Description
These Fruity Pebbles Cheesecake Tacos are a delightful no-bake dessert combining the colorful crunch of Fruity Pebbles cereal with a smooth, creamy cheesecake filling. Perfect for parties or a fun treat, the crispy taco-shaped shells are filled with a whipped cream and cream cheese mixture, making each bite a perfect balance of texture and sweetness.
Ingredients
For the Taco Shells
- 3 cups colorful Fruity Pebbles cereal
- ½ cup unsalted butter, melted
For the Cheesecake Filling
- 8 oz cream cheese, softened
- ½ cup powdered sugar, sifted
- 1 tsp pure vanilla extract
- 1 cup whipped cream
Garnish
- Additional Fruity Pebbles cereal for garnish
Instructions
- Prepare the taco shells: In a large bowl, combine the Fruity Pebbles cereal with the melted butter. Stir thoroughly to ensure every piece of cereal is fully coated with butter.
- Mold and chill: Firmly press the cereal mixture into taco-shaped molds or a muffin tin, creating shells about ¼ inch thick. Place them in the refrigerator for at least 30 minutes until the shells harden and hold their shape.
- Make the cheesecake filling: Using an electric mixer, beat the softened cream cheese for about 2 minutes until smooth and fluffy. Gradually add the powdered sugar and vanilla extract, scraping down the sides of the bowl as needed to ensure even mixing.
- Incorporate whipped cream: Gently fold the whipped cream into the cream cheese mixture until just combined. This will keep the filling light and airy.
- Fill the taco shells: Spoon or pipe the cheesecake filling into the chilled taco shells, generously filling them so the filling slightly overflows the edges for an inviting look.
- Garnish and serve: Top each taco with a few additional Fruity Pebbles, pressing them gently into the filling so they adhere. Serve immediately for best texture or refrigerate up to 2 hours before serving to keep them fresh.
Notes
- Ensure the cream cheese is fully softened to avoid lumps in the filling.
- Press the cereal mixture firmly to create sturdy shells that don’t crumble easily.
- You can use a muffin tin or any taco-shaped molds you have available.
- Serve the tacos soon after assembling for the best crunch, or store in the refrigerator but consume within 2 hours to maintain texture.
- For a dairy-free option, substitute cream cheese and whipped cream with plant-based alternatives.
