
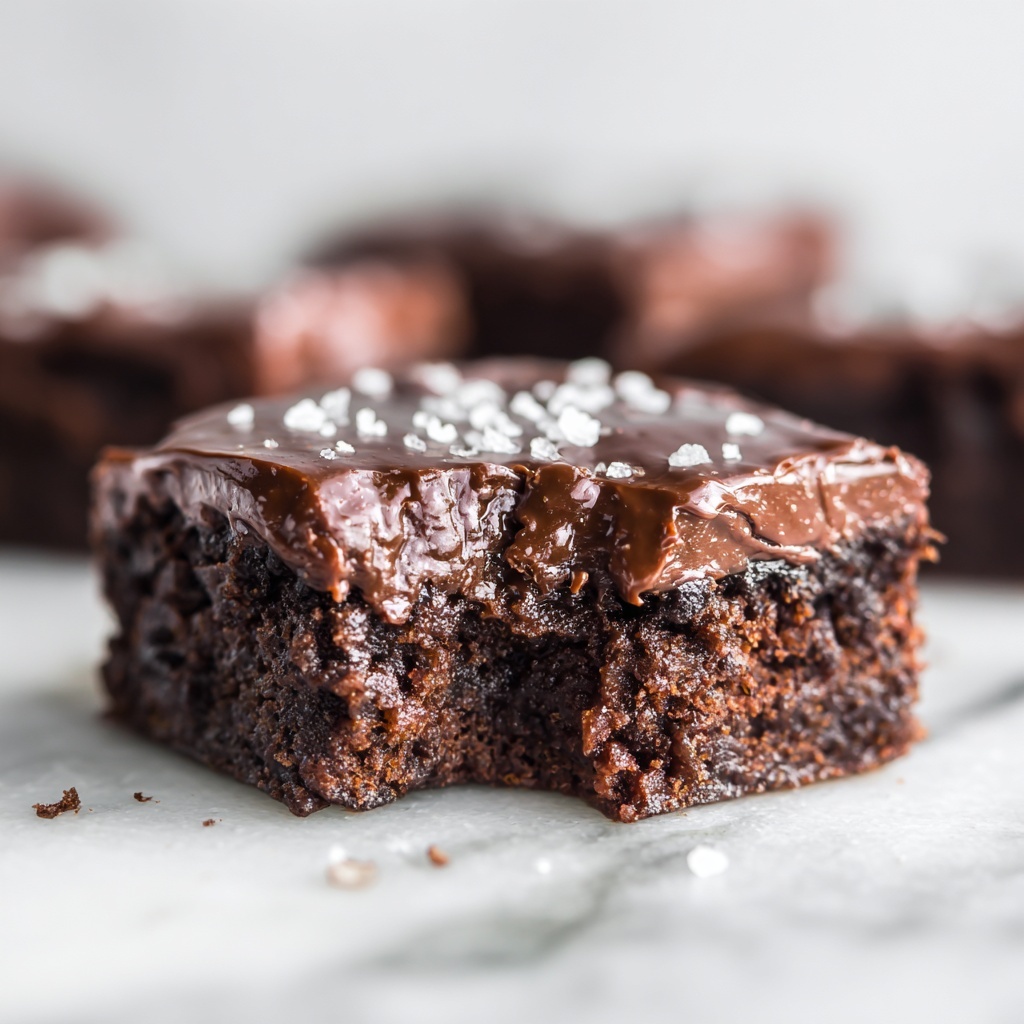
If you have a sweet tooth that loves nostalgic flavors with a rich chocolate punch, then you are in for a treat with this classic Lunch Lady Brownies Recipe. These brownies are a delightful combination of moist, fudgy cake and a smooth, decadent frosting that will take you right back to those cherished school cafeteria moments. Whether you’re making a batch for a family gathering, a potluck, or just a cozy afternoon with coffee, this recipe brings the perfect balance of chocolatey goodness and that homestyle charm that is impossible to resist.
Ingredients You’ll Need
The magic of the Lunch Lady Brownies Recipe lies in its simplicity. Each ingredient plays an essential role in creating the perfect texture and flavor—from the rich cocoa powder that delivers deep chocolate intensity, to the butter that adds moistness and tenderness throughout the brownies.
- Salted butter (1 cup, melted): This acts as the rich fat base that ensures moist, tender brownies with a luscious crumb.
- Unsweetened cocoa powder (1/2 cup): It delivers that bold chocolate flavor without any added sugar for balance.
- All-purpose flour (2 cups): Provides the structure that holds the fudgy brownie together perfectly.
- Granulated sugar (2 cups): Sweetness that balances the bitterness of cocoa for that ideal classic brownie taste.
- Large eggs (4): They bind ingredients, giving brownies their chewy yet soft texture.
- Vanilla extract (4 teaspoons): Adds a warm, inviting aroma that complements the chocolate beautifully.
- Salted butter (1/4 cup, softened): Used in the frosting for a creamy, rich finish.
- 2% milk (1/4 cup): Adds smoothness to the frosting, making it spreadable and luscious.
- Unsweetened cocoa powder (1/4 cup): Provides a punch of chocolate in the frosting for extra indulgence.
- Powdered sugar (3 cups): Sweetens and thickens the frosting to the perfect consistency.
How to Make Lunch Lady Brownies Recipe
Step 1: Prepare the Oven and Pan
Preheat your oven to 350° F. While it warms up, line a 9×13-inch baking dish with parchment paper and give that parchment a spritz with non-stick spray. This preparation ensures your brownies will release effortlessly after baking and keep their beautiful edges intact.
Step 2: Mix the Wet Ingredients with Cocoa
In the bowl of your stand mixer fitted with a paddle attachment, pour in the melted butter and the 1/2 cup of unsweetened cocoa powder. Blend these together until the mixture is smooth, dark, and inviting. This step infuses the butter evenly with deep chocolate flavor, setting the tone for the brownies.
Step 3: Combine Dry Ingredients and Eggs
Next, add your all-purpose flour and granulated sugar to the chocolate mixture and beat gently to combine. Then, add in the eggs and vanilla extract. Mix just until combined, being mindful not to overmix—it’s key to achieving that tender, fudgy texture. The batter should be thick and dense, promising decadence in every bite.
Step 4: Bake Your Brownies
Pour the thick brownie batter into your prepared pan and spread it out evenly to ensure consistent baking. Slide it into the oven and bake for about 25 to 30 minutes. To check doneness, poke the center lightly with a toothpick; it should come out clean or with just a few moist crumbs. Remove from the oven and let the brownies stand for 15 minutes—this brief resting time lets them firm up but keeps them wonderfully warm for frosting.
Step 5: Whip Up the Chocolate Frosting
While the brownies cool gently, it’s frosting time. Combine the softened butter, milk, cocoa powder, and powdered sugar in a bowl. Beat them thoroughly until the frosting is silky smooth and spreadable. Pour and spread this luscious frosting generously over the warm brownies to let it melt into every nook. Allow the entire tray to cool completely before slicing to enjoy those perfect, fudgy squares.
How to Serve Lunch Lady Brownies Recipe

Garnishes
While these brownies shine on their own, a light dusting of powdered sugar or a scattering of mini chocolate chips on top of the frosting adds a playful texture and visual appeal. You can also sprinkle chopped nuts, like pecans or walnuts, for a delightful crunch that complements the creamy frosting.
Side Dishes
Pair your brownies with a scoop of vanilla ice cream for that classic hot-and-cold contrast, or serve alongside fresh berries to bring a fruity brightness to balance the rich chocolate. A simple cup of hot coffee or cold milk also makes an ideal companion, enhancing every bite.
Creative Ways to Present
For a fun twist, cut the brownies into bite-sized squares and present them on a decorative platter with colorful toothpicks. You might also layer brownie pieces with whipped cream and berries in individual cups for an elegant dessert parfait. If you’re feeling festive, drizzle warm caramel or chocolate sauce over each brownie to wow your guests.
Make Ahead and Storage
Storing Leftovers
Lunch Lady Brownies Recipe leftovers stay delicious for several days when stored properly. Keep them in an airtight container at room temperature, and the brownies will remain moist and flavorful for up to four days. The frosting tends to soften nicely without becoming soggy.
Freezing
To freeze, cut brownies into individual portions first. Wrap each piece tightly in plastic wrap and place them in a freezer-safe container or zip-top bag. They freeze beautifully for up to three months. When ready to enjoy, thaw overnight in the refrigerator or at room temperature for a couple of hours for the best texture.
Reheating
If you want that just-baked warmth, gently reheat a brownie in the microwave for about 15 to 20 seconds. This warms the chocolate frosting to a melty dream and softens the brownie’s crumb, almost like they’re freshly out of the oven.
FAQs
Can I use unsalted butter instead of salted butter?
Absolutely! If you use unsalted butter, simply add a pinch of salt to your batter and frosting to balance flavors. Salted butter contributes a subtle savory note that enhances chocolate, so adjusting with a little salt helps keep the taste just right.
How do I know when the brownies are perfectly baked?
Keep an eye out for a toothpick inserted in the center coming out clean or with a few moist crumbs attached. Overbaking dries them out, while underbaking can make the centers too gooey, so timing and testing are key to that ideal fudgy texture.
Can I make these brownies gluten-free?
You can substitute the all-purpose flour with a gluten-free flour blend of equal measure. Just make sure your blend contains xanthan gum or a similar binder to help mimic gluten’s structure and maintain that classic brownie texture.
Is it okay to use milk other than 2% in the frosting?
Certainly! You can use whole milk, skim, or even a dairy-free alternative like almond or oat milk. Just keep in mind that variations in fat content might slightly affect the frosting’s texture, so adjust powdered sugar as needed for consistency.
Can I double the recipe for a bigger batch?
Yes, the recipe scales up well! Use a larger baking dish or two 9×13-inch pans. Just keep your baking time similar and start checking for doneness early to avoid overbaking. Doubling means even more layers of that irresistible Lunch Lady Brownies Recipe to share!
Final Thoughts
There’s something truly comforting and joyful about making the Lunch Lady Brownies Recipe—it’s like bringing a beloved school treat right into your own kitchen. Every bite is rich, nostalgic, and love-filled, perfect for sharing or savoring solo. So go ahead, pull out your mixing bowl, and get ready to delight yourself and those around you with this timeless chocolatey treasure.
Print
Lunch Lady Brownies Recipe
- Prep Time: 15 minutes
- Cook Time: 30 minutes
- Total Time: 1 hour
- Yield: 16 servings
- Category: Dessert
- Method: Baking
- Cuisine: American
Description
These classic Lunch Lady Brownies are rich, fudgy, and topped with a smooth, chocolate frosting. Perfectly balanced with a melt-in-your-mouth texture, these brownies make a nostalgic treat for any occasion. With simple pantry ingredients and easy steps, you can have a batch of warm, comforting brownies ready in about an hour.
Ingredients
Brownies
- 1 cup salted butter, melted
- 1/2 cup unsweetened cocoa powder
- 2 cups all-purpose flour
- 2 cups granulated sugar
- 4 large eggs
- 4 teaspoons vanilla extract
Chocolate Frosting
- 1/4 cup salted butter, softened
- 1/4 cup 2% milk
- 1/4 cup unsweetened cocoa powder
- 3 cups powdered sugar
Instructions
- Preheat and Prepare Baking Dish: Preheat your oven to 350° F. Line a 9×13-inch baking dish with parchment paper, then spray the parchment paper lightly with non-stick spray to ensure the brownies release easily after baking.
- Mix Butter and Cocoa: In the bowl of an electric stand mixer fitted with the paddle attachment, combine the melted butter and unsweetened cocoa powder. Blend until the mixture is smooth and evenly mixed.
- Add Dry Ingredients and Eggs: Add the all-purpose flour and granulated sugar to the bowl. Beat together briefly, then add the eggs one at a time along with the vanilla extract. Mix just until combined to avoid over mixing; the batter will be thick.
- Bake the Brownies: Pour the batter evenly into the prepared baking dish, spreading it out to the edges. Bake for 25 to 30 minutes, or until a toothpick inserted into the center comes out clean. Remove from the oven and let the brownies stand for 15 minutes; the brownies should still be warm when frosting.
- Prepare the Frosting: While the brownies are resting, beat together the softened butter, milk, cocoa powder, and powdered sugar until the frosting is smooth and creamy.
- Frost the Brownies: Pour the chocolate frosting over the warm brownies and spread it evenly. Allow the brownies to cool completely before cutting into squares and serving.
Notes
- Do not over mix the batter to keep brownies fudgy.
- Use parchment paper and non-stick spray to easily remove brownies from the pan.
- Frost brownies while still warm for easier spreading.
- Store brownies in an airtight container at room temperature for up to 3 days.
- You can refrigerate brownies; bring to room temperature before serving.

