
If you’re craving a sweet treat that is both decadent and simple to whip up, this No-Bake Peanut Butter Bars Recipe is going to become your new favorite. Imagine the perfect harmony of creamy peanut butter and rich chocolate resting effortlessly atop a crispy, buttery base, all coming together without turning on the oven. It’s an indulgent, crowd-pleasing dessert that satisfies your sweet tooth and shows off how a few basic pantry staples can transform into something downright irresistible.
Ingredients You’ll Need
These ingredients are incredibly straightforward yet essential to crafting the perfect texture and flavor in your bars. Each element plays a crucial role, from the creamy peanut butter that adds richness, to the graham cracker crumbs that bring a lovely crunch and body.
- 1 cup creamy peanut butter: This is the star ingredient; creamy ensures smooth, luscious bars without any graininess.
- 1/2 cup unsalted butter, melted: Adds a velvety richness and helps bind the base together perfectly.
- 1 1/2 cups graham cracker crumbs: Contributes a subtle sweetness and crumbly texture, forming the perfect foundation.
- 1 cup powdered sugar: Sweetens the base and blends seamlessly with the peanut butter for that melt-in-your-mouth feel.
- 1 cup semi-sweet chocolate chips: Provides a classic chocolate layer that’s not too sweet and balances the peanut butter beautifully.
- 1/4 cup creamy peanut butter: Mixed with the chocolate for a silky, nutty topping that completes the bars with extra depth.
How to Make No-Bake Peanut Butter Bars Recipe
Step 1: Prepare the Baking Dish
Start by lining an 8×8-inch baking dish with parchment paper, ensuring you leave some overhang on the sides. This little trick makes lifting the entire set of bars out much easier later, so you get clean, neat edges without any stickiness or crumbling. It’s all about making your life simpler right from the start.
Step 2: Make the Peanut Butter Base
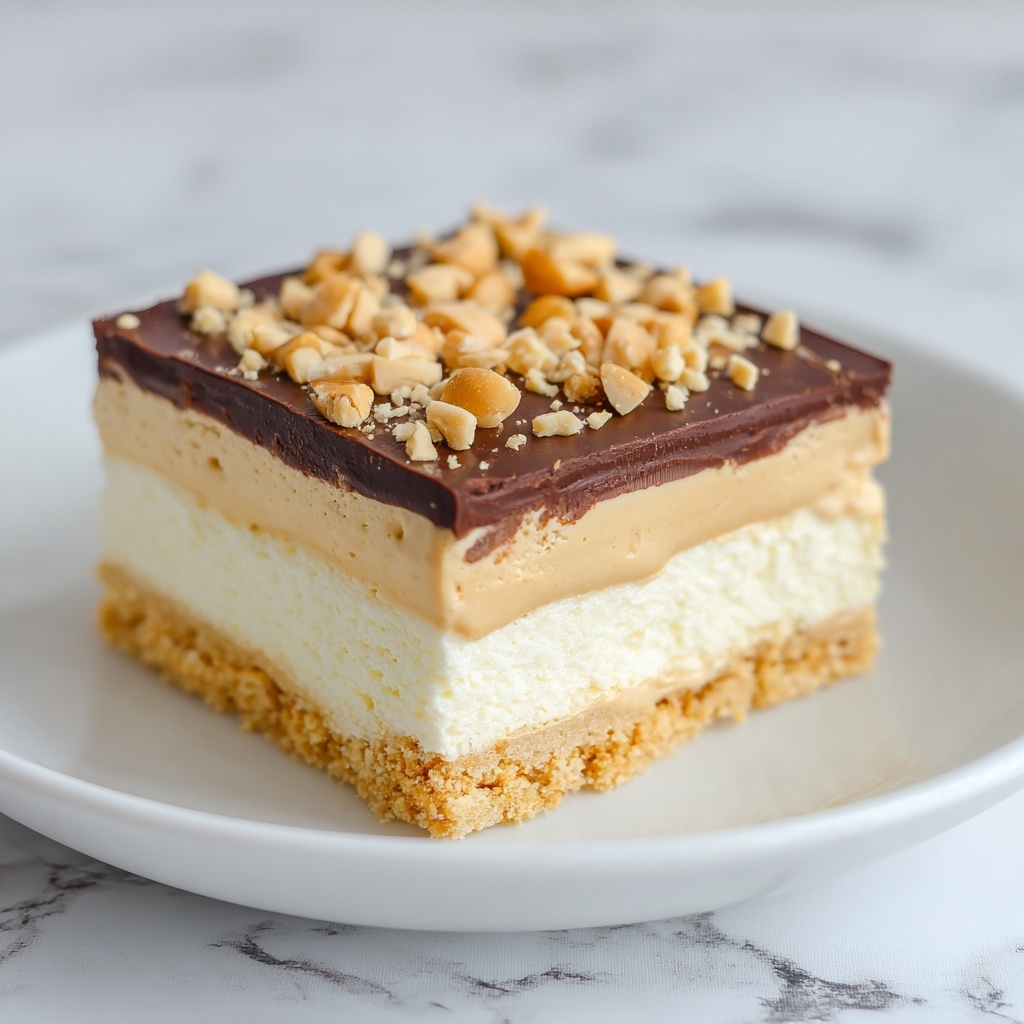
In a large mixing bowl, combine the creamy peanut butter, melted unsalted butter, graham cracker crumbs, and powdered sugar. Stir these together until the mixture is smooth and fully combined. The texture should be pliable but firm enough to press down without crumbling—this ensures your bars hold together perfectly after chilling.
Step 3: Form the Base Layer
Firmly press the peanut butter mixture evenly into the bottom of your prepared baking dish. This base will provide that wonderful, chewy foundation that contrasts so nicely with the chocolate topping. You want it packed tight to avoid any falling apart when cutting.
Step 4: Make the Chocolate Topping
In a microwave-safe bowl, melt together the semi-sweet chocolate chips and 1/4 cup of creamy peanut butter. Heat in short intervals of 20-30 seconds, stirring each time, until smooth and glossy. If you prefer, use a double boiler for a gentler melt to avoid scorching the chocolate. This luscious mixture becomes the decadent finishing touch on your bars.
Step 5: Top the Bars and Chill
Pour the melted chocolate-peanut butter layer over the pressed base and spread it evenly using a spatula. This step is where your bars start to look irresistible, glossy, and inviting. Once covered, pop the dish into the refrigerator for at least 2 hours to allow the chocolate to harden and the bars to fully set up before slicing.
How to Serve No-Bake Peanut Butter Bars Recipe
Garnishes
Sprinkle a pinch of flaky sea salt on the chocolate layer just before chilling to add a balance of salty contrast that highlights the sweetness and richness. You can also add crushed peanuts scattered on top for extra texture and a sophisticated look.
Side Dishes
These bars pair beautifully with a simple glass of cold milk—classic and comforting. For a grown-up twist, serve alongside a cup of coffee or a creamy latte to complement the peanut butter’s nuttiness and chocolate’s depth.
Creative Ways to Present
Cut the bars into mini squares and serve them on a decorative platter with colorful cupcake liners for a party-ready treat. Alternatively, stack a few bars alongside fresh strawberries or banana slices to add freshness, color, and an unexpected fruity flair.
Make Ahead and Storage
Storing Leftovers
Store any leftover bars in an airtight container in the refrigerator to maintain their firmness and freshness. They will keep well for up to one week, making them a perfect make-ahead dessert for busy days or unexpected guests.
Freezing
You can freeze these bars by wrapping them individually in plastic wrap and then placing them in a freezer-safe container. They freeze well for up to 2 months. When you’re ready to enjoy, simply thaw them in the refrigerator overnight to retain that smooth texture.
Reheating
These bars are best enjoyed chilled or at room temperature, so reheating isn’t necessary. If you prefer a softer texture, leave them out at room temperature for 15 to 20 minutes before serving to allow the chocolate and base to soften slightly.
FAQs
Can I use crunchy peanut butter instead of creamy?
Absolutely! Using crunchy peanut butter will add a bit of extra texture and crunch to the bars, which can be a delightful twist. Just know it might slightly change the smoothness of the bars.
Is there a substitute for graham cracker crumbs?
If graham cracker crumbs aren’t available, you can use crushed digestive biscuits or even vanilla wafer cookies. These alternatives offer a similar texture and flavor that works beautifully in these bars.
Can I make these bars vegan?
Yes! Simply swap the butter for a vegan margarine or coconut oil and choose dairy-free chocolate chips to make this recipe vegan-friendly without sacrificing flavor.
How long do these bars need to chill?
For the best results, chill the bars for at least 2 hours. This allows the chocolate topping to set firmly and the base to solidify so that they cut cleanly and hold together well.
Can I add toppings like nuts or sprinkles?
Definitely! Feel free to sprinkle chopped peanuts, crushed pretzels, or colorful sprinkles on the chocolate before chilling for an added pop of flavor and fun.
Final Thoughts
Honestly, I can’t recommend this No-Bake Peanut Butter Bars Recipe enough for anyone looking for a quick, delicious, and utterly satisfying dessert. It takes minimal effort but delivers the kind of flavor and texture combo that will have you making it again and again. Give it a try—you’ll wonder how you ever lived without it.
Print
No-Bake Peanut Butter Bars Recipe
- Prep Time: 15 minutes
- Cook Time: 0 minutes
- Total Time: 2 hours 15 minutes
- Yield: 16 servings
- Category: Dessert
- Method: No-Cook
- Cuisine: American
Description
Delicious and easy-to-make No-Bake Peanut Butter Bars featuring a creamy peanut butter and graham cracker crumb base topped with a smooth chocolate and peanut butter layer. Perfect for a quick treat without the need for an oven.
Ingredients
Base
- 1 cup creamy peanut butter
- 1/2 cup unsalted butter, melted
- 1 1/2 cups graham cracker crumbs
- 1 cup powdered sugar
Topping
- 1 cup semi-sweet chocolate chips
- 1/4 cup creamy peanut butter
Instructions
- Prepare the baking dish: Line an 8×8-inch baking dish with parchment paper, leaving an overhang for easy removal later.
- Make the peanut butter base: In a large bowl, combine 1 cup creamy peanut butter, melted butter, graham cracker crumbs, and powdered sugar. Stir until smooth and fully combined.
- Form the base layer: Press the peanut butter mixture evenly into the bottom of the prepared baking dish to form a solid base layer.
- Make the chocolate topping: In a microwave-safe bowl, melt the chocolate chips and 1/4 cup peanut butter together. Heat in 20-30 second intervals, stirring after each interval until the mixture is smooth and fully melted. Alternatively, melt using a double boiler method.
- Top the bars: Pour the melted chocolate mixture evenly over the peanut butter base and spread with a spatula.
- Chill: Refrigerate the bars for at least 2 hours or until the chocolate topping is hardened and the bars have set completely.
- Serve: Lift the bars out of the baking dish using the parchment paper overhang. Cut into squares or rectangles and enjoy your no-bake treat.
Notes
- Ensure the bars chill for the full recommended time for easy slicing without breaking.
- You can substitute creamy peanut butter with natural peanut butter for a more wholesome version, but texture may vary.
- For a nut-free option, consider using sunflower seed butter and suitable chocolate alternatives.
- Store bars in an airtight container in the refrigerator for up to one week.
