
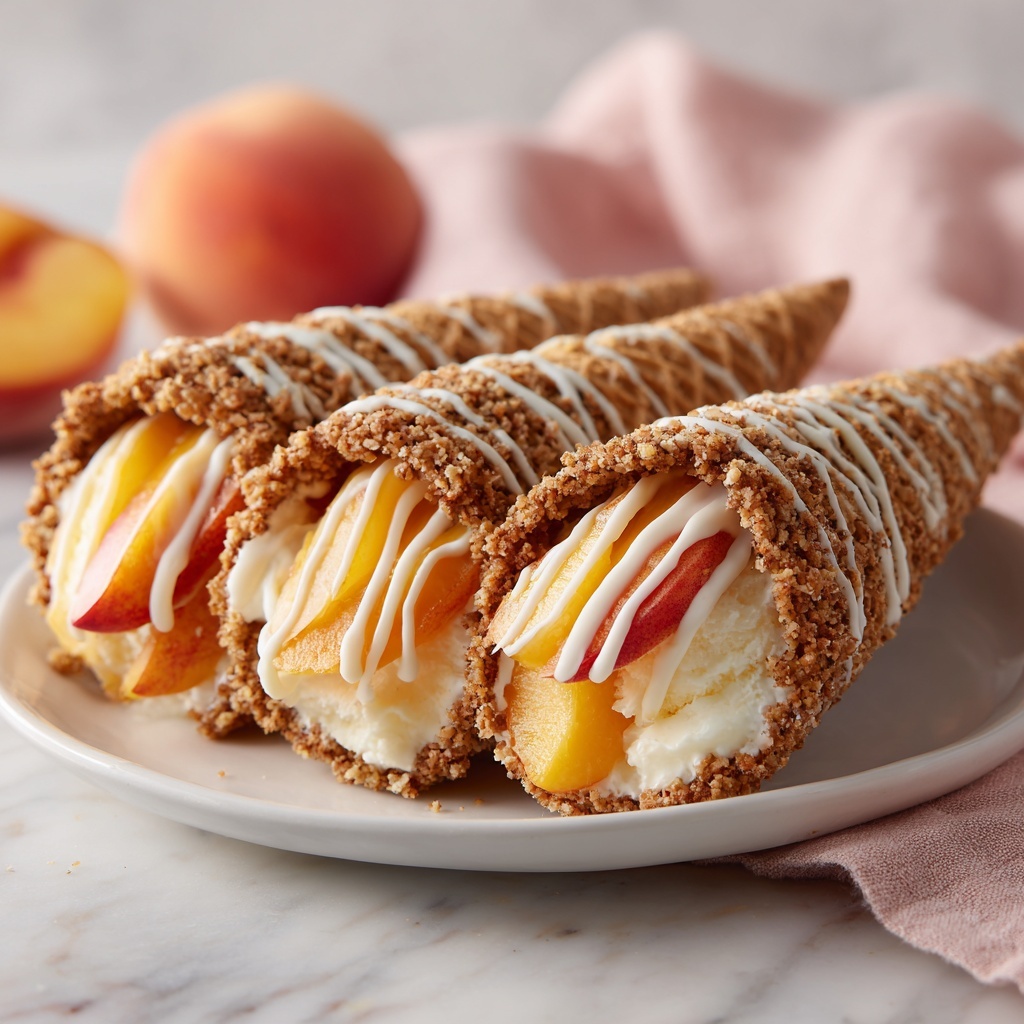
If you are looking for a summer dessert that combines the best of fruit, creaminess, and a bit of nostalgic fun, then you simply must try the Peach Cobbler Cheesecake Cones Recipe. This delightful treat layers sweet, juicy peaches and warm cobbler topping right inside crispy waffle cones, all crowned with a luscious cheesecake filling that’s light as a cloud. It’s an inventive spin on traditional peach cobbler that’s perfect for serving at barbecues, picnics, or just because it’s a sunny day calling for something sensational!
Ingredients You’ll Need
Each ingredient in this recipe plays a key role in balancing flavor and texture, making the Peach Cobbler Cheesecake Cones Recipe both irresistible and approachable. From the richness of cream cheese and butter to the fresh brightness of peaches and lemon, these elements come together in perfect harmony.
- Cream Cheese (16 oz, softened): The creamy base of your cheesecake filling that adds smoothness and richness.
- Heavy Whipping Cream (1 cup, cold): Whipped to stiff peaks to give the filling a light, airy texture.
- Confectioner’s Sugar (1 cup): Provides the perfect amount of sweetness without grit.
- Vanilla Extract (1 tsp, preferably pure): Adds warm, aromatic depth to the filling.
- Lemon Juice (½ tsp, fresh preferred): Brightens the cheesecake’s flavor with a subtle zing.
- Sliced Peaches with juice (48 oz): The star fruit that’s juicy, tender, and full of summer sunshine.
- Yellow or White Cake Mix (1 box): Creates the golden, crumbly cobbler topping.
- Butter (1 cup, salted): Melted and drizzled over cake mix to create a rich, crispy crust.
- Cinnamon (1½ tsp): A warm spice that perfectly complements the peaches.
- Waffle Cones (12): The fun, edible vessel that makes this dessert playful and portable.
- Cream-Filled Cookies (16 oz, crushed): Adds an extra bit of sweet crunch as a topping.
- Whipped Cream (3 tbsp): For finishing touches and extra fluff.
- Melted Chocolate: For dipping and drizzling that adds a rich, glossy finish.
How to Make Peach Cobbler Cheesecake Cones Recipe
Step 1: Preheat and Prep
Start by preheating your oven to 350°F to get it ready for the cobbler baking. Meanwhile, prepare your waffle cones by melting chocolate in the microwave until smooth — about 30 seconds to a minute. Dip the top halves of each cone into the melted chocolate for a gorgeous, glossy touch that will harden as it cools.
Step 2: Crush and Prepare Cookie Crumbs
While the chocolate sets, crush the cream-filled cookies into fine crumbs. These will be the crunchy, sweet garnish that adds a fun texture to your cones later on.
Step 3: Assemble and Bake the Peach Cobbler
Spray a 9×13 inch baking dish with non-stick cooking spray and pour the sliced peaches along with their juice into the dish. Sprinkle the dry cake mix evenly over the peaches, then drizzle the melted salted butter all over the top. Add cinnamon for warmth and flavor. Bake for 45 to 55 minutes until the mixture is bubbly and golden brown — the aroma will instantly make your mouth water.
Step 4: Prepare the Cheesecake Filling
While the cobbler cools slightly, whip the heavy cream until stiff peaks form—this is the secret to the light and fluffy texture you’ll love. In a separate bowl, combine the softened cream cheese, confectioner’s sugar, vanilla extract, and fresh lemon juice until completely smooth. Gently fold the whipped cream into this mixture for a luscious cheesecake filling that is simply heavenly.
Step 5: Assemble the Cones
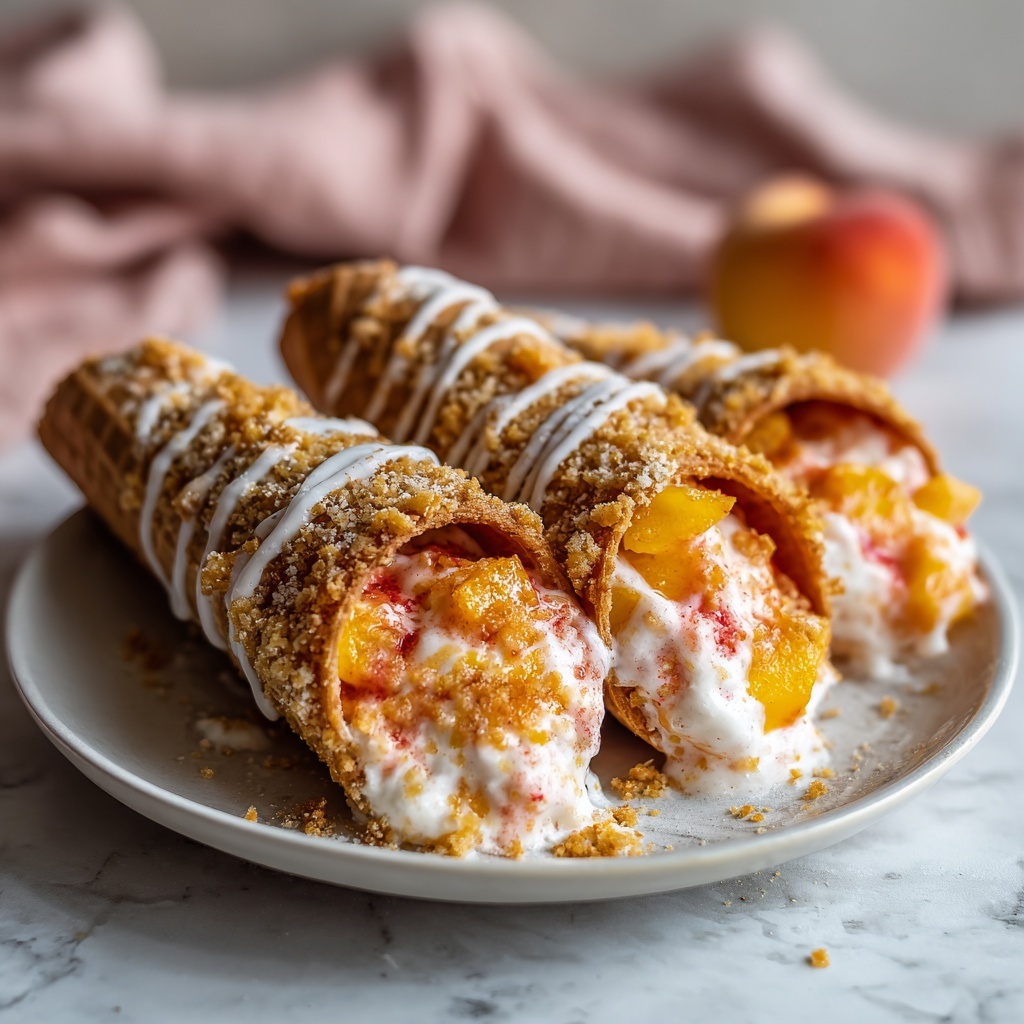
Now for the fun part: layering the cheesecake filling and warm peach cobbler inside each chocolate-dipped waffle cone. Start with a spoonful of cheesecake, add some cobbler, then repeat layers if your cone allows. Top each cone with a drizzle of melted chocolate and a sprinkle of cookie crumbs for an irresistible finish.
How to Serve Peach Cobbler Cheesecake Cones Recipe
Garnishes
Adding garnishes transforms your cones from delicious to show-stopping. Use a small dollop of whipped cream on top, a sprinkle of extra cookie crumbs, or even a few fresh peach slices for a burst of color and freshness. A drizzle of melted chocolate also makes it extra decadent and eye-catching.
Side Dishes
These peach cobbler cheesecake cones shine as a stand-alone dessert, but if you want to build a whole summer menu, pair them with light, refreshing sides like a crisp green salad or vanilla bean ice cream. Fresh berry salads or mint-infused water also complement the sweet richness of the cones perfectly.
Creative Ways to Present
Instead of serving in cones only, try presenting the filling in mini mason jars layered with cobbler and crushed cookies for a portable grab-and-go dessert. You could also use small dessert cups lined with cookie crumbs for an elegant twist. For a party, set up a DIY station where guests fill their own chocolate-dipped cones with cobbler and cheesecake — fun and interactive!
Make Ahead and Storage
Storing Leftovers
If you have any leftover filling or cobbler, store them separately in airtight containers in the refrigerator. The waffle cones are best enjoyed fresh to maintain their crispness, so keep these stored at room temperature in a sealed bag.
Freezing
You can freeze the peach cobbler portion wrapped tightly in plastic wrap and foil for up to three months. When ready to enjoy, thaw it overnight in the refrigerator and warm gently before layering with fresh cheesecake filling. Avoid freezing the assembled cones, as the waffle cones lose their crunch.
Reheating
To reheat leftover peach cobbler, warm it in the oven at 350°F for 10-15 minutes until bubbly and heated through. This will help revive the crispy topping. Then, freshen it up by mixing with a little chilled cheesecake filling right before serving.
FAQs
Can I use canned peaches for this recipe?
Absolutely! Canned peaches, especially if packed in juice rather than syrup, work wonderfully in the Peach Cobbler Cheesecake Cones Recipe. Just be sure to drain or reduce excess liquid if needed to avoid sogginess.
Is it necessary to use cream-filled cookies?
No, you can substitute with any crunchy cookie crumbs you love, such as graham crackers or digestive biscuits. The cream filling adds a little sweetness and moisture, but the crushed cookie texture is the star here.
Can I prepare the cheesecake filling in advance?
Yes! The cheesecake filling can be made a day ahead and stored in the fridge tightly covered. Just fold in the whipped cream shortly before assembling for the freshest texture.
How long do the chocolate-dipped cones take to set?
The chocolate will start to harden within 10-15 minutes at room temperature. For faster setting, you can place them in the refrigerator for about 5 minutes.
Can I make this recipe gluten-free?
With some adjustments, yes! Use a gluten-free cake mix and gluten-free waffle cones, and ensure your cookies are gluten-free as well. The rest of the ingredients are naturally gluten-free, making this an easy swap for special diets.
Final Thoughts
Making the Peach Cobbler Cheesecake Cones Recipe is like bringing a little summer magic to your kitchen. The combination of juicy peaches, creamy cheesecake, and crunchy cones creates a dessert experience that’s both nostalgic and fresh. Whether you’re serving them at a family gathering or enjoying a sweet treat on a sunny day, these cones are sure to delight everyone’s taste buds. So go ahead, treat yourself and your loved ones to this charming dessert—you’ll want to make it again and again!
Print
Peach Cobbler Cheesecake Cones Recipe
- Prep Time: 20 minutes
- Cook Time: 50 minutes
- Total Time: 1 hour 15 minutes
- Yield: 12 servings
- Category: Dessert
- Method: Baking
- Cuisine: American
Description
Peach Cobbler Cheesecake Cones combine the sweetness of baked peach cobbler with creamy cheesecake filling, all served inside crunchy waffle cones dipped in chocolate. This delightful summer dessert features a buttery cake mix base baked with juicy peaches and topped with a luscious cream cheese and whipped cream filling. Finished with a drizzle of melted chocolate and cookie crumbs, these cones are perfect for a fun, handheld treat at any summer gathering.
Ingredients
Cheesecake Filling
- 16 oz Cream Cheese (softened)
- 1 cup Heavy Whipping Cream (cold)
- 1 cup Confectioner’s Sugar
- 1 tsp Vanilla Extract (preferably pure)
- ½ tsp Lemon Juice (fresh preferred)
Peach Cobbler
- 48 oz Sliced Peaches (with juice)
- 1 box Cake Mix (yellow or white)
- 1 cup Butter (salted)
- 1½ tsp Cinnamon
Other Ingredients
- 12 Waffle Cones
- 16 oz Cream Filled Cookies (crushed)
- Melted Chocolate (for dipping and drizzling)
- 3 tbsp Whipped Cream (for garnish)
- Cookie Crumbs (for garnish)
Instructions
- Preparation: Preheat your oven to 350°F (175°C). Spray a 9×13-inch baking dish with non-stick cooking spray to prevent sticking.
- Chocolate Dipping: Melt the chocolate in the microwave in 30-second intervals until smooth and glossy. Dip the top halves of your waffle cones into the melted chocolate and set aside to harden.
- Cookie Crumbs: Crush the cream-filled cookies into fine crumbs; these will be used for garnish.
- Prepare Peach Cobbler: Pour the sliced peaches along with their juice into the prepared baking dish. Sprinkle the dry cake mix evenly over the peaches, then drizzle the melted butter across the top. Optionally, sprinkle 1½ tsp of cinnamon to add warmth to the cobbler. Bake for 45 to 55 minutes until the topping is golden brown and the mixture is bubbly.
- Whip Cream: Using a mixer, whip the cold heavy cream until stiff peaks form to create a fluffy texture for the cheesecake filling.
- Make Cheesecake Filling: In a mixing bowl, combine the softened cream cheese, confectioner’s sugar, vanilla extract, and lemon juice. Beat until smooth, then gently fold in the whipped cream until no streaks remain.
- Assemble Cones: Once the peach cobbler has cooled slightly, carefully fill each chocolate-dipped waffle cone in layers with cheesecake filling and baked peach cobbler mixture, creating alternating layers for optimal flavor and texture balance.
- Garnish and Serve: Drizzle melted chocolate over the filled cones and sprinkle with the crushed cookie crumbs. Add a dollop of whipped cream on top if desired. Serve immediately for best taste and texture.
Notes
- Make sure the cream cheese is softened to room temperature for easier mixing and a smoother filling.
- Use fresh lemon juice for the best flavor in the cheesecake filling.
- Let the peach cobbler cool slightly before layering to prevent the cones from becoming soggy.
- For a dairy-free option, substitute cream cheese and heavy cream with plant-based alternatives.
- Chocolate dipping can be skipped if preferred; instead, sprinkle cones with cookie crumbs for added texture.
- These cones serve best immediately after assembly for the crunchiest texture; if refrigerated, the cones may soften.

