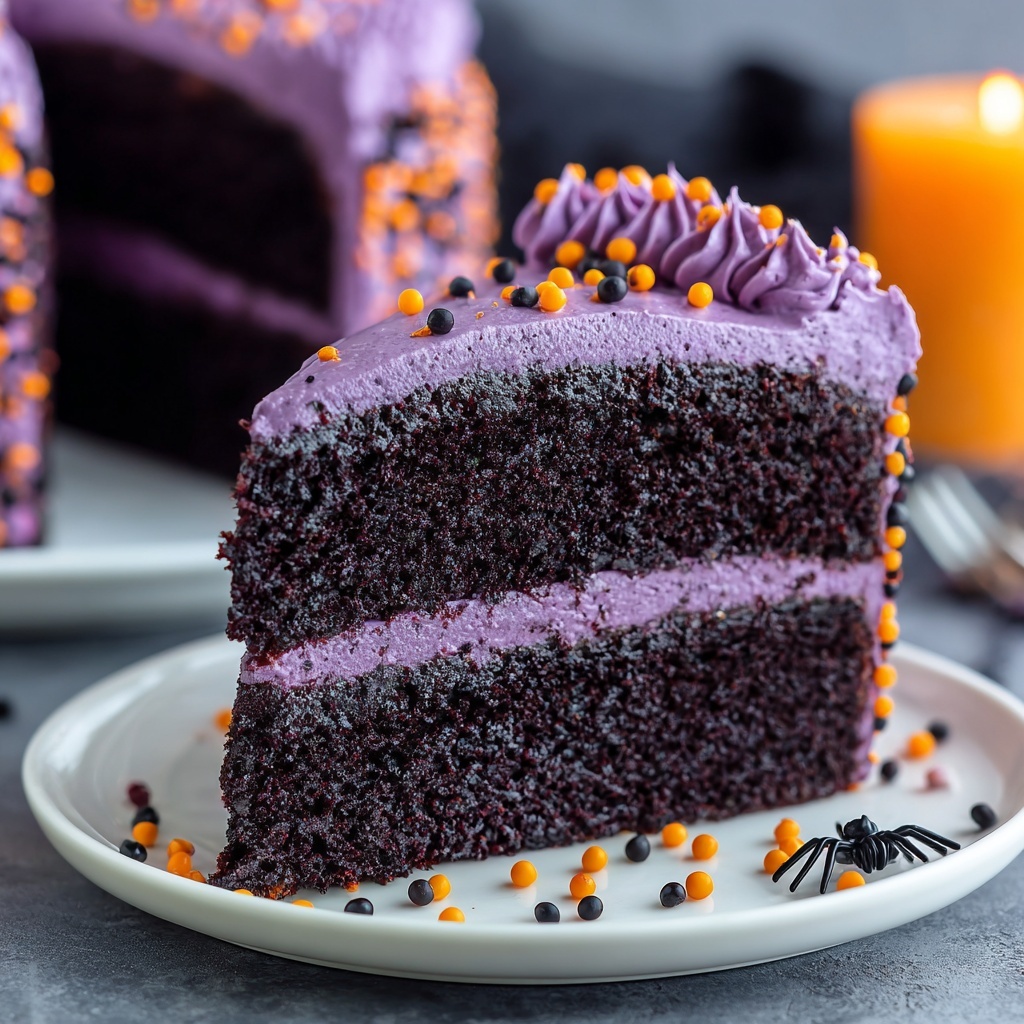
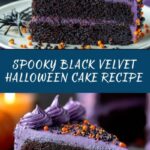
If you’re on the hunt for a show-stopping dessert this spooky season, the Spooky Black Velvet Halloween Cake Recipe is your new best friend. Imagine a rich, velvety chocolate cake swirled with the deepest black hues, frosted with luscious creamy sweetness, and decked out in festive Halloween flair. This cake isn’t just delicious—it’s a Halloween party centerpiece guaranteed to impress kids and adults alike. The contrast between the dark cake and bright decorations creates an irresistible visual treat while the moist crumb and smooth frosting satisfy every craving. Let’s dive into this enchanting recipe that brings together simplicity, bold flavor, and all the spooky fun you want on your holiday table.
Ingredients You’ll Need
Gathering these ingredients is easier than you think. Each one plays an essential role in achieving that ideal moist texture, rich flavor, and dramatic black color that defines the Spooky Black Velvet Halloween Cake Recipe. From the cocoa powder’s deep chocolate taste to the buttermilk’s tenderizing magic, every component counts.
- All-purpose flour (1 3/4 cups): The backbone that provides structure to the cake.
- Unsweetened cocoa powder, Dutch-processed (3/4 cup): Adds a deep chocolate flavor and enhances the black color.
- Baking powder (1 tsp): Helps the cake rise to perfect fluffy heights.
- Baking soda (1/2 tsp): Works with acidity for tender crumb and lift.
- Salt (1/2 tsp): Balances sweetness and elevates flavor complexity.
- Granulated sugar (1 1/4 cups): Sweetens the cake, contributing to moisture and texture.
- Buttermilk, room temperature (1 cup): Provides acidity for tenderness and plays a key role in activating baking soda.
- Vegetable oil (1/2 cup): Keeps the cake moist and soft without overpowering the flavor.
- Large eggs, room temperature (2): Bind ingredients and add richness.
- Black food coloring gel (2 tsp): Gives the cake that spectacular jet-black shade.
- Vanilla extract (1 tsp): Enhances all flavors with subtle warmth.
- Unsalted butter, softened (1 cup): Forms the base of the frosting for creamy lusciousness.
- Powdered sugar (4 cups): Sweetens and thickens the frosting.
- Milk (2 tbsp): Adjusts frosting consistency to perfect spreadability.
- Vanilla extract (1 tsp): Adds flavor depth to the frosting.
- Black or orange food coloring (optional): Customize your frosting with spooky hues.
- Halloween-themed sprinkles or edible glitter: Fun and festive decorations that bring the cake alive.
- Plastic spider rings and black or purple candles: Add spooky charm for presentation or party fun.
How to Make Spooky Black Velvet Halloween Cake Recipe
Step 1: Prepare Your Pans and Heat the Oven
Start by preheating your oven to 350°F (175°C). Grease and flour two 8-inch round cake pans or line them with parchment paper. This step ensures your cakes release easily and bake evenly—the foundation for a perfect cake.
Step 2: Mix the Dry Ingredients
In a large bowl, whisk together the flour, Dutch-processed cocoa powder, baking powder, baking soda, and salt until fully combined. This thorough blending ensures your leavening agents are dispersed evenly and that the cocoa’s rich, dark flavor will be consistent throughout every bite.
Step 3: Whisk the Wet Ingredients
In a separate bowl, beat together the granulated sugar, buttermilk, vegetable oil, eggs, black food coloring gel, and vanilla extract until the mixture is smooth and uniform. The combination of the buttermilk with the black food coloring sets the stage for that signature black velvet color and a tender crumb.
Step 4: Combine Wet and Dry Mixtures
Gradually add the dry ingredients to the wet ingredients, mixing just until smooth. Be careful not to overmix; you want the batter to be silky but not tough. This balance helps achieve the perfect cake texture every time.
Step 5: Bake Your Cake Layers
Divide the batter evenly between the two prepared pans. Pop them into the oven and bake for 30 to 35 minutes or until a toothpick inserted in the center comes out clean. The rich aroma filling your kitchen is a sure sign deliciousness is in the making.
Step 6: Cool Your Cakes Completely
Allow the cakes to cool in their pans for 10 minutes before transferring them to a wire rack to cool fully. Cooling completely is crucial so your frosting doesn’t melt and run off, preserving that lovely layered look.
Step 7: Make the Frosting
Beat the softened butter until creamy. Gradually add powdered sugar, milk, and vanilla extract, and whip until fluffy and spreadable. If you want to amp up the Halloween vibe, add black or orange food coloring to tint the frosting to your desired shade.
Step 8: Assemble Your Cake
Spread a generous layer of frosting over one cake layer, then carefully place the second layer on top. Frost the top and sides of the entire cake evenly. Don’t stress about perfection here—rippled frosting adds to the homemade charm!
Step 9: Decorate with Halloween Spirit
Finish your spooky masterpiece by sprinkling Halloween-themed decorations like glitter, sprinkles, or plastic spider rings. Add black or purple candles for a dramatic glow, making your cake a feast for the eyes as well as the palate.
How to Serve Spooky Black Velvet Halloween Cake Recipe
Garnishes
Nothing spells festive like Halloween-themed garnishes. Edible glitter, sprinkles shaped like bats or pumpkins, and candy spiders add a playful edge and texture contrast to the smooth frosting, turning every slice into an exciting adventure.
Side Dishes
Complement the rich chocolate cake with light, fresh sides like a tart cranberry compote or a dollop of whipped cream with a sprinkle of cinnamon. These sides brighten and balance the intense chocolate flavor, enhancing every bite.
Creative Ways to Present
Present this cake on a rustic wooden board surrounded by small pumpkins, faux cobwebs, and flickering candles for dramatic effect. Serve slices on black or orange plates to keep the spooky mood going strong—that extra thought in presentation makes all the difference when hosting.
Make Ahead and Storage
Storing Leftovers
Wrap any leftover cake tightly in plastic wrap or store it in an airtight container in the refrigerator. This keeps the cake moist and preserves the flavor for up to 4 days, perfect for lingering Halloween cravings.
Freezing
This cake freezes beautifully! Wrap individual slices or whole layers in plastic wrap, then foil, and store in the freezer for up to 2 months. Thaw overnight in the fridge before frosting and decorating, so you’re always ready for an impromptu spooky celebration.
Reheating
For the best experience, enjoy this cake chilled or at room temperature. If you prefer it slightly warmed, a brief 10-second zap in the microwave per slice will soften the frosting without melting it completely. Just remember, this cake shines brightest fresh or gently warmed.
FAQs
Can I substitute regular cocoa powder for Dutch-processed in this recipe?
While you can use natural cocoa powder, Dutch-processed cocoa offers a smoother flavor and darker color, which is key to the signature rich black velvet look of this cake. If you swap, expect a slightly different color and taste.
Is there a way to make this cake vegan or dairy-free?
You can absolutely experiment with substitutes like plant-based milk, flax eggs, and vegan butter. The texture may vary slightly, so keep an eye on baking time and batter consistency to maintain that moist velvet finish.
How do I get the black color so dark and even?
The trick is using black food coloring gel rather than liquid. Gel offers more concentrated pigment without affecting the batter’s texture, ensuring every slice comes out as spooky black as you imagine.
Can I make cupcakes instead of a cake with this recipe?
Yes! This batter works wonderfully for cupcakes. Just reduce baking time to around 18-22 minutes and keep a close eye to avoid overbaking. Decorate with your favorite Halloween sprinkles for a fun twist.
What if I don’t have buttermilk on hand?
Don’t worry! You can make a simple substitute by adding one tablespoon of lemon juice or white vinegar to a cup of milk. Let it sit for 5 minutes before using to mimic the acidity and texture of buttermilk.
Final Thoughts
The Spooky Black Velvet Halloween Cake Recipe is one of those magical desserts that bring everyone together with its rich flavor and festive flair. Whether you’re throwing a big Halloween bash or just want to treat your family to something special, this cake promises a hauntingly delicious experience that’s as fun to make as it is to eat. Grab your ingredients, turn on some spooky tunes, and bake your way to a Halloween memory everyone will treasure.
Print
Spooky Black Velvet Halloween Cake Recipe
- Prep Time: 15 minutes
- Cook Time: 35 minutes
- Total Time: 55 minutes
- Yield: 10 servings
- Category: Dessert
- Method: Baking
- Cuisine: American
Description
This Spooky Black Velvet Halloween Cake is a delightfully dark and festive treat perfect for Halloween celebrations. Featuring a rich black velvet cake made with Dutch-processed cocoa and black food coloring, layered and frosted with creamy buttercream, this cake is decorated with Halloween-themed sprinkles and spooky accents to bring the perfect eerie vibe to your party.
Ingredients
For the Cake:
- 1 3/4 cups all-purpose flour
- 3/4 cup unsweetened cocoa powder (Dutch-processed)
- 1 tsp baking powder
- 1/2 tsp baking soda
- 1/2 tsp salt
- 1 1/4 cups granulated sugar
- 1 cup buttermilk, room temperature
- 1/2 cup vegetable oil
- 2 large eggs, room temperature
- 2 tsp black food coloring gel
- 1 tsp vanilla extract
For the Frosting:
- 1 cup unsalted butter, softened
- 4 cups powdered sugar
- 2 tbsp milk
- 1 tsp vanilla extract
- Black or orange food coloring (optional)
For Decoration:
- Halloween-themed sprinkles or edible glitter
- Plastic spider rings
- Black or purple candles
Instructions
- Preheat and prepare pans: Preheat your oven to 350°F (175°C). Grease and flour two 8-inch round cake pans or line them with parchment paper to prevent sticking.
- Mix dry ingredients: In a large bowl, whisk together the all-purpose flour, Dutch-processed cocoa powder, baking powder, baking soda, and salt until combined evenly.
- Prepare wet ingredients: In a separate bowl, beat together the granulated sugar, buttermilk, vegetable oil, eggs, black food coloring gel, and vanilla extract until the mixture is smooth and homogenous.
- Combine wet and dry: Gradually add the dry ingredient mixture into the wet mixture, stirring gently until smooth and no lumps remain, creating your black velvet cake batter.
- Bake the cakes: Divide the batter evenly between the two prepared cake pans. Bake in the preheated oven for 30-35 minutes, or until a toothpick inserted into the center comes out clean.
- Cool the cakes: Allow the cakes to cool in the pans for about 10 minutes, then transfer them to a wire rack to cool completely before frosting.
- Make the frosting: Beat the softened butter in a medium bowl until creamy. Gradually add the powdered sugar, milk, and vanilla extract while beating continuously until the frosting is fluffy. Add black or orange food coloring if you desire a festive hue.
- Assemble the cake: Once the cakes are completely cooled, spread a layer of frosting on one cake layer. Place the second layer on top, then frost the top and sides of the entire cake evenly.
- Decorate: Decorate the frosted cake with Halloween-themed sprinkles, edible glitter, and plastic spider rings for a spooky effect. Add black or purple candles if desired to complete the Halloween look.
Notes
- Make sure eggs and buttermilk are at room temperature to help the batter mix evenly.
- Using Dutch-processed cocoa powder gives the cake a richer and smoother chocolate flavor.
- Black food coloring gel is more concentrated and gives a deeper color than liquid food coloring.
- Letting the cake cool completely before frosting prevents the frosting from melting.
- Store leftover cake covered at room temperature for up to 2 days or refrigerate for longer freshness.

