Description
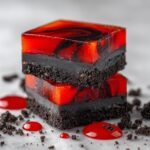
Vampire Fudge is a decadent and spooky sweet treat perfect for Halloween or any special occasion. This rich, creamy fudge combines a luscious blend of semi-sweet and milk chocolate with creamy peanut butter swirled with a dramatic red hue for a festive look. Topped with optional crunchy pretzels, crushed Oreos, or nuts, this no-bake fudge is chilled to perfection for a smooth, melt-in-your-mouth experience that serves 16.
Ingredients
Scale
Chocolate Mixture
- 1 cup (2 sticks) unsalted butter
- 1 (14 ounce) can sweetened condensed milk
- 1 (12 ounce) bag semi-sweet chocolate chips
- 1 (12 ounce) bag milk chocolate chips
- 1 teaspoon vanilla extract
Peanut Butter Swirl
- 1 cup creamy peanut butter
- 1/2 cup powdered sugar
- Red food coloring gel (a tiny amount, for dramatic effect)
Optional Garnishes
- Pretzel sticks
- Crushed Oreos
- Chopped nuts
Instructions
- Prepare the Pan: Line an 8×8 inch baking pan with parchment paper, ensuring there is an overhang on the sides for easy removal later.
- Melt Butter: In a large saucepan over medium-low heat, melt the butter completely, stirring occasionally to prevent burning.
- Add Sweetened Condensed Milk: Gradually whisk in the sweetened condensed milk until the mixture is smooth and fully combined.
- Melt Chocolate: Add both semi-sweet and milk chocolate chips to the saucepan and stir constantly until the chocolate is fully melted and the mixture is glossy.
- Flavoring: Stir in the vanilla extract to enhance the chocolate mixture’s flavor.
- Make Peanut Butter Mixture: In a separate bowl, combine the creamy peanut butter with the powdered sugar. Mix thoroughly until the texture is smooth and creamy.
- Add Color: Add a small amount of red food coloring gel to the peanut butter mixture and mix until the color is evenly distributed and vibrant.
- Layer Base Fudge: Pour half of the chocolate mixture into the prepared baking pan and spread it evenly to form the base layer.
- Add Peanut Butter Swirl: Spoon dollops of the red peanut butter mixture over the chocolate base. Gently swirl it with a skewer or knife to create a marbled effect.
- Top Layer: Pour the remaining chocolate mixture over the peanut butter swirl and spread evenly to cover the entire surface.
- Add Garnishes: Sprinkle optional pretzel sticks, crushed Oreos, or chopped nuts on top for added texture and visual appeal.
- Chill: Cover the pan tightly with plastic wrap and refrigerate for at least 4 hours, preferably overnight, to allow the fudge to set completely.
- Unmold: Use the parchment paper overhang to lift the fudge block out of the pan carefully.
- Slice: Cut into small squares using a sharp knife, wiping the knife clean between cuts to maintain clean edges.
- Serve: Arrange the fudge squares on a serving platter and serve chilled for the best texture and flavor.
Notes
- Use parchment paper with an overhang for easy removal of the fudge block from the pan.
- Be patient while melting the chocolate mixture over medium-low heat to prevent scorching.
- Adjust the amount of red food coloring gel to achieve your desired intensity of the swirl.
- Optional garnishes add texture and contrast but can be omitted if preferred.
- The fudge should be stored refrigerated and enjoyed within one week for optimal freshness.