
“`html
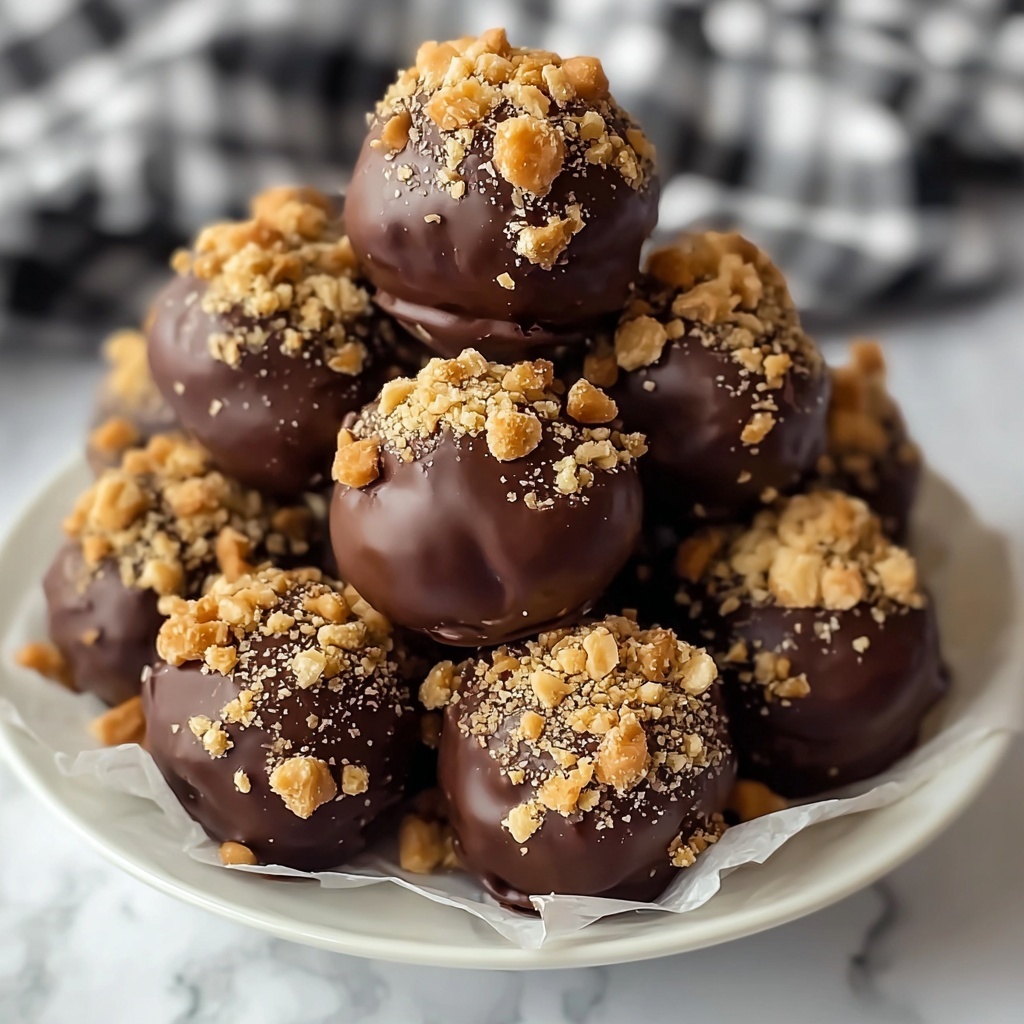
If you have a sweet tooth and love the irresistible combination of peanut butter and crunchy candy bars, you will absolutely adore this Butterfinger Balls Recipe. These little bites of pure delight pack all the flavor of Butterfinger bars into smooth, creamy peanut butter centers that are lightly sweetened and sometimes dipped in luscious chocolate for that extra wow factor. The result is a perfectly balanced treat with a tender chew giving way to snap and crunch, ideal for sharing with friends or savoring anytime you want a quick, decadent pick-me-up.

Ingredients You’ll Need
Don’t be fooled by how simple this recipe is; each ingredient is crucial for making these butterfinger balls perfectly rich, creamy, and delightfully crunchy. Let’s break down how these staples come together to create such magic.
- 1 cup creamy peanut butter: This forms the smooth, nutty base that melts in your mouth and pairs beautifully with the candy bits.
- 1/4 cup unsalted butter, softened: Adds silkiness and richness without overpowering the peanut butter flavor.
- 2 cups powdered sugar: Sweetens the mixture while creating that firm texture needed to roll the balls easily.
- 1 teaspoon vanilla extract: A tiny touch that elevates and rounds out all the flavors perfectly.
- Pinch of salt: Balances the sweetness and enhances the overall taste.
- 6 Butterfinger candy bars, finely crushed: The star crunch component, delivering that signature crispy, flaky texture.
- 12 ounces semisweet or milk chocolate, chopped (optional): For dipping, this adds a smooth, glossy coating that hardens to a satisfying shell.
How to Make Butterfinger Balls Recipe
Step 1: Prepare the Peanut Butter Mixture
Start by combining the creamy peanut butter, softened unsalted butter, powdered sugar, vanilla extract, and a pinch of salt in a mixing bowl. Use an electric mixer or a sturdy spoon to mix everything until the texture is perfectly smooth and silky, with no lumps. This creamy base is where all the magic begins, so be sure to blend until fully incorporated for that melt-in-your-mouth feeling.
Step 2: Incorporate the Butterfinger Bars
Gently fold in the finely crushed Butterfinger candy bars into the peanut butter mixture. Take your time with this step to ensure the candy pieces are evenly distributed throughout the mixture, guaranteeing every Butterfinger ball has that wonderful crispy crunch everyone looks forward to.
Step 3: Form the Balls
Line a baking sheet with parchment or wax paper to keep things neat and simple. Using a tablespoon scoop, portion out the mixture and roll each into smooth, compact balls with your hands. Placing the balls evenly on the sheet ensures they chill evenly and stay perfectly round.
Step 4: Dip in Chocolate (Optional)
If you’re ready to take things up a notch, melt the chopped semisweet or milk chocolate over low heat on the stove or in short bursts in the microwave, stirring frequently to prevent burning. Dip each Butterfinger ball into the melted chocolate with a fork or dipping tool, tapping off any excess before returning it to the parchment-lined sheet. This chocolate shell adds an indulgent, elegant touch that pairs beautifully with the crunchy, sweet center.
Step 5: Chill and Set
Pop the baking sheet into the refrigerator and chill the Butterfinger Balls for about 30 minutes, until the chocolate sets and the balls become firm. This final chilling step ensures they hold their shape perfectly and have the ideal texture for biting into.
Step 6: Serve and Store
Once chilled and set, your Butterfinger Balls are ready to be enjoyed right away or stored in an airtight container in the refrigerator. They’ll stay fresh and delicious for up to a week, making them a perfect treat to prepare ahead of time for parties or cravings that strike unexpectedly.
How to Serve Butterfinger Balls Recipe
Garnishes
Adding a sprinkle of crushed Butterfinger pieces on top or a dusting of cocoa powder can turn your Butterfinger Balls into an irresistible showstopper. You can also drizzle a little extra melted chocolate for a decorative swirl or sprinkle chopped peanuts for an added nutty crunch that complements the peanut butter base beautifully.
Side Dishes
These buttery treats pair wonderfully with a cold glass of milk, coffee, or even a creamy vanilla ice cream, enhancing the overall indulgent experience. For a party, you can offer fresh fruit slices like apple or pear that cut through the richness and add a refreshing balance to your dessert spread.
Creative Ways to Present
Turn your Butterfinger Balls into a festive centerpiece by stacking them in a decorative bowl or arranging them on a tiered dessert stand. You could also place them in colorful mini cupcake liners or wrap each in cellophane tied with a ribbon to create delightful homemade gifts. No matter how you present them, these treats are guaranteed to steal the show.
Make Ahead and Storage
Storing Leftovers
Keep your Butterfinger Balls fresh by storing them in an airtight container in the refrigerator. This will preserve their texture and flavor for up to a week, so you can enjoy your favorite dessert over several days without worry.
Freezing
If you want to make these ahead of time for larger batches or future cravings, Butterfinger Balls freeze beautifully. Place them in a single layer on a baking sheet to freeze solid, then transfer to a freezer-safe container or bag. They’ll keep for up to two months without losing taste or texture.
Reheating
When ready to eat frozen Butterfinger Balls, thaw them overnight in the refrigerator for the best texture. If you dipped them in chocolate, let them sit at room temperature for 15 minutes before serving to soften ever so slightly, allowing all those luscious flavors to shine.
FAQs
Can I use crunchy peanut butter instead of creamy?
Absolutely! Crunchy peanut butter will add an extra layer of texture to your Butterfinger Balls Recipe, making each bite even more interesting. Just note it might slightly change the smoothness of the mixture.
Do I have to dip the balls in chocolate?
Not at all! The chocolate coating is totally optional. Butterfinger Balls are delicious on their own with the candy bar pieces providing plenty of crunch and sweetness. The chocolate just adds a lovely finishing touch if you want something a bit more polished and decadent.
What if I don’t have Butterfinger bars? Can I substitute something else?
While Butterfinger bars give this recipe its signature flavor and crunch, you can experiment with other crunchy peanut butter candy bars like Butterfingers’ counterparts or even chopped peanut brittle for a similar effect.
Is this recipe kid-friendly?
Yes! These treats are a huge hit with kids thanks to their sweetness and fun texture. Just be mindful of the chocolate dipping step and supervise younger children to avoid any mess or burns from melted chocolate.
How long does it take to make these Butterfinger Balls?
The entire process usually takes about 15 minutes of prep and then about 30 minutes chilling time. It’s a quick and easy recipe perfect for when you want a tasty homemade treat without spending hours in the kitchen.
Final Thoughts
I can’t recommend trying this Butterfinger Balls Recipe enough—it’s a total crowd-pleaser that’s both simple to make and incredibly delicious. Whether you’re making these for a party, a holiday, or just a midweek sweet fix, the combination of creamy peanut butter, crunchy candy bar, and optional chocolate coating will leave everyone asking for seconds. Go ahead, treat yourself to these bite-sized nuggets of happiness. You won’t regret it!
“`
Print
Butterfinger Balls Recipe
- Prep Time: 15 minutes
- Cook Time: 0 minutes
- Total Time: 15 minutes plus 30 minutes chilling
- Yield: 20 servings
- Category: Dessert
- Method: No-Cook
- Cuisine: American
Description
Butterfinger Balls are a delicious no-bake treat combining creamy peanut butter, buttery sweetness, and crunchy Butterfinger candy bars, optionally coated in rich melted chocolate for an extra indulgent dessert perfect for parties or snacks.
Ingredients
Peanut Butter Mixture
- 1 cup creamy peanut butter
- 1/4 cup unsalted butter, softened
- 2 cups powdered sugar
- 1 teaspoon vanilla extract
- Pinch of salt
Add-Ins
- 6 Butterfinger candy bars, finely crushed
Chocolate Coating (Optional)
- 12 ounces semisweet or milk chocolate, chopped
Instructions
- Prepare the Peanut Butter Mixture: In a mixing bowl, combine creamy peanut butter, softened butter, powdered sugar, vanilla extract, and a pinch of salt. Mix thoroughly until smooth and well incorporated, using an electric mixer or mixing by hand.
- Incorporate the Butterfinger Bars: Gently fold the finely crushed Butterfinger candy bars into the peanut butter mixture, ensuring they are evenly distributed throughout the batter.
- Form the Balls: Line a baking sheet with parchment or wax paper. Scoop tablespoon-sized portions of the mixture and roll each into a ball. Place the balls evenly spaced on the prepared baking sheet.
- Dip in Chocolate (Optional): Melt the chopped semisweet or milk chocolate over low heat on the stove or in short intervals in the microwave, stirring constantly to avoid burning. Dip each ball into the melted chocolate, coating evenly, then tap off excess chocolate and return to the baking sheet.
- Chill and Set: Refrigerate the coated or uncoated Butterfinger Balls for about 30 minutes, or until the chocolate coating sets and the balls firm up.
- Serve and Store: Once set, transfer the Butterfinger Balls to an airtight container. Store them in the refrigerator for up to one week for best freshness.
Notes
- Use creamy peanut butter for a smooth texture.
- Butterfinger bars must be crushed finely to ensure even coating and texture.
- Chocolate coating is optional but adds richness and a nice finish.
- Refrigeration is important to help the balls set and maintain shape.
- Store in an airtight container to keep them fresh longer.

